Adding Authentication and Authorisation to ASP.NET Core Web Applications

One feature that a lot of web applications will need to include is the ability restrict access to certain resources within the application to authorised users only. To do this, we need to be able to authenticate users by letting them register and log in. Once authenticated, the server will be able to determine which resources the user should have access to.
In this post, we will go through the steps needed to add authentication and authorisation using ASP.NET Core Identity, ASP.NET Core's built-in membership system.
Throughout this post, we will be working with a web application using ASP.NET Core MVC. The application has one page called Confidential that contains a short message. The goal of this demo is to allow only authenticated users to view the message.

Using ASP.NET Core Identity
In order to restrict access to certain resources in our application, we need to manage authentication and authorisation. Authentication means being able to recognise the user that is trying to log into the site, whereas authorisation means being able to manage the permissions that a user has to access certain resources.
We will implement user authentication and authorisation using ASP.NET Core Identity, ASP.NET Core's built-in membership system, which supports SQL Server. Starting in ASP.NET Core 2.1, Identity includes scaffolding support. Thanks to this, all the views related to identity will be automatically generated for us. These will be the pages that allow users to register and log into the site.
Let's see how to add support for ASP.NET Core Identity in three steps.
- Add the required packages
Starting form ASP.NET Core 3.0, you will need to install a couple of packages to be able to use ASP.NET Core Identity. They are the following:
- Microsoft.AspNetCore.Identity.EntityFrameworkCore package
- Microsoft.AspNetCore.Identity.UI
Identity is included as a Razor Class library. The second package is the one that contains this library with all the Razor pages used for scaffolding, but more on that later.
- Set
DbContextto inherit fromIdentityDbContext<IdentityUser>
If you haven't done so yet, you will have to set your application to use the EntityFrameworkCore.
Once you have done so, you will need to update your AppDbContext class to inherit from IdentityDbContext in IdentityUser, the base class for the Entity Framework Core used with Identity.
public class AppDbContext : IdentityDbContext<IdentityUser>
{
    public AppDbContext(DbContextOptions<AppDbContext> options)
        : base(options)
    {
    }
}
IdentityUser It's a built-in class that represents a user in identity, and contains properties to describe user information.
Once we've changed our AppDbContext to inherit from IdentityDbContext, we'll need to do another migration and update the database. Identity adds a number of tables related to user and role information.
- Add authentication middleware
Add the UseAuthentication middleware after UseRouting in the Configure method in the Startup file. This will enable us to authenticate using ASP.NET Core Identity.
With all of this in place, the application Is all set to start using Identity. Let's see how to use it.
Adding Authentication
Now that our application is configured with ASP.NET Identity, we can start making use of it. Let's start by adding support for authentication to our site. As mentioned earlier, authentication means being able to recognise the user that is logging into our site.
Identity is included in a Razor class library with all the views that it usually needs to support identity in an application. Razor class libraries are reusable projects containing ASP.NET Core specific functionality that can be used across multiple applications. So, all views and functionality needed to allow users to log in is included in a Razor class library. Using scaffolding, we will generate source code in our application by adding a copy of the code in the default Razor class library in our application.
There are two ways we can run the Identity scaffolder: in Visual Studio, or through the .NET CLI.
Running the Identity scaffolder in Visual Studio
From solution explorer in Visual Studio, right-click on the project file > Add > New Scaffolded Item.
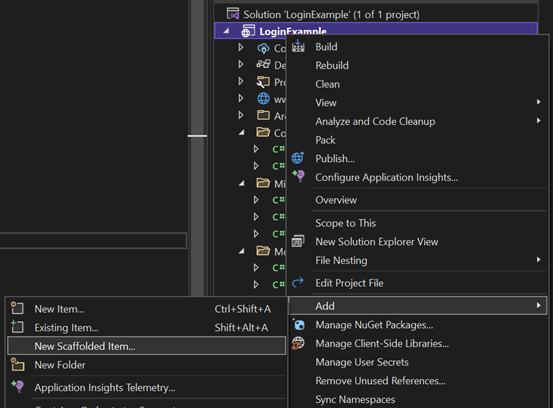
In the dialog that appears, make sure you select Identity, and click Add.

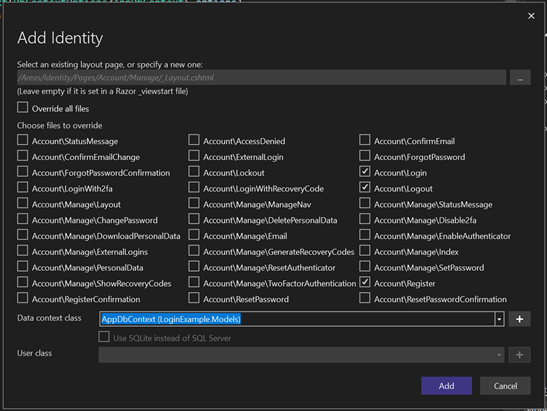
Next, you will be prompted with a new dialog where you'll be able to indicate which files you want to overwrite, meaning which files you want copied and generated in your application. In this example, we will overwrite the Account\Login, Account\Logout, and Account\Register files. We then need to point identity to our AppDbContext which now inherits from IdentityDbContext.
Running the Identity scaffolder in the .NET CLI
I have come across an error a number of times when using Visual Studio to run the Identity scaffolder, so here's a second way of doing this using the .NET CLI.
In a command prompt, make sure you navigate to the directory where your project is located. To install the ASP.NET Core scaffolder, run the following command:
dotnet tool install -g dotnet-aspnet-codegenerator

The following command will run the Identity scaffolder, where AppDbContext is the DbContext class that inherits from IdentityDbContext:
dotnet-aspnet-codegenerator identity --dbContext AppDbContext
In our example, we only want to generate the Login, Logout, and Register views. We can specify this with the following command:
dotnet-aspnet-codegenerator identity --dbContext AppDbContext --files "Account.Login;Account.Logout;Account.Register"
Note that an Areas folder has been created in Solution Explorer. Areas is a feature in ASP.NET Core used to create a structure in an MVC application. Each Area represents a small functional group. In our example, the subfolder Identity is an Area. Inside, we'll find all the views and functionality needed for Identity.
Inside the Identity Area, you'll find Pages instead of Views, as the scaffolded files are generated using the ASP.NET Core Razor Pages framework. Under the Account folder, you'll find the overwritten files: Login, Logout, and Register. Overwritten files belong to your application, so you can make changes to them if you wish to do so.

It is worth pointing out two important classes used in the code generated that provide an abstraction of the detailed implementation of authentication:
- The
UserManagerclass manages the interactions with user objects in the database. Through this class, we will be creating, deleting, or finding user objects, for example. - The
SignInManagerdefines methods related to the authentication of users. For example, thePasswordSignInAsyncmethod accepts a username and a password and returns a sign-in result with a property indicating whether the authentication attempt was successful.
We now only need to do some configuration changes to our application to be able to use the log in capabilities.
In our Startup class, we will be adding two things.
First, we need to bring in the functionality for working with identity. We do so in the ConfigureServices method using AddDefualtIdentity with IdentityUser.
public void ConfigureServices(IServiceCollection services)
{
    services.AddDbContext<AppDbContext>(options =>
        options.UseSqlServer(Configuration.GetConnectionString("DefaultConnection")));

    services.AddDefaultIdentity<IdentityUser>().AddEntityFrameworkStores<AppDbContext>();

    services.AddControllersWithViews();
    services.AddRazorPages();
}
AddEntityFrameworkStores specifies that identity has to use the Entity Framework to store data, and we pass in AppDbContext, which inherits from IdentityDbContext.
Second, we need to bring in support for Razor pages, since the scaffolded files that we have overwritten use the Razor pages framework in ASP.NET Core. We do so by adding an endpoint in the Configure method.
app.UseEndpoints(endpoints =>
{
    endpoints.MapControllerRoute(
        name: "default",
        pattern: "{controller=Home}/{action=Index}/{id?}");
    endpoints.MapRazorPages();
});
If we run the application at this point, we won't see any changes, as we still need to make the login capabilities visible. Under the Views folder, we find another file automatically added by ASP.NET Core indentity, _LoginPartial.cshtml. This is a partial view that checks if the user is signed in thanks to the SignInManager class. This shows a different layout depending on the login status of the user. To make this layout visible, we reference this partial inside our _Layout.cshtml file using the partial tag helper to point to the _LoginPartial.cshtml partial.
Our _Layout.cshtml page will look like this:
<!DOCTYPE html>
<html lang="en">
<head>
    <!-- code omitted -->
</head>
<body>
    <header>
        <nav class="navbar navbar-expand-sm navbar-toggleable-sm navbar-light bg-white border-bottom box-shadow mb-3">
            <div class="container">
                <!-- code omitted -->
                <div class="navbar-collapse collapse d-sm-inline-flex flex-sm-row-reverse">
                    <ul class="navbar-nav flex-grow-1">
                        <!-- code omitted -->
                        <partial name="_LoginPartial" />
                    </ul>
                </div>
            </div>
        </nav>
    </header>
    <!-- code omitted -->
</body>
</html>
Everything is now ready to be able to log into our application. We should see two new tabs at the top of the page when first building the application, one called “Register” and one called “Login”.

We can register and log into the application.

Once we are logged in, the layout of the page changes.

Enabling Authorisation
Although we have now allowed to authenticate (they can register and log in), we still need to add support for authorisation. Remember, our goal is to only display the content in the Confidential page to logged in users.
We can easily restrict access to certain resources in our application by placing the Authorize attribute on a controller or an action. In our example, we want to restrict access to the content of the Confidential page, so let's add the Authorized attribute on the corresponding controller.
[Authorize]
public class ConfidentialController : Controller
{
    public IActionResult Index()
    {
        return View();
    }
}
If we now try to access the Confidential page without being logged in, we are prompted with a page to log in.

Once we do log in, we can access the content of the page.

The Authorize attribute here is only requiring the user to be logged in to perform a certain action, but the attribute can take properties to have a more fine grained control of authorisation. For example, using the Roles attribute, we can specify which role is allowed to perform a certain action.
[Authorize(Roles = "Manager")]
Here, the Authorize attribute will verify that the user is a manager before being authorised to access the resource.
Conclusion
In this post, we have seen how to use authentication and authorisation to restrict access to certain resources within an application. For this, we have used Identity, ASP.NET Core's built-in membership system. Using the scaffolding options in ASP.NET Core to generate the views needed to implement the log in capabilities, we can easily add pages to register and to log into our application. Finally, once we have allowed users to authenticate, adding authorisation to our application is very simple using the Authorize attribute.


