Understanding Middleware in ASP.NET Core


TLDR; Middleware is responsible for processing HTTP messages in ASP.NET Core applications. In this post, we define the middleware pipeline, explore a real example, and look at how to create custom middleware components.
In this post, we explore the Configure method in the Startup class in a ASP.NET Core web application. Inside of the configure method we find the middleware pipeline, responsible for processing HTTP messages.
The Middleware Pipeline
Middleware is responsible for processing HTTP messages. Let's illustrate this with a very simple middleware pipeline.
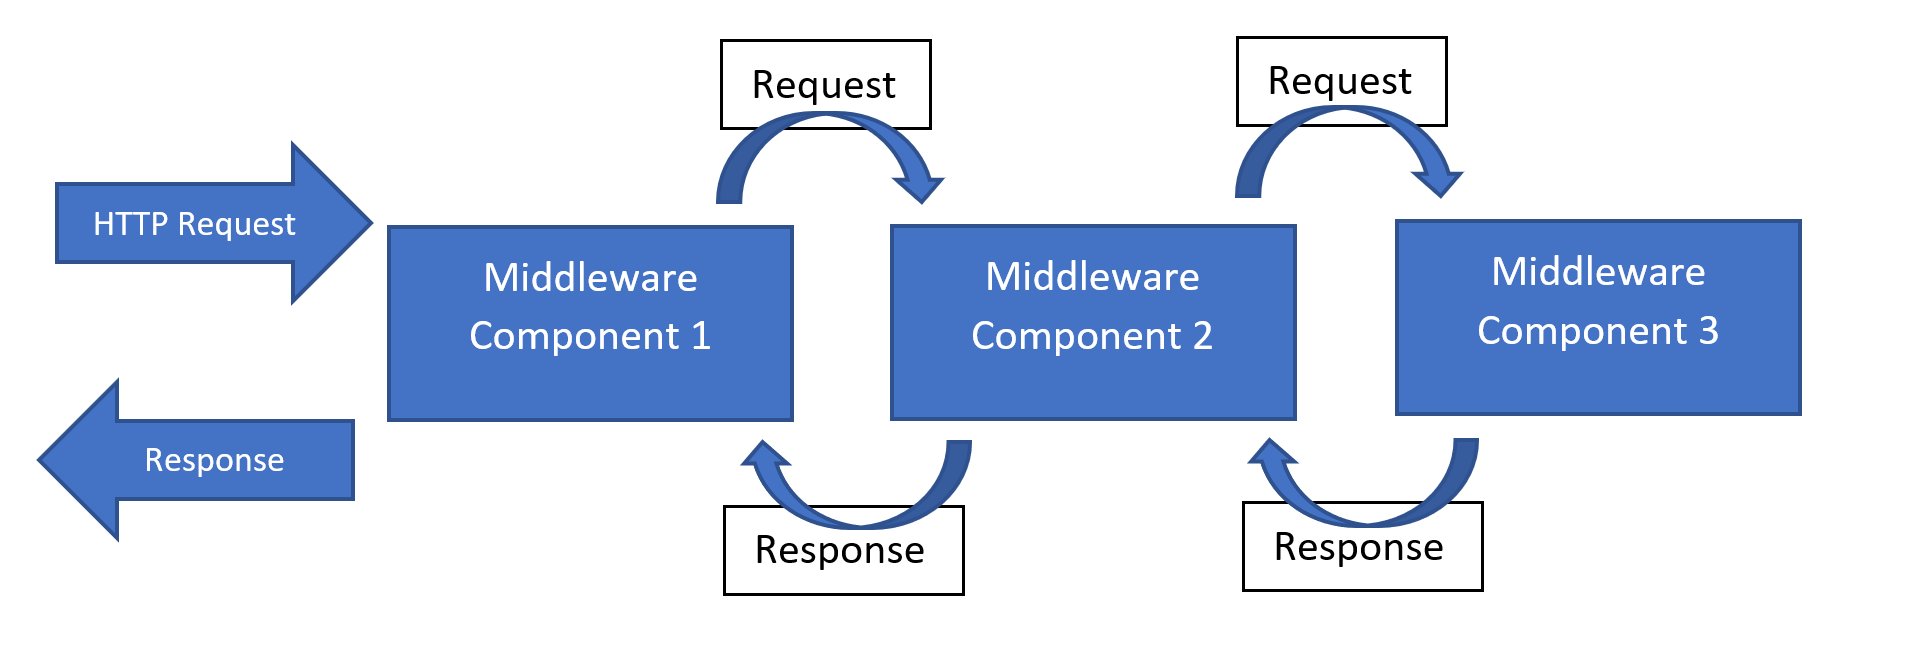
Imagine a middleware pipeline consisting of three elements. Once an HTTP request is received, it will be inspected by the first piece of middleware. If it doesn't have any response to return or any exception to throw, it passes the request on to the next component in the pipeline. Again, after inspecting the request, this component will either return a response, throw an exception, or pass the request along to the following piece of middleware. Suppose it does pass it along. Imagine this third and last component of this pipeline is responsible for finding something inside of the application that can process the request. If this was a POST request for a certain URL, it would go and look for a Razor Page in the folder with the same name as the URL in the request. If it finds the file, it will pass the request on to that Razor Page, which will generate a response in the form of HTML.
At this point, it is important to note that the middleware pipeline is bi-directional. When the request enters the pipeline, it will flow through the different components of the pipeline until one of them can produce a response, or an exception is thrown. Once this happens, the response will go through the pipeline again in the opposite direction, being inspected by the same components that the request went through on the way in.

So, in our example, once this third piece of middleware has emitted a response, this will be passed back onto the second component, and to the first one after. Most components won't act after inspecting the response, but some might be in charge of recording information about the process or rendering an exception thrown by one of the components in the pipeline, if that was the case. We will later see some concrete examples of middleware components and what they do.
It is important to note that the order in which the middleware is placed inside of the Configure method in the Startup class will determine the order in which the request will invoke the different components of the middleware pipeline. The order of the components of the pipeline will affect the performance of the app, as we will see later.
A Concrete Example
Now that we have described how the middleware pipeline works, let's look at a real example of middleware in an ASP.NET Core web application. When building a new web application, Visual Studio adds a middleware pipeline by default.
Below is the Configure method in the Startup class in a new ASP.NET Core web app.
// This method gets called by the runtime. Use this method to configure the HTTP request pipeline.
public void Configure(IApplicationBuilder app, IWebHostEnvironment env)
{
    if (env.IsDevelopment())
    {
        app.UseDeveloperExceptionPage();
    }
    else
    {
        app.UseExceptionHandler("/Error");
        // The default HSTS value is 30 days. You may want to change this for production scenarios, see https://aka.ms/aspnetcore-hsts.
        app.UseHsts();
    }

    app.UseHttpsRedirection();
    app.UseStaticFiles();

    app.UseRouting();

    app.UseAuthorization();

    app.UseEndpoints(endpoints =>
    {
        endpoints.MapRazorPages();
    });
}
Let's look at what each of these middleware components do.
DeveloperExceptionPage:
In order to understand what these components do, let's remind ourselves again that the middleware pipeline is bi-directional. This means that the first component of the pipeline will be both the first to inspect the incoming HTTP request and the last to inspect the response. This will condition what we decide to place at the very beginning of the pipeline (or at the very end). In this case, DeveloperExceptionPage has been placed at the top because it cares about being the last to inspect the response. Its task is to handle exceptions being thrown by any other component in the pipeline.
When DeveloperExceptionPage receives an HTTP request, it will simply pass it on to the next component in the pipeline. If any subsequent component in the pipeline throws an exception, it will be passed back to the previous components of the pipeline and will finally reach DeveloperExceptionPage. DeveloperExceptionPage is in charge of rendering HTML containing detailed information on the exception, which will be useful for developers when debugging the problem.
ExceptionHandler:
Note that DeveloperExceptionPage is only used in development. When running in production, the level of detail rendered would be not only unnecessary, but could also expose sensitive information to users. When in production, ExceptionHandler will be used instead. ExceptionHandler operates in the same way as DeveloperExceptionPage, but the information displayed when an exception has been thrown is less detailed and more user friendly.
Hsts:
Hsts is also only used in production. This will check that the browser sending the request is operating over a secure connection.
HttpsRedirection:
This will redirect any requests using plain HTTP to an HTTPS URL.
StaticFiles:
The StaticFiles middleware will attempt to serve a request by responding to a file that's in the wwwroot folder of the application.
RoutingandEndpoints:
When UseRouting and UseEndpoints are used in the middleware pipeline, this means that ASP.NET Core is performing EndPoint routing. This is where routing is implemented splitting the routing middleware into two separate middleware components: Routing and Endpoints. An endpoint is the object that contains the information needed to execute a request. So here, the Routing middleware matches the HTTP request to an endpoint first and then the Endpoints middleware executes the matched endpoint.
Authorisation:
In between the Routing and Endpoints middleware, Authorisation will check whether the browser is authorised to access the information it is requesting.
If any of these pieces of middleware can't fulfil their purpose, they will throw an exception that will be handled by either DeveloperExceptionPage or ExceptionHandler, depending on whether we're running in development or production.
Building Custom Middleware
In some situations, you might want to build your own custom piece of middleware. The easiest way to do this is by invoking a method on IApplicationBuilder named Use.

We see that Use() takes a function of RequestDelegate and RequestDelegate. So we pass into Use a parameter of type RequestDelegate, and a RequestDelegate will be returned.
A RequestDelegate is a method that takes an HttpContext as a parameter and returns a Task.

So, as you would expect knowing the definition of middleware, a RequestDelegate is a method that will handle an HTTP request. All the information about that HTTP request will be inside of the HttpContext passed as a parameter inside of RequestDelegate. Based on this HttpContext, the middleware will be able to inspect the request and produce a response.
Let's call our middleware component SayHello, which we pass inside of Use()
.
App.Use(SayHello);
Now, create a method SayHello, taking a RequestDelegate as a parameter and returning a RequestDelegate.
private RequestDelegate SayHello(RequestDelegate arg)
{
    return async ctx =>
    {
        await ctx.Response.WriteAsync("Hello, World");
    };
}
This piece of middleware, when invoked, will display the message “Hello, World!”.
It is important to remember at this point that the order of the middleware inside of the Configure method matters. Let's see this in practice.
Let's first place SayHello at the beginning of the middleware pipeline:
public void Configure(IApplicationBuilder app, IWebHostEnvironment env)
{
    if (env.IsDevelopment())
    {
        app.UseDeveloperExceptionPage();
    }
    else
    {
        app.UseExceptionHandler("/Error");
        // The default HSTS value is 30 days. You may want to change this for production scenarios, see https://aka.ms/aspnetcore-hsts.
        app.UseHsts();
    }

    app.Use(SayHello);

    app.UseHttpsRedirection();
    app.UseStaticFiles();

    app.UseRouting();

    app.UseAuthorization();

    app.UseEndpoints(endpoints =>
    {
        endpoints.MapRazorPages();
    });
}
What will happen when this web application is run? We said that, when in development, DeveloperExceptionPage is the first component in the middleware pipeline, which will always pass the HTTP request onto the next component in the pipeline. The next component is our SayHello. From its definition, we know this component will always return a response – the message “Hello, World!”. Once SayHello produces a response, it will be passed back to the previous component in the pipeline, DeveloperExceptionPage. This won't have to do anything, since no exceptions have been thrown by any components. So, no matter what the HTTP request is, when our middleware pipeline is set up in this order, the response will always be the “Hello, World!” message.

What happens if we move SayHello to the very end of the pipeline, after the Endpoints component? When the HTTP request is valid, meaning that the Endpoints middleware does have something to return, then our web app will work exactly like before we added the new piece of middleware. This is because the HTTP request never reaches the SayHello. If, however, the HTTP request is an invalid URL, we will then hit the end of the pipeline, as none of the earlier components will be able to return anything.


This would of course not be done in a real web application, but it is useful to illustrate the concept. If we move SayHello back to the top of the pipeline, we can choose to only invoke it in certain situations, such as when the HTTP request matches a certain URL. Using an IF statement inside of our method, we can activate SayHello only when the URL in the request is “/hello”. Otherwise, we can use the next parameter to pass the request to the next middleware component in the pipeline.
private RequestDelegate SayHello(RequestDelegate next)
{
    return async ctx =>
    {
        if (ctx.Request.Path.StartsWithSegments("/hello"))
        {
            await ctx.Response.WriteAsync("Hello, World!");
        }
        else
        {
            await next(ctx);
        }
    };
}
Now, requesting a valid URL will let us access the different pages in our web app. If we pass an invalid URL, an error is thrown. Finally, if we request the URL “/hello”, the message “Hello, World” is returned.


Conclusion
We have first seen how a middleware pipeline works - the HTTP request invokes each middleware component one by one until one produces a response, which makes its way out going through the same components in the opposite direction. We noted that each piece of middleware has a unique purpose, and the order in which they are called affects the performance of the application. Finally, we gave an example of building a custom middleware component, and illustrated the different behaviours the application could have, simply by changing the order of the components.