Gotchas when installing an Elasticsearch cluster on Microsoft Azure
Elasticsearch is an open source distributed search server, based on Lucene. It provides full-text search via a RESTful interface and JSON documents. It is ideally suited for running on cloud platforms like Azure.
This is not a step-by-step guide to using Elasticsearch and running it on Azure. I'm assuming you already have some basic knowledge on Elasticsearch and how to use it, and now want to get it running on Azure. To get started setting up the necessary Azure infrastructure, you can follow this excellent article by Thomas Ardal.
This post is intended to be a quick reference of important gotchas or things to consider, around infrastructure, Elasticsearch and it's dependencies, and useful Elasticsearch plugins.
Also see this later post which gives lots more tips on elasticsearch configuration and index/query design.
A quick overview of the necessary infrastructure
These are the Azure infrastructure items you'll need to create to successfully run an Elasticsearch cluster:
An affinity group
An affinity group can be configured when creating a storage account, virtual network or cloud service. It ensures the infrastructure is created physically close together, reducing latency and increasing performance, but also ensuring instances are across upgrade and fault domains (i.e. on different power grids / network circuits).
A virtual network
This lets you define an address space. Any virtual machines created in this virtual network will have an internal IP in that address space, and will be visible and able to communicate with any other virtual machine in the network. This simplifies configuration to allow your Elasticsearch nodes to talk to each other.
Storage account
This is required to store VHDs. When you create a VM at least two disks are added. One is the OS disk and the other is a temporary local disk. You can also add additional data disks.
It is possible to configure Elasticsearch to backup and restore indexes using blob storage.
Cloud Service
A cloud service is the public configuration for one or many services. That could be web or worker roles. In this case it will be for multiple virtual machine instances. It allows you to load balance between virtual machines, via a single public DNS name.
Virtual Machines and availability sets
When creating virtual machines, make them part of the same availability set. Virtual machines can be taken offline due to planned maintenance events. The availability set will ensure that only some of your VMs are taken offline at any point in time.
When creating public endpoints for the virtual machines, make them part of the same load balanced set.
Installing Elasticsearch
Installing elasticsearch is straightforward. It aims to have sensible enough defaults that you can install it and run it without having to really configure anything. It also handles almost all the details of running as a cluster.
One way of installing would be to install Chocolatey (a machine package manager for Windows), then use that to install Elasticsearch. It will install any dependencies as well (such as the java runtime).
The important bits and gotchas
Add separate data disks to your virtual machines and use them for installing and running Elasticsearch
This will separate your own data from the OS disk. If the VM needs to be deleted and recreated for some reason, or becomes corrupt, the data disk can be detached and reattached to the new VM.
Elasticsearch can also hold a lot of data. Putting your app data on a separate data disk means it isn't going to grow to the point that it chokes the OS and takes down the server. Admittedly, at this point you've got problems and probably should have been monitoring properly to start with, but you might still be able to serve requests!
Windows Firewall ports have to be opened.
Having all the virtual machines in the same virtual network means there is almost no Windows or network configuration required. However you still do need to allow access through the Windows Firewall for specific ports. Elasticsearch uses 9200 (for communicating with the web API) and 9300 (for intra-node communication). This is possible using "Windows Firewall with Advanced Security", or by using PowerShell. Here is an example for opening up port 9200 using PowerShell:
Automatic node discovery via UDP multicast does not work in Azure. Use the Azure Cloud plugin.
Out of the box, Elasticsearch uses UDP multicast to discover other nodes on the network to form a cluster with. However, Azure does not support UDP multicast.
It is possible to hardcode a list of IPs in the Elasticsearch configuration file (elasticsearch.yml), for the machines that make up your cluster.
A better way is to use the Azure Cloud Plugin, which solves this problem in a different way. It queries the Azure Management API to retrieve details of a cloud service (configurable). From this data it can retrieve the IP of all the other virtual machines under the cloud service. Thus, when you add new nodes to the cluster, they will automatically be discovered.
Java Runtime and environment variables
Elasticsearch requires the Java runtime to be present, and the JAVA_HOME environment variable to be set.
One way of installing Elasticsearch is by creating a remote PowerShell session, installing Chocolatey first, and then using that to install Elasticsearch. The Elasticsearch package has the java runtime as a dependency so that will automatically installed first. However, the Java environment variables that get added will not be present in your current PowerShell session, so the Elasticsearch install would fail thinking the dependency is missing. A work around might be to install the java runtime in a separate PowerShell remoting session, and then create a new remoting session to install Elasticsearch.
The Azure Cloud plugin requires a certificate for inter-node communication.
The Azure Cloud plugin requires a certificate to enable intra-node communication. The steps required to create and configure this are detailed in this article by Andrew Westgarth.
Be careful editing elasticsearch.yml as it can easily be broken.
YAML is a human readable data serialization format. It doesn't use quotes or braces or other mark up for structuring the data. It uses new lines and white space. This means it can be quite easy to break the file and not notice. Notepad++ or Sublime Text can handle YAML syntax highlighting and indentation, so I'd recommend using one of those to edit the file. There are also online parsers available, such as this one.
Elasticsearch has no built-in security. Use the Jetty plugin.
No-built in security means you really do need to think about security when using Elasticsearch. For example, you should lock down ports 9200 and 9300 except to known machines on your network. This includes on your development machine. Elasticsearch has powerful scripting abilities, that could be used to essentially execute arbitrary commands. This was such a big deal that scripting was disabled by default in version 1.2 of Elasticsearch. In the recently released 1.3 version, some scripting features have been added which are enabled and can be used safely.
If you are running Elasticsearch in Azure and need it to be accessible outside of a secure network within Azure itself, you must be sure it is secure – otherwise anyone could perform any command including reading or deleting all data, creating or deleting an index, and so on. The Jetty plugin enables use of SSL encryption and basic authentication. It also enables role based user management. This means you can configure at a very fine-grained level exactly what endpoints a specific role can use. For example, you could use it to create a user that is read-only.
The SSL certificate must be uploaded as an Azure management certificate.
Azure uses certificates to identify a trust relationship. A service certificates (.pfx certificate files) must be uploaded to Azure to enable the client connecting to the service to trust it.
Set up a CNAME for a DNS valid with your SSL certificate to your Cloud Service DNS.
SSL certificates are valid for a specific domain or set of domains. There are also wildcard certificates that allow any subdomains as well. To successfully validate a certificate you'll need to reach the public endpoint by an allowed domain name. To do this you can set up a CNAME for your particular domain name, pointing at your cloud service endpoint. For example, your cloud service is called mycloudservice.cloudapp.net and your SSL certificate is valid for domain *.mydomain.com. You could set up a CNAME to point search.mydomain.com at mycloudservice.cloudapp.net. Then, using search.mydomain.com will mean you reach your Elasticsearch cluster, and the SSL certificate is valid.
The SSL certificate must be converted to a Java Key Store, for use by Jetty.
The Jetty plugin uses a Java Key Store. This is a repository of security certificates. You can convert your certificate (.pfx) into a java key store by using the java keytool executable, which is provided as part of the JDK. Take a look at the keytool docs. Here is an example of the command to run (replace the strings as appropriate):
By default, Jetty will look in the config folder under the elasticsearch installation, for a file named "keystore", so be careful what is specified for the "destkeystore" parameter.
The file encoding for realm.properties (provides Basic Authentication details for Jetty) must be ASCII.
Chances are, you will be automating all steps related to creating infrastructure in Azure, installing Elasticsearch and its dependencies, and configuring everything. When sending output to a file using PowerShell, the default encoding is Unicode. If your realm.properties file is Unicode, Basic Authentication will not work – you'll receive 403 Forbidden responses on every request. There will be no helpful errors in the Elasticsearch logs.
Make sure to set the file encoding for the realm.properties file to ASCII!
Configure Elasticsearch Azure Repositories
The Azure Cloud plugin allows you to use Azure blob storage to backup and restore your Elasticsearch indexes. To enable this, all that is required is to specify the storage account name and key in the elasticsearch.yml config. See the documentation for full details.
Useful plugins
Plugins are very easy to install in Elasticsearch. They can be added manually, or using the plugin script. The plugins documentation provides all the necessary details. Plugins can have "sites" in them, which are statically served at a known url. Plugins can be installed simply from Github, or by specifying a particular url to download from. These are a few of the plugins we've used and found useful:
Marvel
Installation example:
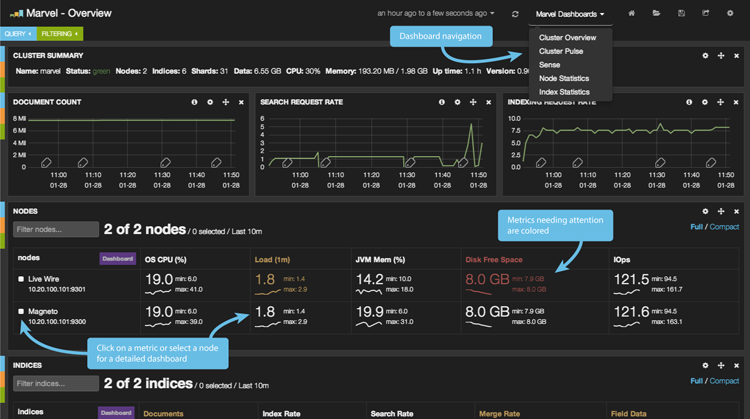
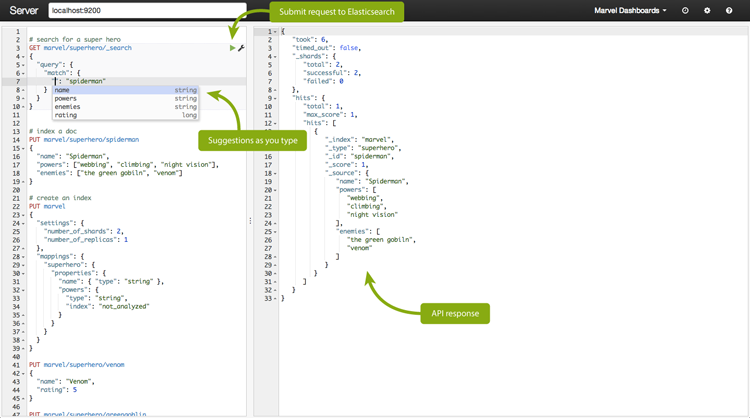
Marvel is a management and monitoring dashboard. It is free in development, but requires a license for production. It lets you monitor all the essential metrics like index and node statistics and shard allocation. It also has a dashboard called Sense, which is a developer console. Sense allows you to submit API requests and shows you the formatted JSON data returned. It offers suggestions and has autocompletion, and is very useful for prototyping queries.
Head
Installation example:
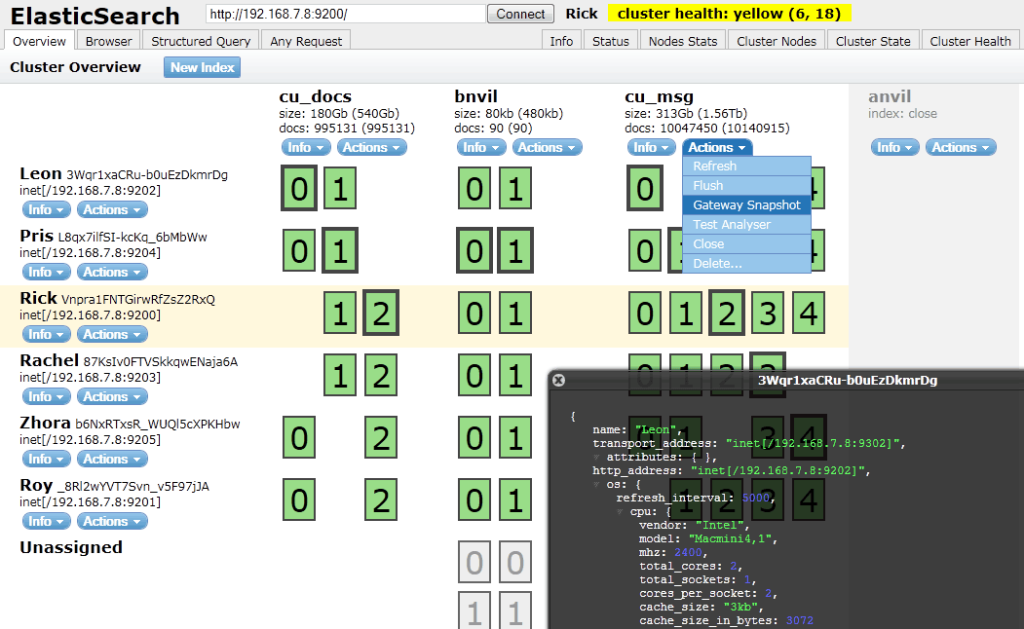
Head provides a web front end for browsing and interacting with an Elasticsearch cluster. The overview screen shows a visualisation of nodes, indexes and how the data is sharded and replicated across them. It also has pages that let you browse the indexed documents, build structured queries, and submit any query (much like Marvel Sense).
Cloud Azure
Installation example:
Cloud Azure allows Elasticsearch to use the Azure Service Management API for node discovery (an alternative to the built-in UDP multicast discovery, as UDP multicast is not possible in Azure). It also lets you use Azure blob storage as a repository to export and import data.
Jetty
Installation example:
Jetty enables you to use Elasticsearch with SSL and basic authentication, among other features such as role based authentication and request logging.
Kibana
Installation example:
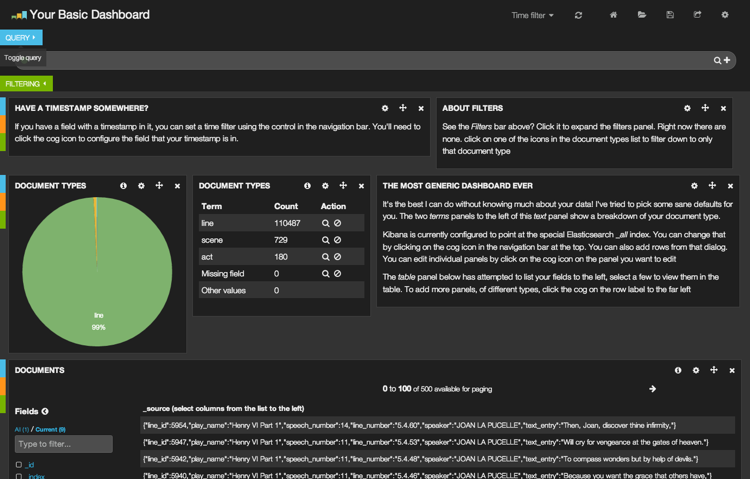
Kibana is a web front end for creating analytics and search dashboards, over timestamped data sets in Elasticsearch. Kibana on Github.
Hopefully some of the ideas and gotchas mentioned in this post will help others when installing and running Elasticsearch in Microsoft Azure.

