A Step by Step Guide to using GitFlow with TeamCity – Part 4 – Feature Branches in TeamCity

Part 1 of the series talked about Different Branching Models. Part 2 covered GitFlow – a Branching Model for a Release Cycle and part 3 covered all the GitFlow Commands.
In this final part of this series about adopting GitFlow, we're going to cover how we can use the exciting new feature branching abilities of TeamCity 7.1 to allow our continuous integration environment to work in harmony with GitFlow without incurring a DevOps overhead having to create build configurations to support all the different, sporadically created branches that the GitFlow process requires.
Enabling feature branching is very simple (as doing most things with TeamCity tends to be) - the first thing to remember is that you need TeamCity 7.1 or higher installed. I mentioned this because from the experience of many of our clients - a large number of people still seem to be running a TeamCity 6.5 install.
Enabling Feature Branches
For the project you are going to enable feature branching on, navigate to the "Edit VCS Root" page via: Administration > Edit Build Configuration > Edit VCS Root. The section you are interested in is the "Branch Specification" section:
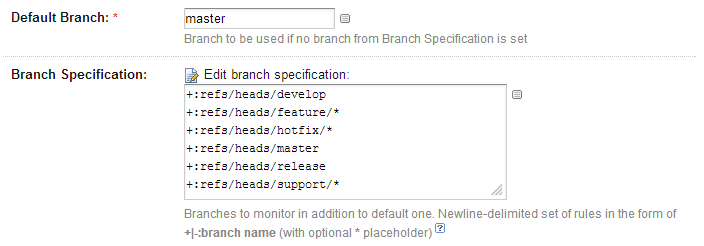
TeamCity enables feature branching by allowing you to create a branch specification - a simple little configuration syntax that has the format:
+:<branch specification>
-:<branch specification>
Where + means include and - means exclude. You can use * to perform matches, for example
+:*
means include all branches, whereas
+:refs/heads/feature/*
means include all feature branches.
For ease of copying and pasting the values for GitFlow are included below:
+:refs/heads/develop
+:refs/heads/feature/*
+:refs/heads/hotfix/*

+:refs/heads/main
+:refs/heads/release
+:refs/heads/support/*
One thing to note is that refs/heads/<branch name> is the fully qualified name of the branch rather than the shorter version of just <branch name> that we're used to using.
Feature Branch Builds
Enabling feature branches has two knock on effects - the first is that you can now filter your builds by branch:

Branches are grouped into two main categories "active branches" and "inactive branches". An active branch is any branch that has had a commit within the last 7 days (this value can be changed by altering the teamcity.activeVcsBranch.age.days parameter). Inactive branches are ones older than the specified threshold. The reason branches "decay" is because on any project of reasonable size the number of concurrent branches can become large quite quickly.
If these branches didn't become "inactive" the UI would soon become cluttered and unusable. In the screenshot above - you can see we have two active branches - develop and "gf005", which is actually the id of the task within YouTrack. We like to use this convention for branch names as it makes it easy for anyone on the project to figure out which changes are in which branch.
If you want an unfiltered view of current activity, you can select "Active branches":

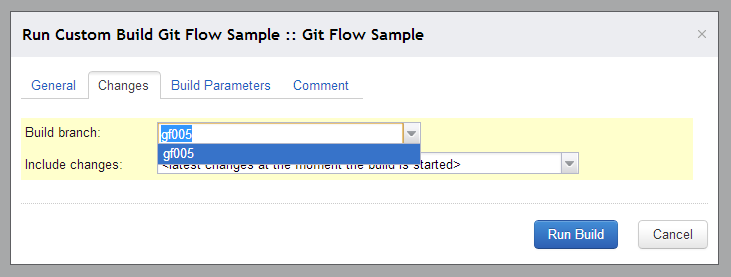
The final knock on effect is that there is a new option available from the "Run Custom Build" dialog. This is very handy if you want to perform any advanced functions against a specific branch, for example deploy a specific version of a build from a specific branch (if you are using TeamCity as your deployment dashboard).
That's really how easy it is to configure TeamCity to work with the GitFlow process. It may seem daunting at the outset - but hopefully this step by step guide illuminates how straight forward the process really is and might persuade you to invest a little more time experimenting with and improving your own ALM processes.
If you have any questions about the process - feel free to leave a comment or ping me via @hvr.endj.in

