A Step by Step Guide to using GitFlow with TeamCity – Part 3 – GitFlow Commands

In part 1 of the series I talked about the difference in branching models inherent with the different types of version control system. In part 2 I talked about the problems inherent in the software development, release and support cycle and how GitFlow was designed as a workflow to try and solve or at the very lease provide a strategy to try and minimise their impact.
This post finally covers the nitty-gritty of how you use the GitFlow extensions to drive the workflow. Firstly the extensions add a new command, "flow" which has 4 sub commands (and one experimental - "support") which encapsulate the workflow:
> git flow
- init
- feature
- release
- hotfix
- support
As each GitFlow command has a series of options - it's probably best to cover them off one by one:
> git flow init
This command initializes your existing git repo to use the GitFlow extensions. The extensions don't perform voodoo magic - they don't do anything special to your repo - they are simply scripts that automate a series of existing git commands to create a "pit of quality" that allows you to easily follow the conventions - if you had an aversion to working smarter you could manually run all the git steps, following the same conventions and achieve the same ends - but why go the long way round?
When you run the following command:
> git flow init
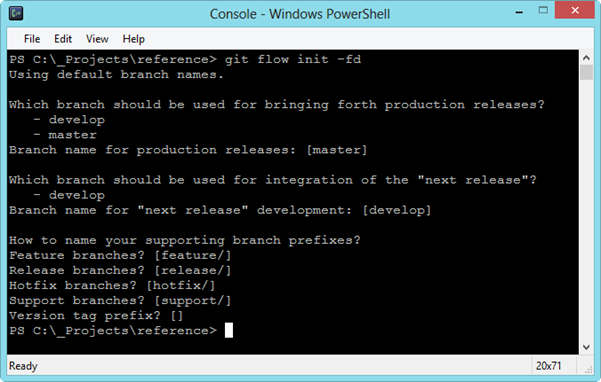
You will be ask if you want to override the default naming pattern (hint - you don't, but it's always nice to be asked).
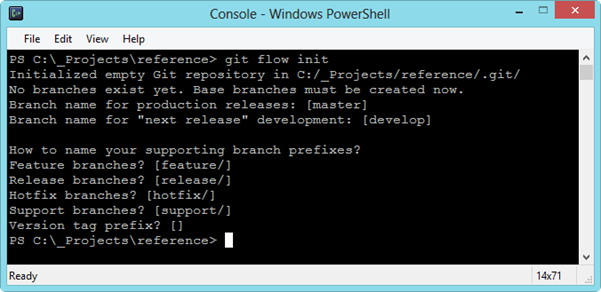
If you find having to hit enter multiple times bothersome then you can use the following command to initialise your git repo with the default settings:
> git flow init –fd
The screenshot below shows the difference:
> git flow feature
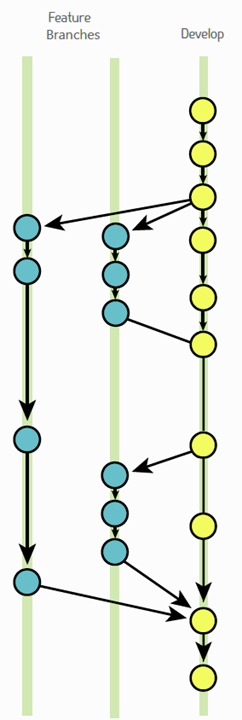
This is probably the command you will most use in your day-to-day development activities. In essence it doesn't do anything particularly special - it just creates a branch in which you can develop a feature. The point is that it's a very low friction way of creating an isolated sandpit for you to create a new feature in. Just like any other branch in git, you can push it up to a remote repo to share it with other developers to collaborate and push, pull and rebase just like you would if you developed just in the master branch.
The point of the feature branch is that it should contain a small unit of work (we're talking hours or days worth of work, not weeks or months) and that there can be many feature branches being worked on independently as in the following workflow visualisation:
The full list of GitFlow feature commands are as follows (many of them should not be a shock to the system as they are just standard git commands):
- git flow feature [list] [-v]
- git flow feature start [-F] <name> [<base>]
- git flow feature finish [-rFkDS] [<name|nameprefix>]
- git flow feature publish <name>
- git flow feature track <name>
- git flow feature diff [<name|nameprefix>]
- git flow feature rebase [-i] [<name|nameprefix>]
- git flow feature checkout [<name|nameprefix>]
- git flow feature pull [-r] <remote> [<name>]
The most common commands you will use are the following:
- start <name>
- finish <name>
- publish <name>
- track <name>
- checkout <name>
- pull <remote> <name>
// > git flow feature start <name>
Naming your feature branch is an interesting topic - our standard is to use the Id of the work item you are delivering - in our internal devlab that is the YouTrack Id. The reason we do this is so that it's absolutely apparent to anyone in the team what a particular branch relates to. This convention works well for hotfixes too as these are generally recorded as bugs in your work item tracking system.
The screenshot below shows the process of creating a new feature for a specific work item id (gf006). GitFlow provides you with a nice set of instructions on what to do at the next step of the workflow.

To backtrack to the "the extensions don't perform voodoo magic" point the command:
> git flow feature start
Translates to:
> git branch feature/<name>
> git checkout feature/<name>
> git flow feature publish <name>
Now you've created a feature branch - you might want commit your initial changes either to ensure they are backed up on the remote or to collaborate with other colleagues. To do this you need to issued the following command:
>git flow feature publish <name>
This command translates to the following native commands:
> git push origin <name>
> git config "branch.<name>.remote" "origin"
> git config "branch.<name>.merge" "refs/heads/<name>"
> git checkout "<name>"
> git flow feature pull <name>
Similarly if you are the other collaborator and want to get the feature branch, you would issue the following command:
> git flow feature pull <name>
For the first time feature pull, translates to:
> git fetch -q "origin" "<name>"
> git branch –no-track "<name>" FETCH_HEAD
> git checkout -q "<name>"
And for any subsequent feature pull translates to:
> git pull -q "origin" "<name>"
> git flow feature finish <name>
Once you completed work on your feature, it's time to merge it back with the main develop branch. To do this you need to issue the following command:
> git flow feature finish
This translates to the following native commands:
> git checkout develop
> git merge –no-ff "<name>"
> git branch -d <name>
> git flow release
Now you have a feature that's complete, you probably want to bundle this up into a release so that you can push it into Production. The purpose of this branch is to test, stabilize and finally release the changes. The diagram below visualizes the workflow, showing how features eventually make there way into a Release branch:
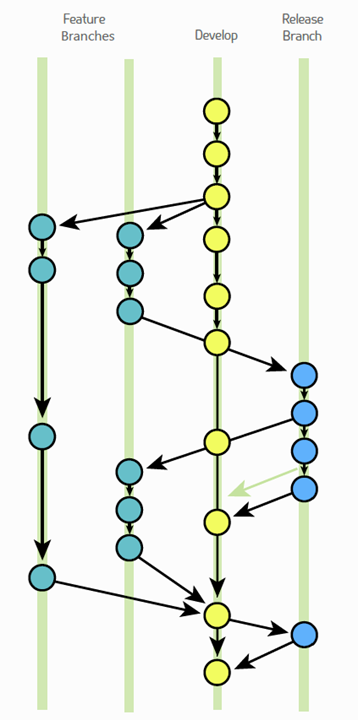
As you can collaboratively make changes to code in the branch - the sub-commands available are very much aligned with those available for feature branches:
- git flow release start <version>
- git flow release finish <version>
- git flow release publish <name>
- git flow release track <name>
> git flow release start <name>
Just like a feature branch you need to "start" it - the screenshot below shows the process of creating a release branch called "iteration01" from within the feature branch "gf006". Note how the release branch is created from the "develop" branch rather than the feature branch:
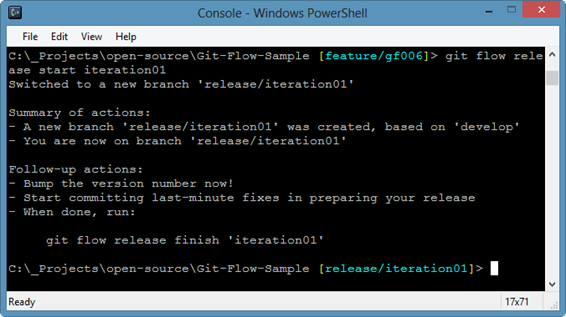
Now the branch is successfully created and testing and stabilisation can continue.
> git flow release finish <name>
One your release has exited the final quality gate and is ready to be released into production - you can "finish" the branch. Note from the screenshot that you should provide a message.
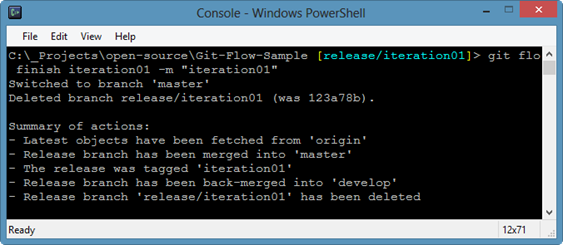
This command is a façade for a whole series workflow steps:
> git flow release finish -F -p iteration01
Translates to:
> git checkout master
> git fetch origin master
> git merge –no-ff iteration01
> git tag -a iteration01
> git push origin master
> git checkout develop
> git fetch origin develop
> git merge –no-ff iteration01
> git push origin develop
> git branch –d iteration01
If you are not familiar with the standard git commands - the above steps translate, in English to:
- Latest objects have been fetched from "origin"
- Release branch has been merged into "master"
- The release was tagged "iteration01"
- Release branch has been back-merged into "develop"
- Release branch "release/iteration01" has been deleted
- "develop", "master" and tags have been pushed to "origin"
- Release branch "release/iteration01" in "origin" has been deleted
At this point the changes for your next release exist on your master branch and have been tagged with the version number specified.
> git flow hotfix
The hotfix command has been created to solve the problem of defects slipping through the quality gates and being identified in production. This branch exists to allow a single defect to be fixed, tested and then merged back into the master branch. This is not a process for adding extra features into the production release - this should only be used to fix a specific defect - any other features should be handled in the normal way using feature branches. The diagram below visualizes the workflow:

The following sub-commands are available:
- git flow hotfix start <version>
- git flow hotfix finish <version>
- git flow hotfix publish <version>
- git flow hotfix track <version>
> git flow support
This is still considered an experimental feature for the case where a team has a product that supports multiple customers who need fixes but don't want to upgrade to new release. The diagram below visualizes the workflow:

And that's it - GitFlow is a simple, low ceremony set of extensions to automate a simple convention for managing the complexities of dealing with the software development release cycle.
In the final part of this series, I'll show how you can configure TeamCity to work in harmony with GitFlow.

