Reading structured data from SharePoint in Synapse Pipelines


One of the most common scenarios we encounter when building cloud-based data platforms is the need to ingest data from files in SharePoint. As tools like Synapse Analytics and Microsoft Fabric put more and more analytical power into the hands of data teams and business users, its no surprise that ingesting, processing and analysing data from the Microsoft 365 environment is a common requirement.
But whilst there's built in support for connecting to structured data in SharePoint lists, when it comes to file-based structured data (i.e. CSV and Excel), things get a little bit more complicated.
This series of blog posts explorers options and approaches for common scenarios that we've encountered when dealing with SharePoint files in our cloud-based data pipelines. Some of the solutions are common across platforms, and some are platform specific according to the specific features available at time of writing.
The first post in the series looks reading files from SharePoint using a Synapse Pipeline. In the next post we'll do the same thing with Fabric Pipelines highlighting the key differences.
Authentication
Before we get started, it's important to understand the authentication story between our Synapse workspace runtime and SharePoint. There's two separate ecosystems at play here - Synapse is an Azure service, and SharePoint lives in M365. The common bridge is Microsoft Entra (formerly Azure Active Directory) which manages our identities, security groups and permissions.
Like a lot of Azure services, a Synapse workspace comes with a System Assigned Managed Identity - a special type of Service Principal.
If you create your workspace through the Azure portal, or via an automated process using PowerShell, then it will be created automatically for you. If you're using the REST API, or a client SDK then you'll need to explicitly specify that you'd like one.
However, the important thing to understand is that how and where you can use this Managed Identity varies across the different tools inside the Synapse Workspace. In this first example, we're going to use Synapse Pipelines to connect and retrieve the files, and the good news is that this is a supported Managed Identity authentication scenario. When we move on to Spark-based connectivity in subsequent posts, we'll see our options change.
Applying permissions to SharePoint
If we've got a System Assigned Managed Identity for Synapse, that's what we're going to use to connect to SharePoint, so the first step would be to grant that Service Principal account the relevant access to the SharePoint site that you want to use.
The only way to do this currently is via the Microsoft Graph API. I've shared the necessary PowerShell code samples to do this, using an interactive notebook, in a previous blog post.
Synapse Pipeline
Once the necessary permissions are applied in SharePoint, we can create the pipeline in Synapse. We need to make use of Web Activities to initiate the connection and query the Graph API for Sharepoint, and then we can use a Copy Activity to retrieve the file and/or its contents. At a high level, the structure of the pipeline is as follows:
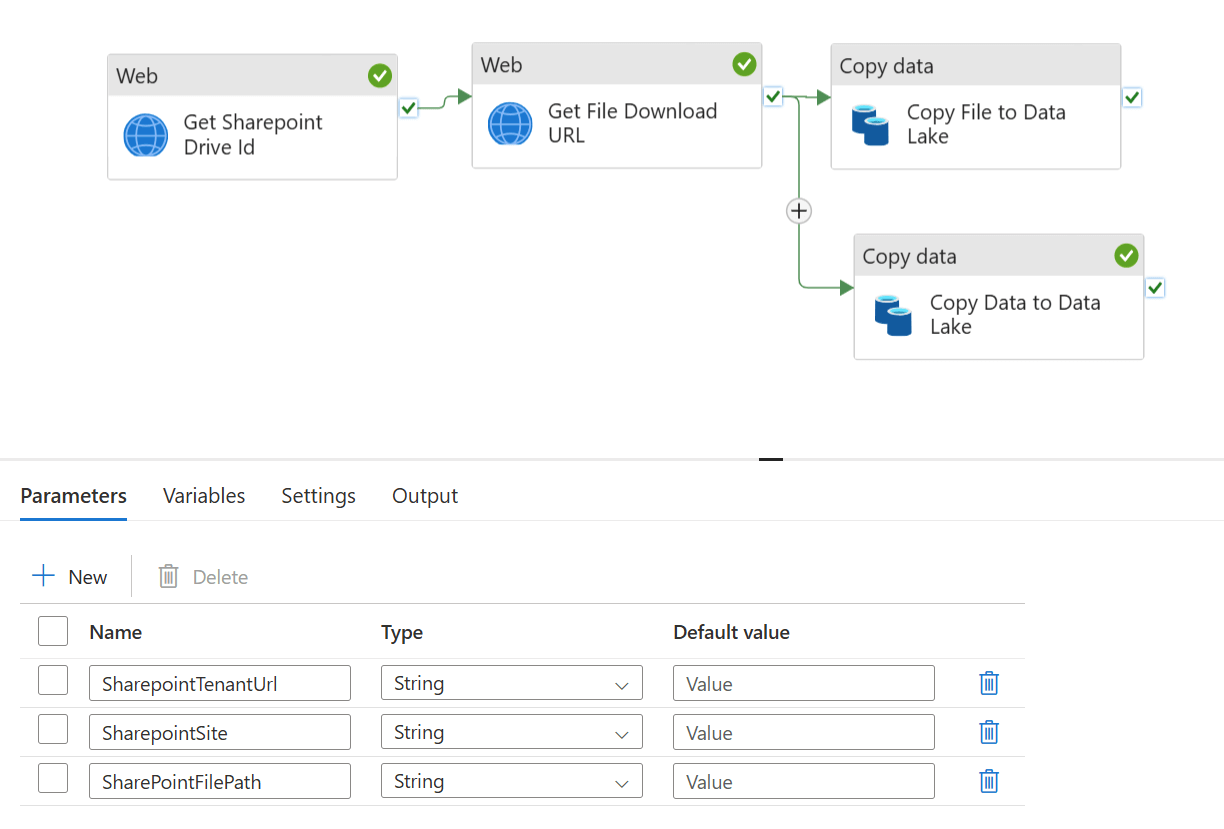
1. Get the SharePoint Drive ID for the SharePoint site
Using a Web Activity, we make a call to the Graph API to query the ID for the SharePoint site that we want to connect to. We'll use the returned Drive ID value in the subsequent step. The authentication to the to Graph API can use the System Assigned Managed Identity which is a built in option for Web Activities:
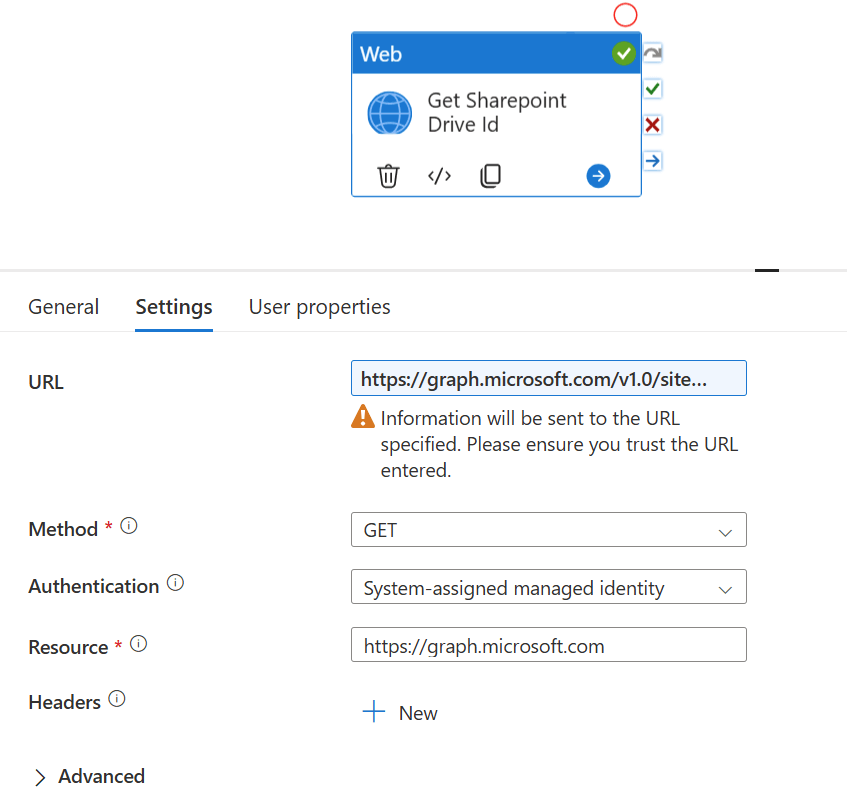
This means that the Synapse pipeline will handle the process of authenticating against the Graph API and passing in the right authorisation headers to our query.
{
    "name": "Get Sharepoint Drive Id",
    "type": "WebActivity",
    "dependsOn": [],
    "policy": {
        "timeout": "0.12:00:00",
        "retry": 0,
        "retryIntervalInSeconds": 30,
        "secureOutput": false,
        "secureInput": false
    },
    "userProperties": [],
    "typeProperties": {
        "method": "GET",
        "url": {
            "value": "https://graph.microsoft.com/v1.0/sites/@{pipeline().parameters.SharepointTenantUrl}:/sites/@{pipeline().parameters.SharepointSite}:/drive?$select=id\n",
            "type": "Expression"
        },
        "connectVia": {
            "referenceName": "AutoResolveIntegrationRuntime",
            "type": "IntegrationRuntimeReference"
        },
        "authentication": {
            "type": "MSI",
            "resource": "https://graph.microsoft.com"
        }
    }
}
2. Get the Download URL property for the file in SharePoint
Once we have the SharePoint Drive ID, we can use another Web Activity to get the Download URL property of the file we care about. We can use the System Assigned Managed Identity option again as per the previous step.
The Download URL is one of the metadata properties of the file that is returned from the Graph API. What's great is that that it's a pre-authorised URL that's valid for 1 hour, so any subsequent requests don't need to be authenticated to use it. This means we can pass that into a Copy Activity to retrieve the file and move it into our Data Lake.
{
    "name": "Get File Download URL",
    "type": "WebActivity",
    "dependsOn": [
        {
            "activity": "Get Sharepoint Drive Id",
            "dependencyConditions": [
                "Succeeded"
            ]
        }
    ],
    "policy": {
        "timeout": "0.12:00:00",
        "retry": 0,
        "retryIntervalInSeconds": 30,
        "secureOutput": false,
        "secureInput": false
    },
    "userProperties": [],
    "typeProperties": {
        "method": "GET",
        "url": {
            "value": "https://graph.microsoft.com/v1.0/drives/@{activity('Get Sharepoint Drive Id').output.id}/root:/@{pipeline().parameters.SharePointFilePath}?select=@@microsoft.graph.downloadUrl,name",
            "type": "Expression"
        },
        "connectVia": {
            "referenceName": "AutoResolveIntegrationRuntime",
            "type": "IntegrationRuntimeReference"
        },
        "authentication": {
            "type": "MSI",
            "resource": "https://graph.microsoft.com"
        }
    }
}
3a. Copy the file from SharePoint to Data Lake
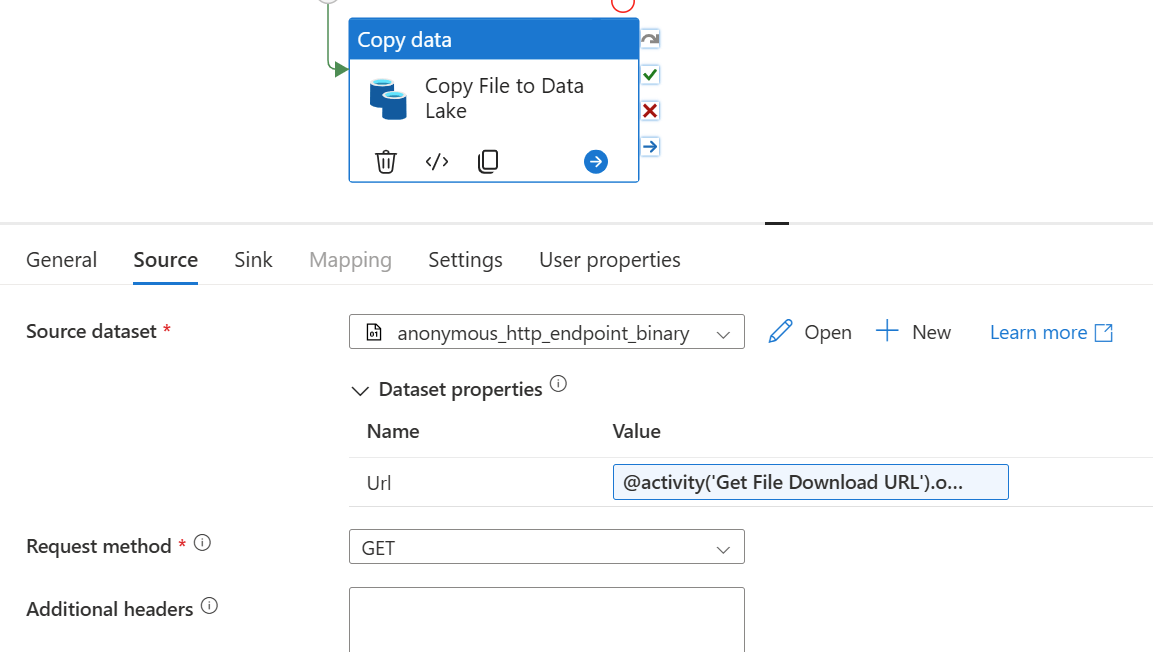
Finally, we can now use a Copy Activity to do something with the file using the pre-authenticated Download URL value from the previous step. It might be that we want to copy the file into Azure Storage/Data Lake. Whilst that might not seem significant, the point is we've now moved the file from the world of M365 into the world of Azure. This means that connectivity and integration for what we want to do with the file next becomes a lot easier.
To do this we need an HTTP dataset of binary format, that uses an HTTP Linked Service. Because the Download URL is pre-authenticated, we can use Anonymous Authentication here.
{
    "name": "Copy File to Data Lake",
    "type": "Copy",
    "dependsOn": [
        {
            "activity": "Get File Download URL",
            "dependencyConditions": [
                "Succeeded"
            ]
        }
    ],
    "policy": {
        "timeout": "0.12:00:00",
        "retry": 0,
        "retryIntervalInSeconds": 30,
        "secureOutput": false,
        "secureInput": false
    },
    "userProperties": [],
    "typeProperties": {
        "source": {
            "type": "BinarySource",
            "storeSettings": {
                "type": "HttpReadSettings",
                "requestMethod": "GET"
            },
            "formatSettings": {
                "type": "BinaryReadSettings"
            }
        },
        "sink": {
            "type": "BinarySink",
            "storeSettings": {
                "type": "AzureBlobFSWriteSettings"
            }
        },
        "enableStaging": false
    },
    "inputs": [
        {
            "referenceName": "anonymous_http_endpoint_binary",
            "type": "DatasetReference",
            "parameters": {
                "Url": {
                    "value": "@activity('Get File Download URL').output['@microsoft.graph.downloadUrl']",
                    "type": "Expression"
                }
            }
        }
    ],
    "outputs": [
        {
            "referenceName": "datalake_binary",
            "type": "DatasetReference",
            "parameters": {
                "FileName": {
                    "value": "@activity('Get File Download URL').output.name",
                    "type": "Expression"
                }
            }
        }
    ]
}
Once the file is in your Data Lake, then you can carry on using the authentication/integration options that are readily available in Synapse. For example, if you want to read the file contents and continue processing in a Spark Notebook then the Synapse Workspace can automatically access the filesystem using the abfss:// protocol (probably by using mssparkutils).
3b. Copy the contents of the file in SharePoint to the Data Lake
Alternatively, if you don't want to copy your file into the Data Lake, you could read the contents directly from Sharepoint as an Excel/CSV/JSON/XML formatted dataset, instead of a binary file. This way you can map the schema, and progress directly into the next steps of your pipeline.
To do this we'd need an HTTP dataset of CSV/Excel/JSON/XML format, that uses an HTTP Linked Service. Again, because the Download URL is pre-authenticated, we can use Anonymous Authentication here.

In this example, the Copy Activity still maps and stores the data in the Data Lake, but this time in parquet format. This could obviously take any direction that you choose, according to the specifics of your use case.
{
    "name": "Copy Data to Data Lake",
    "type": "Copy",
    "dependsOn": [
        {
            "activity": "Get File Download URL",
            "dependencyConditions": [
                "Succeeded"
            ]
        }
    ],
    "policy": {
        "timeout": "0.12:00:00",
        "retry": 0,
        "retryIntervalInSeconds": 30,
        "secureOutput": false,
        "secureInput": false
    },
    "userProperties": [],
    "typeProperties": {
        "source": {
            "type": "ExcelSource",
            "storeSettings": {
                "type": "HttpReadSettings",
                "requestMethod": "GET"
            }
        },
        "sink": {
            "type": "ParquetSink",
            "storeSettings": {
                "type": "AzureBlobFSWriteSettings"
            },
            "formatSettings": {
                "type": "ParquetWriteSettings"
            }
        },
        "enableStaging": false,
        "translator": {
            "type": "TabularTranslator",
            "typeConversion": true,
            "typeConversionSettings": {
                "allowDataTruncation": true,
                "treatBooleanAsNumber": false
            }
        }
    },
    "inputs": [
        {
            "referenceName": "anonymous_http_endpoint_excel",
            "type": "DatasetReference",
            "parameters": {
                "Url": {
                    "value": "@activity('Get File Download URL').output['@microsoft.graph.downloadUrl']",
                    "type": "Expression"
                }
            }
        }
    ],
    "outputs": [
        {
            "referenceName": "datalake_parquet",
            "type": "DatasetReference",
            "parameters": {
                "FileName": "data.parquet"
            }
        }
    ]
}
4. What next?
The examples above, and the full pipeline definition below, assume that we're accessing a single file in SharePoint. If you need to access multiple files, then it can easily be modified to fit - for example, to query the Graph API for the children in a folder, or files matching a specific pattern, and then iterate over the list as appropriate.
Here's the full pipeline definition that you can use as a starting point for your own workloads.
Summary
Whilst ingesting data from files in SharePoint is a very common requirement in most of the data projects we deliver, there's no out-the-box support inside Synapse. This post and the pipeline code samples within demonstrate an approach that we've used successfully to bridge the gap between M365 and Azure.
In the next post, I'll look at how the same requirement would be implemented in Microsoft Fabric, before moving on to other common file integration scenarios that we've encountered.