Notebooks in Azure Synapse Analytics
A Synapse Notebook is an interactive, collaborative environment which provides an intuitive way to combine live code, narrative text and visualisations. A Synapse Notebook is a powerful data science tool that can be utilised in a variety of contexts including exploratory data analysis, hypothesis testing, data cleaning and transformation, data visualisation, statistical modeling and machine learning.
What are Synapse Notebooks?

With Synapse Notebooks, you can:
- Develop code using Python, Scala, SQL, C# and R.
- Store live code, visualisations and markdown documentation.
- Utilise the computing power of Apache Spark Pools.
- Analyse data across raw formats (CSV, txt, JSON, etc.), processed file formats (parquet, Delta Lake, ORC, etc.) and SQL tabular data files against Spark and SQL.
- Leverage the built-in enterprise security features which helps your data stay secure (data protection, access control, authentication etc.)
In his talk, Ian Griffiths provides a more general technical overview of how notebooks work with some specific examples relating to notebooks in Azure Synapse Analytics.
Synapse Notebooks Key Features
There are a number of key features of Synapse Notebooks:
| Feature | Description |
|---|---|
| Outline (Table of Contents) | The outline is a sidebar window for quick navigation. It contains the first markdown header of any markdown cell. |
| Variables Pane | Instead of printing out the variables you have set to see the values they contain, you can simply look in the variables pane. The variables pane lists your variables along with their corresponding values. |
| Comments | Comments are where developers can collaborate and add comments to any part of the notebook. |
| Code Cells | Code cells contain the code you're going to run. For example, you could write code for writing/reading out data, training a machine learning model, or generating visualisations. |
| Markdown Cells | Markdown cells contain the documentation for your code. |
| Parameter Cells | Parameter cells allow you to pass values into your notebook. You can pass parameters from a Synapse Pipeline. You can also pass parameters from another notebook. You can create a parent-child kind of design pattern and make your notebooks more modular and reusable. |
| Hide/Show Output | You can opt to hide or show the output of each cell. |
Creating a Synapse Notebook
The initial setup of a Synapse Notebook is easy. First you will need to launch Azure Synapse Studio from the Azure Synapse workspace you want to use. Then you will need to navigate the 'Develop' tab. From here, you can choose to simply create a new notebook from scratch or you can import an existing notebook.
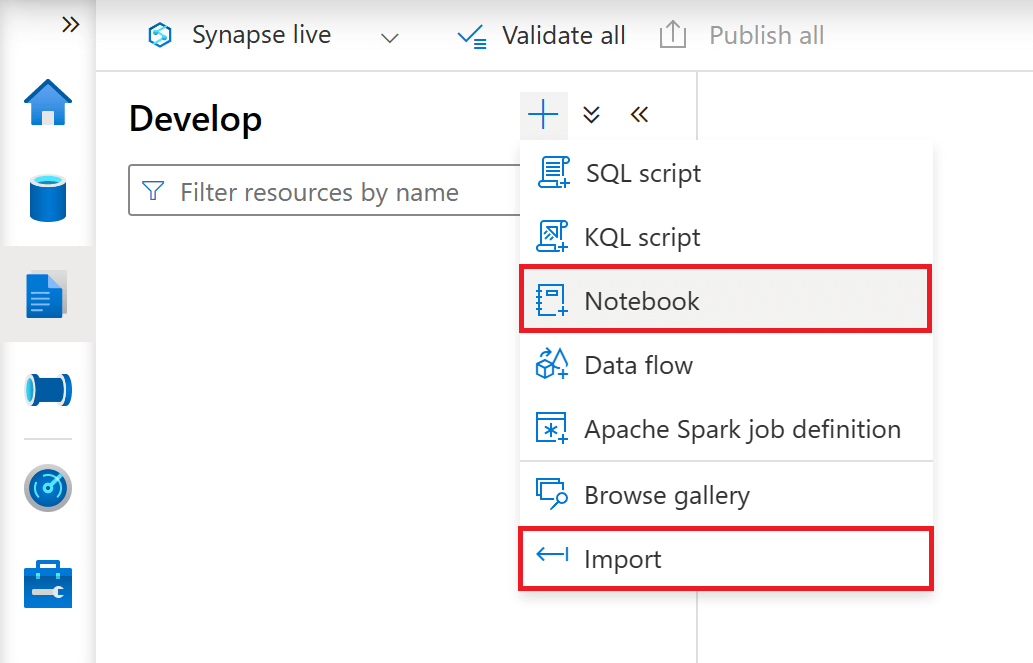
You can also create a new notebook from files that already exist within Azure Synapse Analytics. For example, if you have a csv file within a Data Lake under the 'Data' tab, you can simply select the csv file, navigate to the 'New notebook' dropdown on the command bar and then select 'Load to DataFrame' (a dataframe is a structure in Spark that represents a tabular dataset). These few simple steps will generate the code necessary to pull the data from the Data Lake. You can make connections to other data stores such as dedicated pools and an Azure SQL database, however these require more code.

Synapse Notebooks & Apache Spark Pools
When you're using the Cloud, you always need to ask, "Where is the compute happening? And how much does it cost?" For Synapse Notebooks, the compute is purely Spark based. Apache Spark is distributed data processing framework that enables large-scale data analytics by co-ordinating work across multiple processing nodes in a cluster. In Azure Synapse Analytics, a cluster is implemented as a Spark Pool, which provides a runtime for Spark operations. You can create a Spark Pool in an Azure Synapse Analytics workspace from within Azure Synapse Studio or by using the Azure Portal.
The Spark Pool hosts the kernel that executes the code within the cells of the notebook. Within the Spark Pool, there is a head node that orchestrates the parallelisation of that execution across the nodes in the cluster. Spark Pools in an Azure Synapse Analytics Workspace are serverless - they start on-demand and stop when idle. This means that the Spark Pool attached to your notebook will start when you first run your notebook.
Be aware that it may take a few minutes to spin up the Spark Pool. The Spark Pool attached to your notebook will close down automatically when it has not been in use for a while.
You can attach your Synapse Notebook to a Spark Pool of your choice by selecting a Spark Pool from the dropdown menu in the top command bar.

Programming Language Support
Synapse Notebooks support five primary programming languages:
- PySpark (Python).
- Spark (Scala).
- Spark SQL (SQL).
- .NET for Spark (C#).
- SparkR (R).
You can set the primary language for cells from the dropdown list in the top command bar. The default language in a new Synapse Notebook is PySpark - a Spark-optimised version of Python.

Synapse Notebooks give you a lot of flexibility and versatility by providing polyglot (multi-language) support. This means that you can switch between different languages within the same notebook by specifying the correct language magic command at the beginning of a cell. The magic commands to switch cell languages are as follows:
- %%pyspark (Python).
- %%spark (Scala).
- %%sql (SQL).
- %%csharp (C#).
- %%sparkr (R).
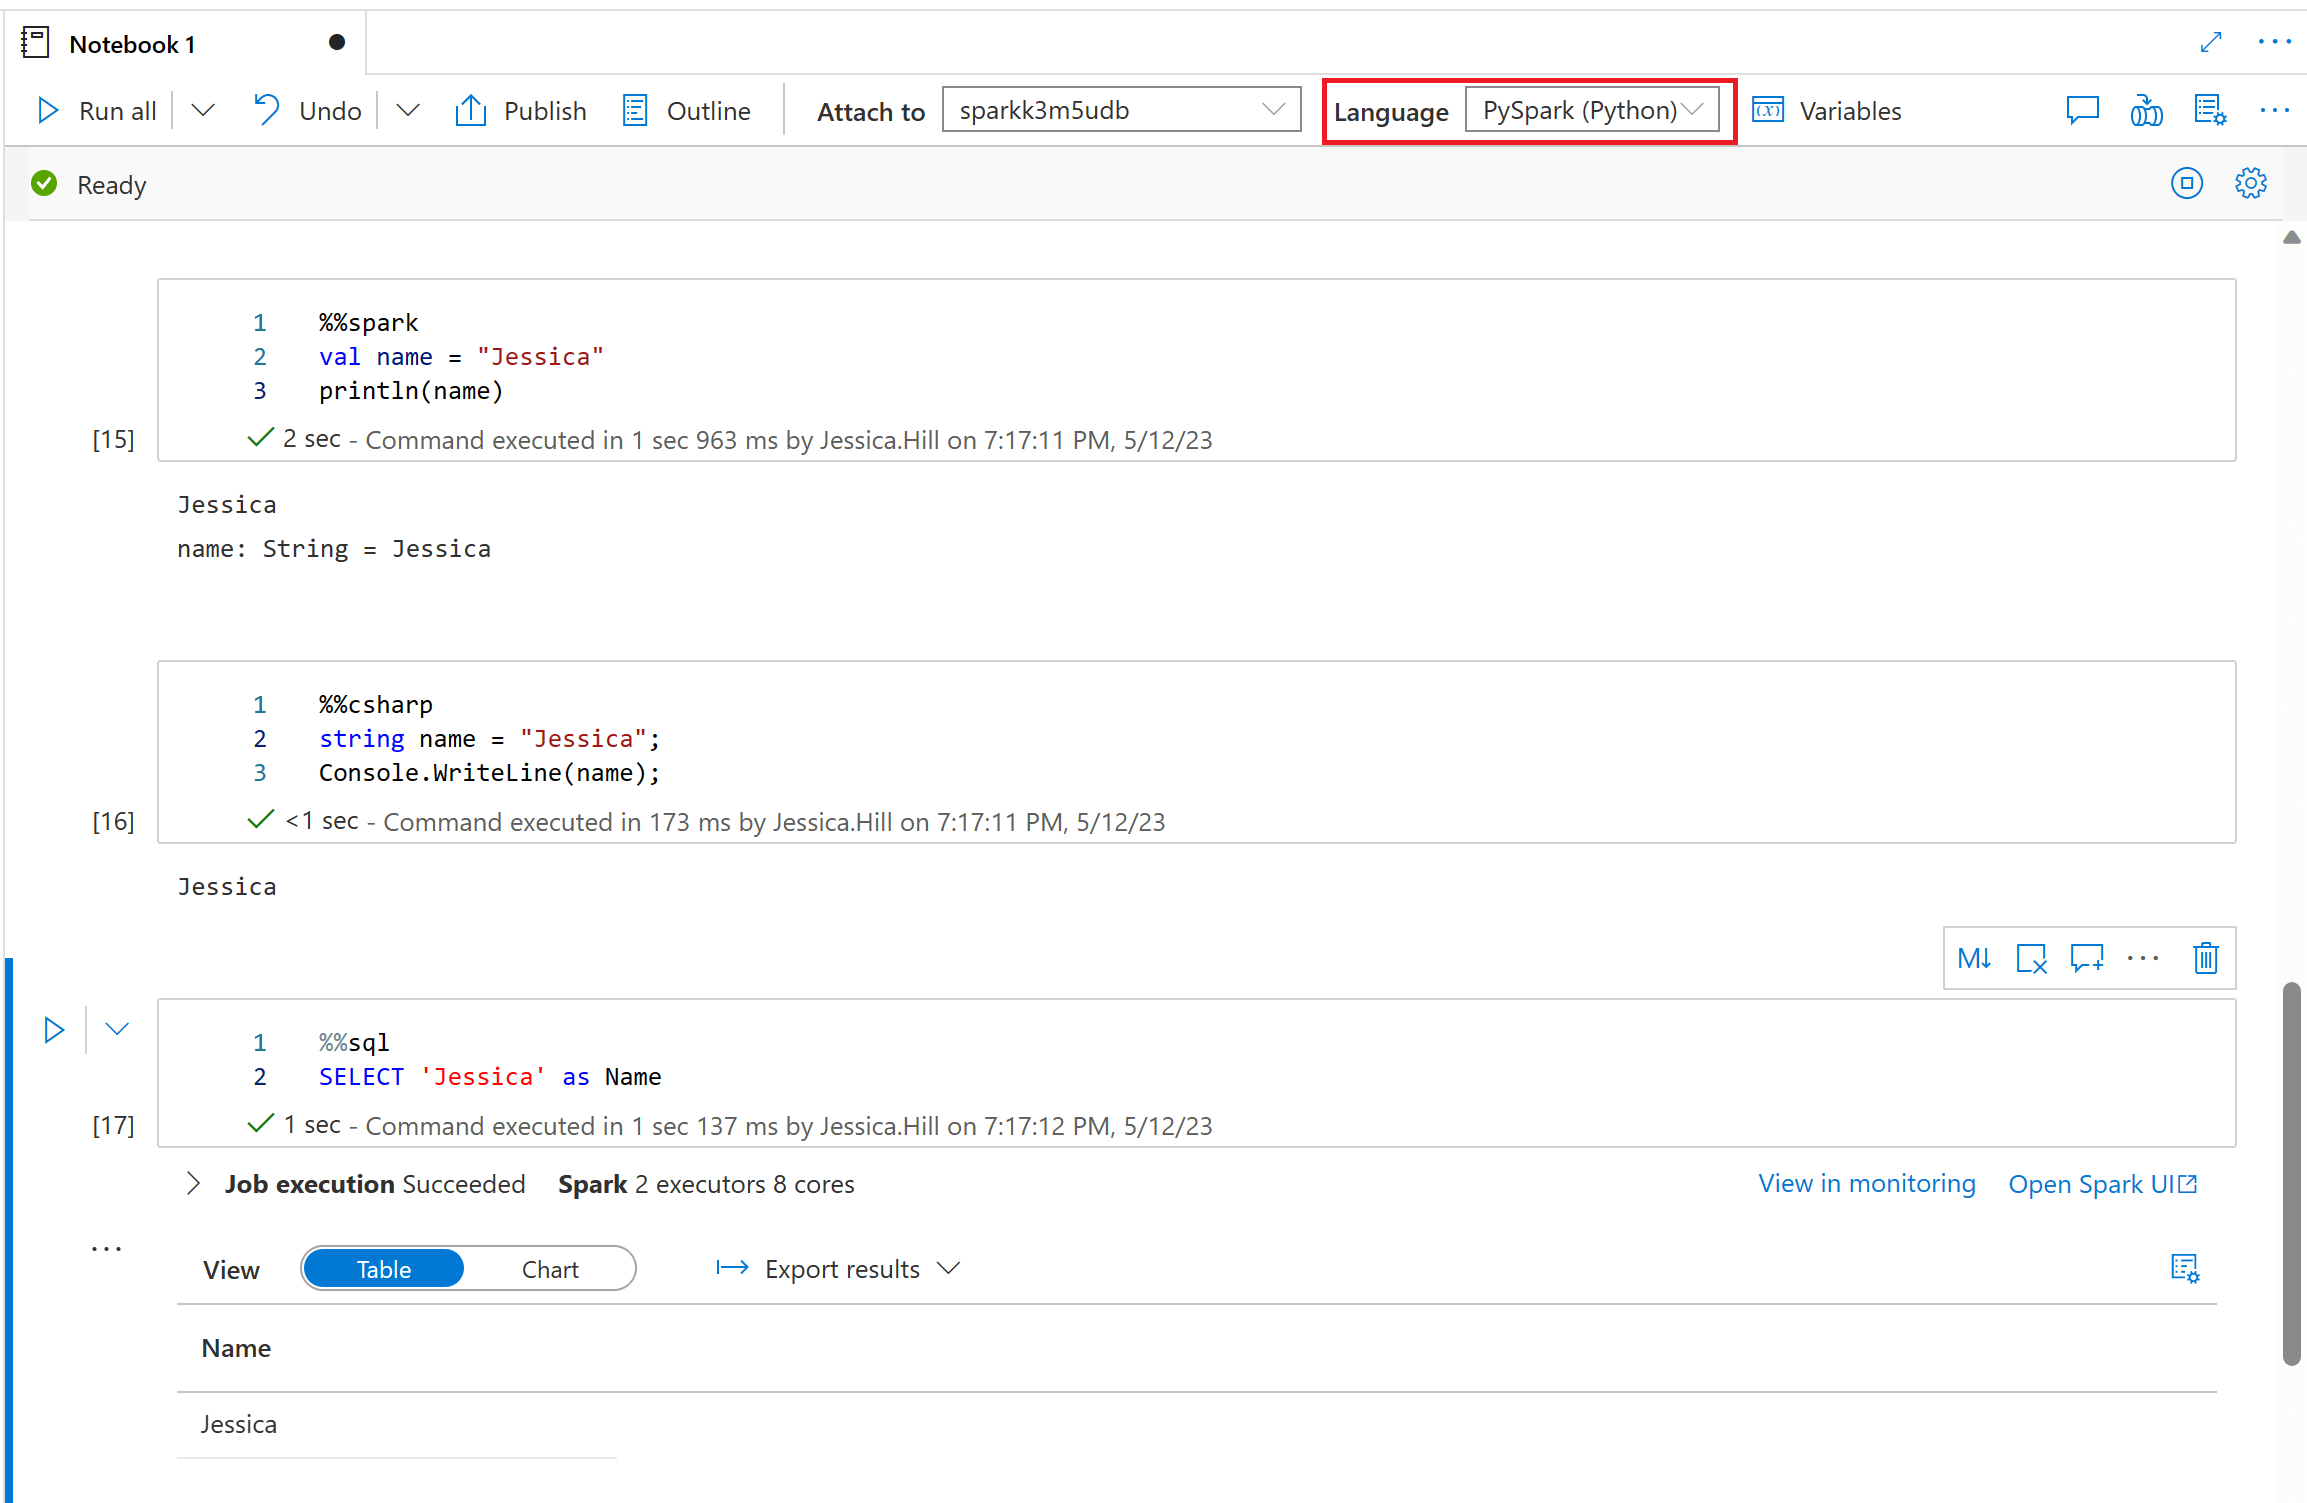
It is important to note that you cannot reference data or variables directly across different languages in a Synapse Notebook, unlike Polyglot Notebooks (powered by .NET Interactive) where sharing of variables between languages is supported. Instead, you can create a temporary table that can be referenced across languages. Furthermore, some operations you may carry out in a Synapse Notebook can only use specific languages. For example, the Azure Synapse Apache Spark to Synapse SQL connector for transferring data between dedicated SQL Pools and Apache Spark Pools in Azure Synapse Analytics, can only be used with Scala. Similarly, the PySpark connector for transferring data to and from a dedicated SQL Pool, also currently only works with Scala.
Visualisations
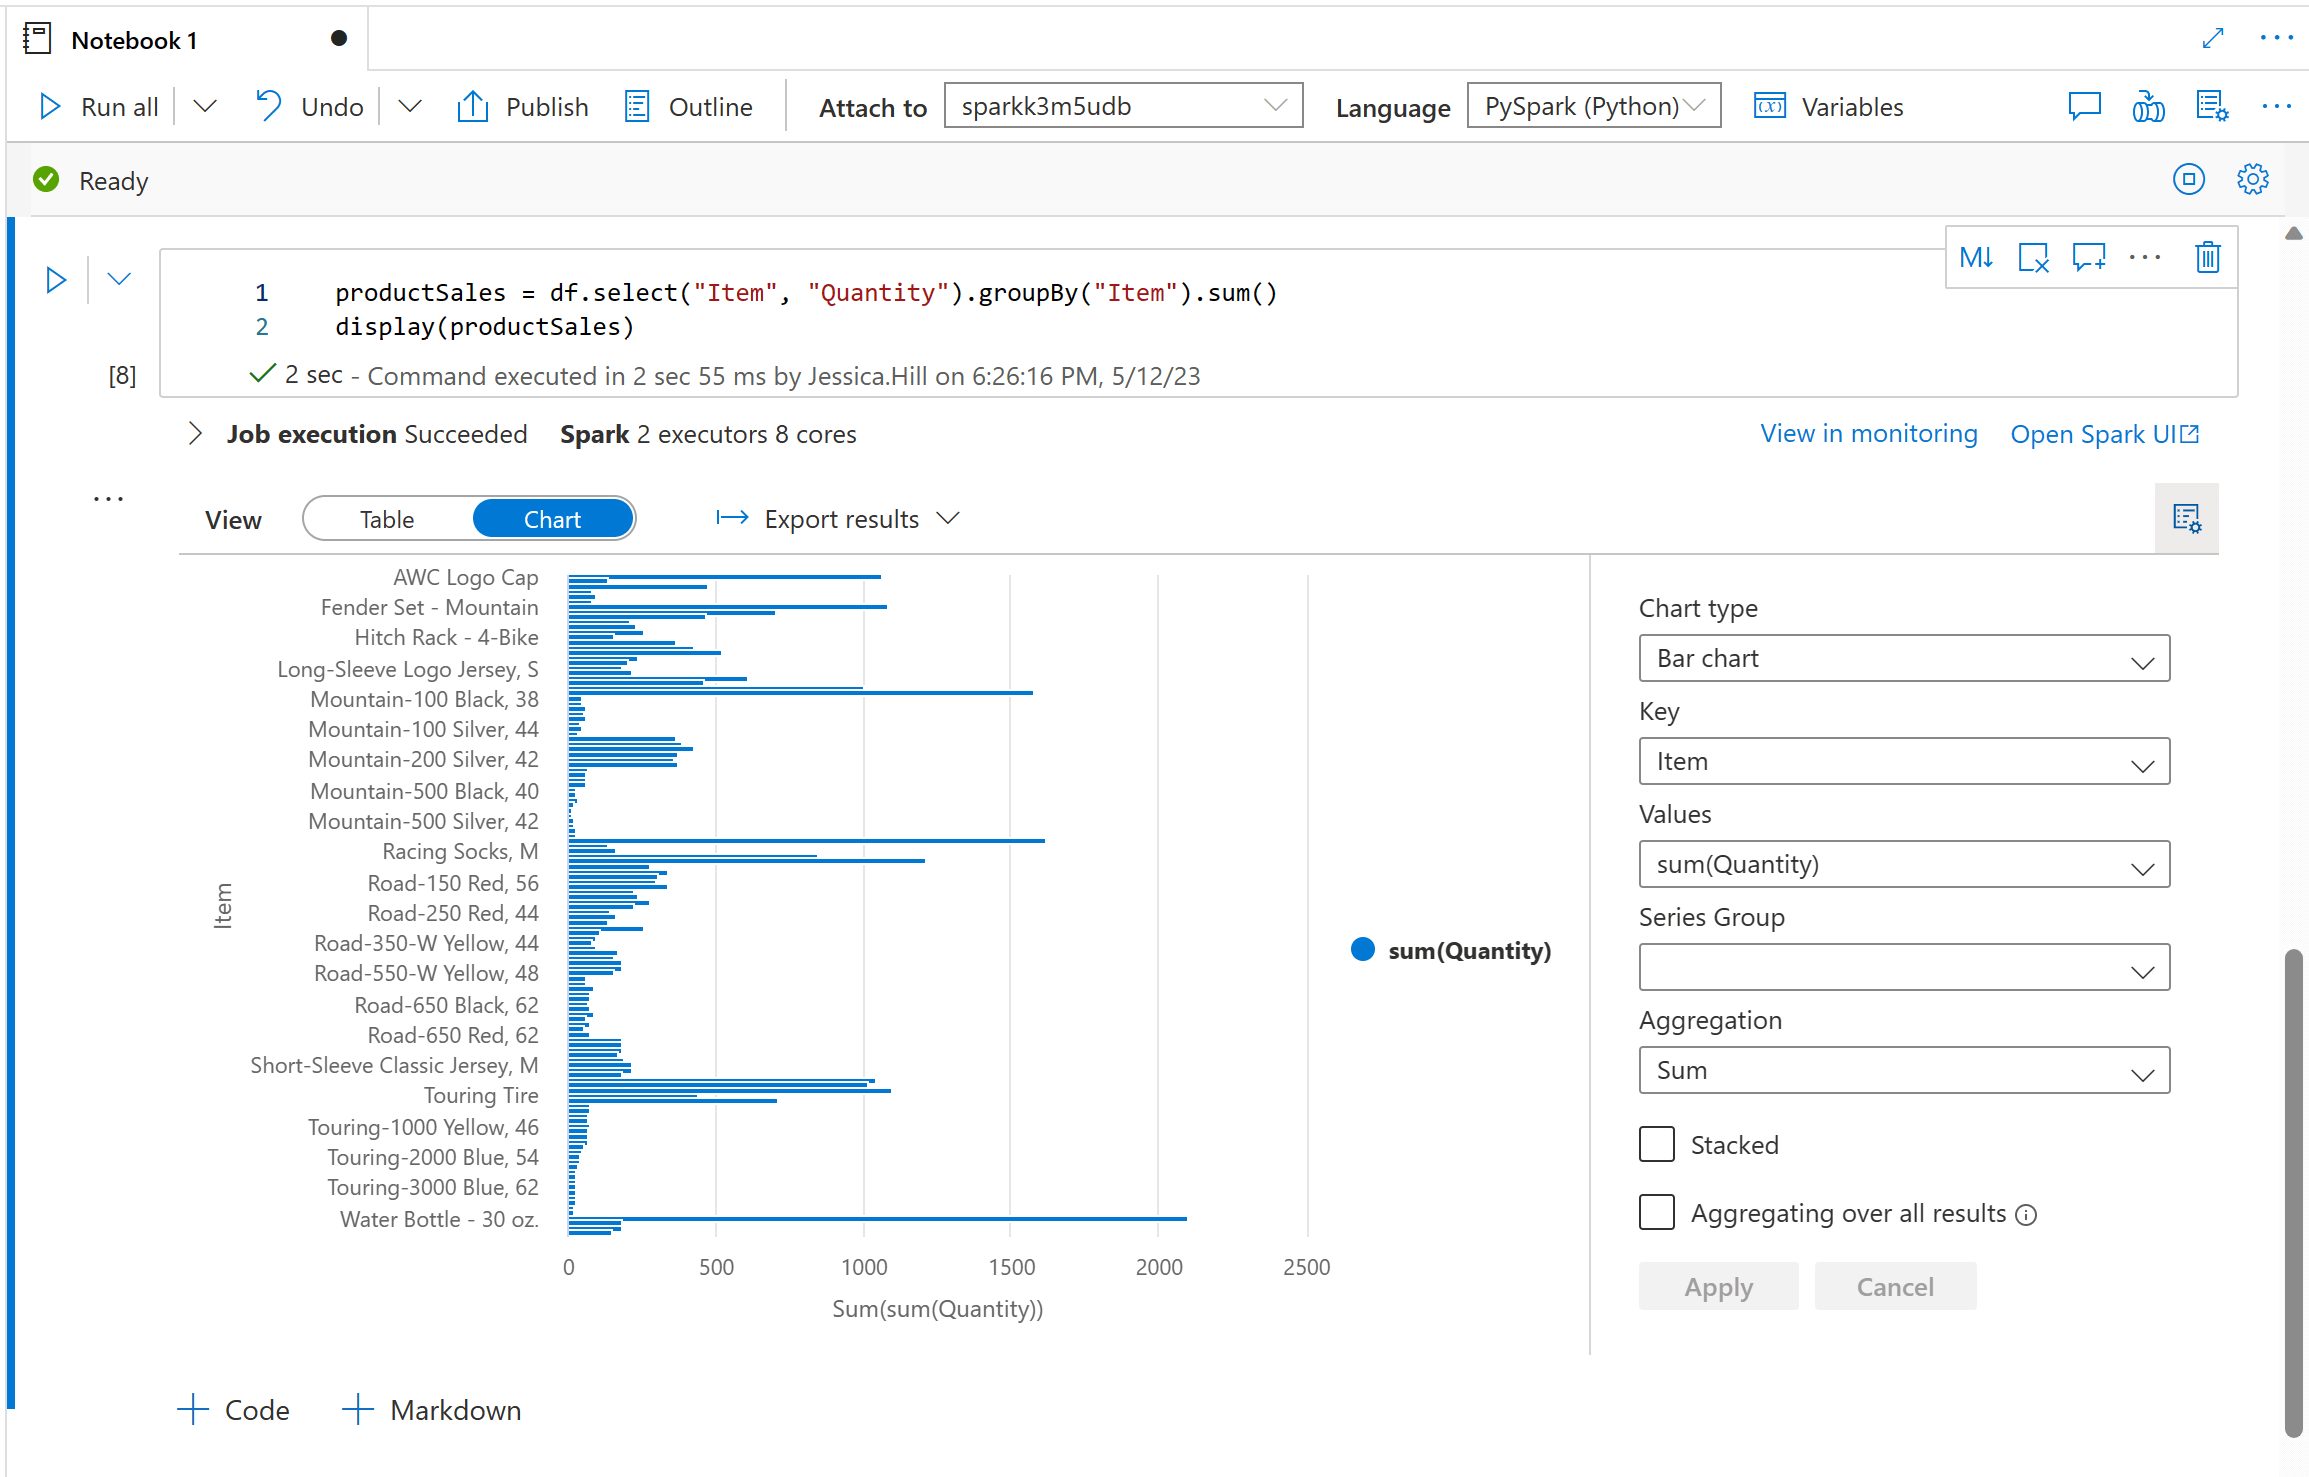
Synapse Notebooks have built-in support for visualisations. To turn your Spark dataframes into visualisations you will need to use the display function. Once you have rendered the table view using the display function, you can turn your tabular results into a customised chart by switching to the 'Chart View'.
You do not need to use the display function with SQL queries as the output of cells using the %%sql magic command appears in the rendered table view by default.
There are various different visualisation types you can choose from including bar charts, scatter plots, line graphs, and more. You can also configure your visualisation by specifying values for the axes range and aggregation method.
By default, Spark Pools in Azure Synapse Analytics contain a set of open-source libraries. For example, there are a number of graphing libraries for data visualisation including Python libraries such as Matplotlib, Seaborn, Bokeh, Plotly and Pandas and R libraries such as ggplot2, rBokeh, R Plotly and Highcharter.
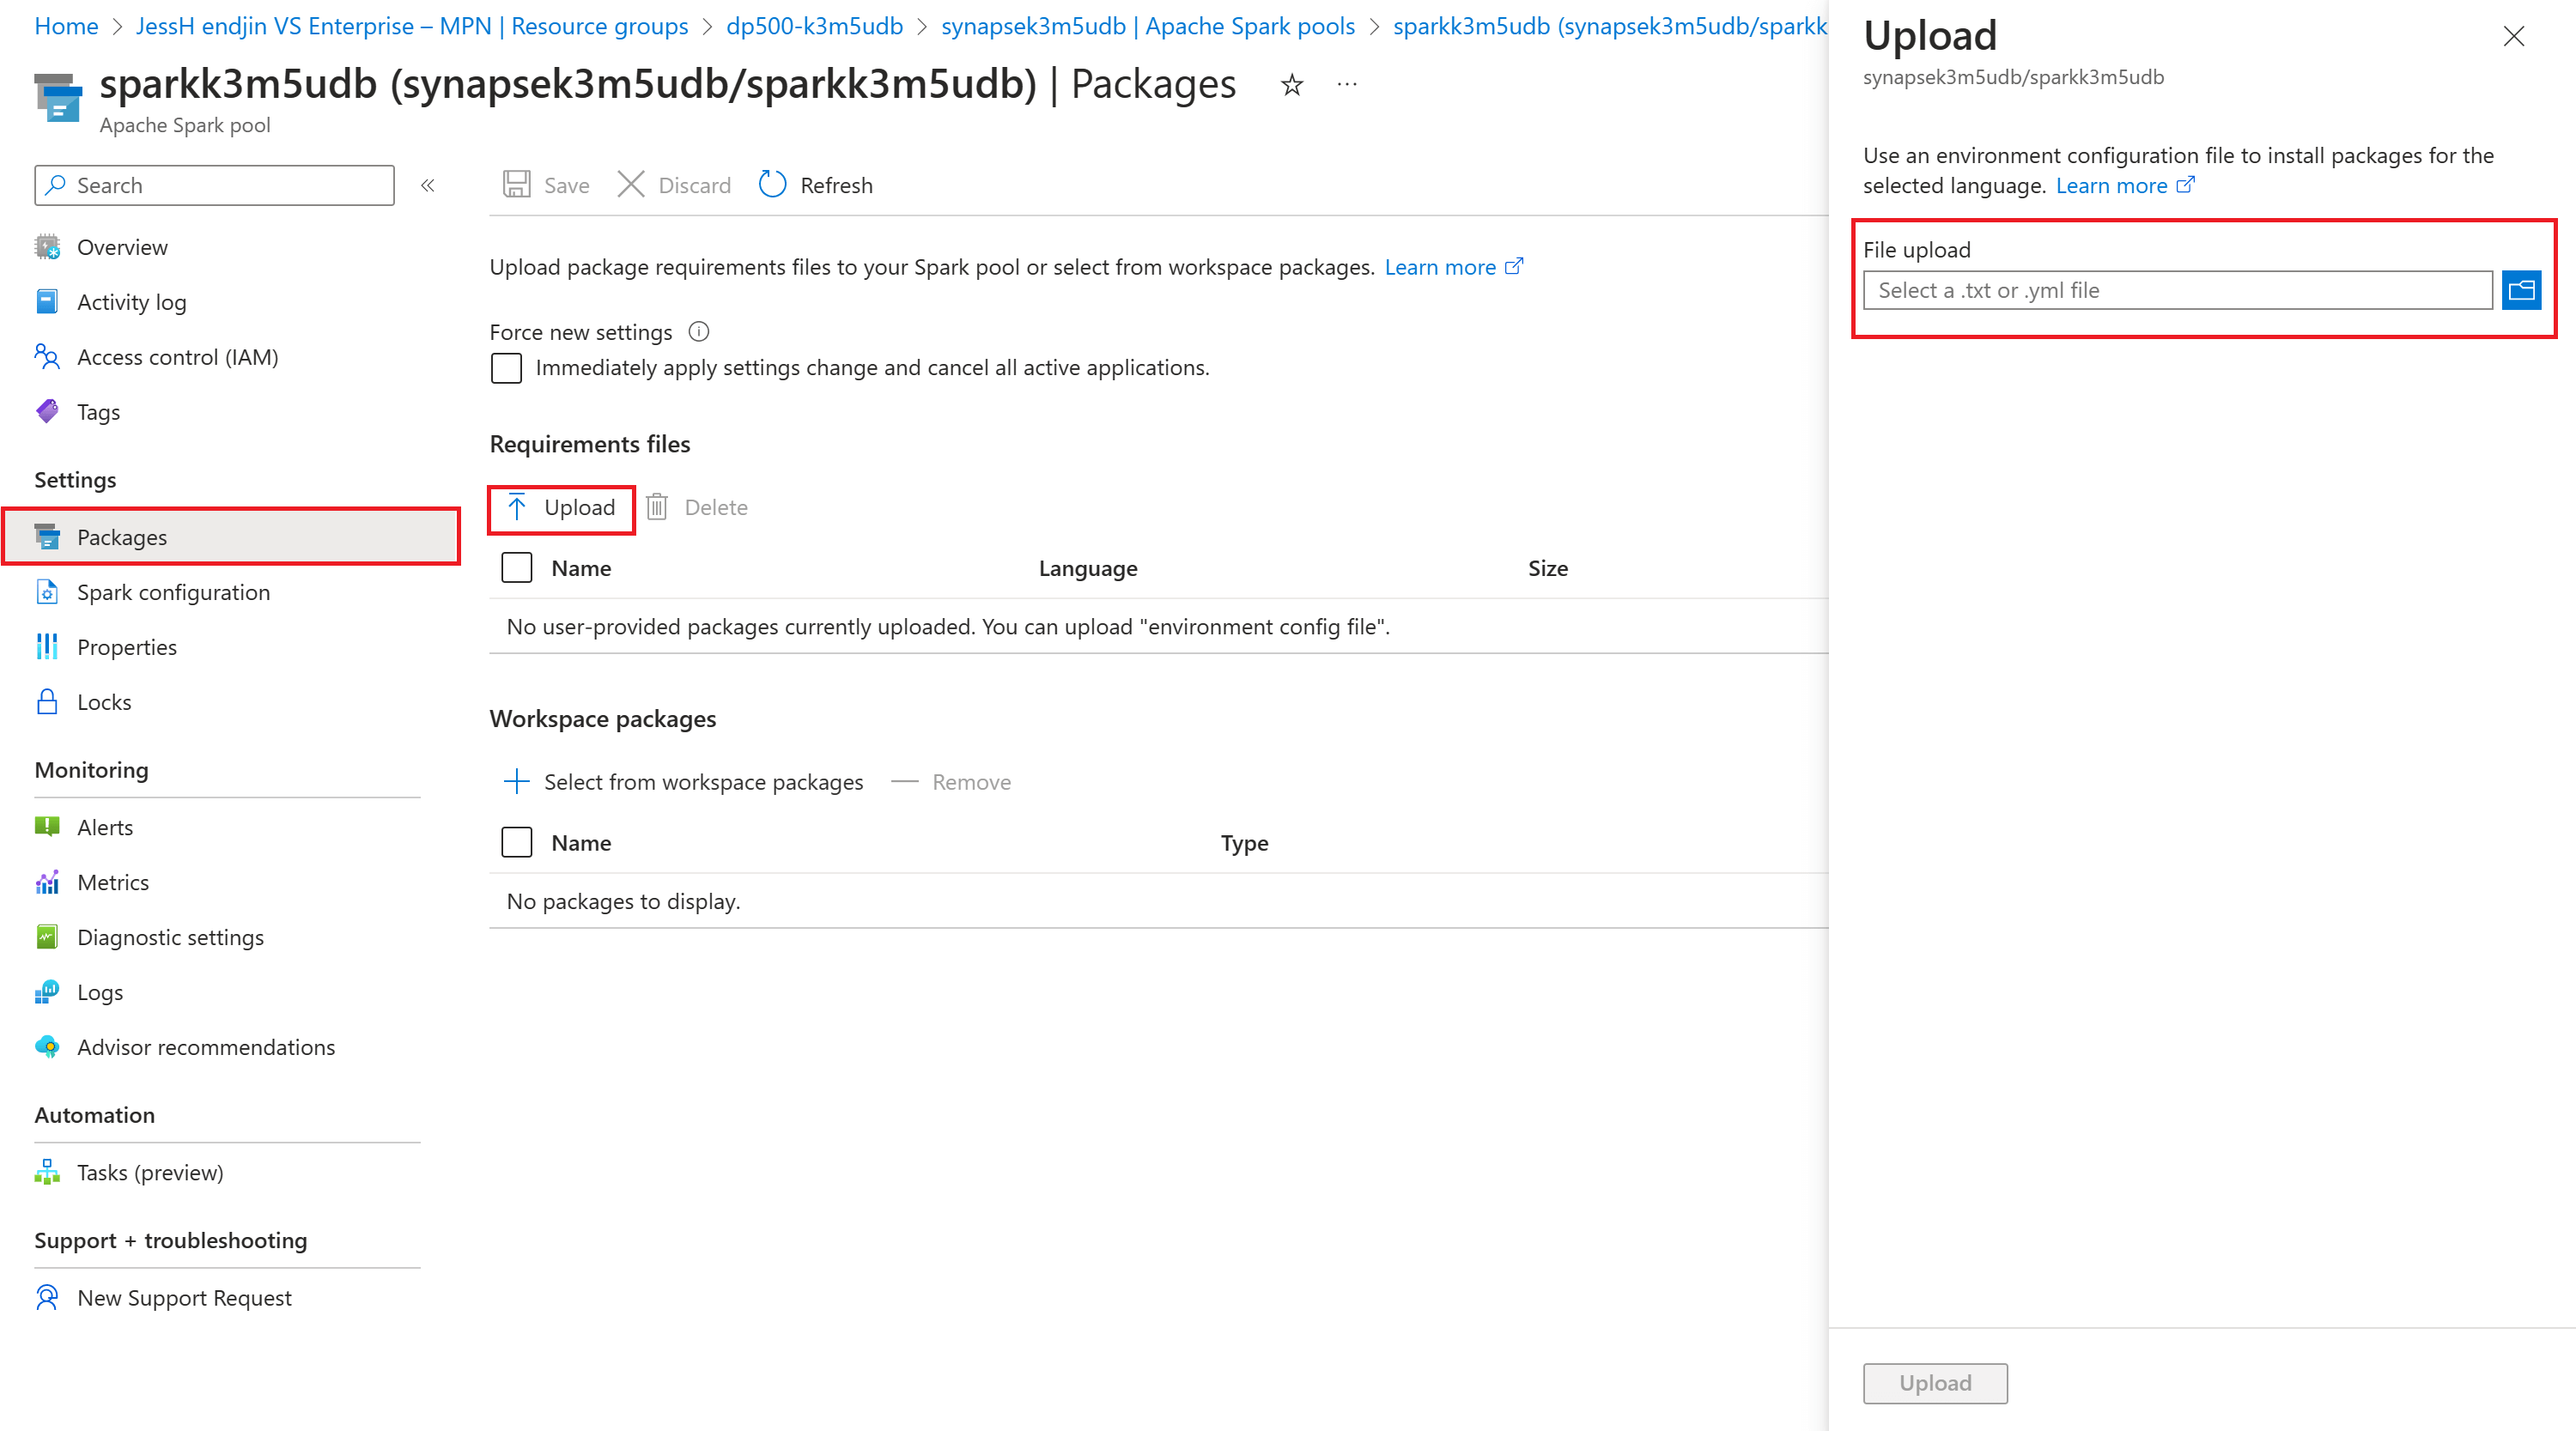
You can also add additional libraries and different versions of libraries onto the Spark Pool that your notebook can call by using the Azure Synapse Analytics library management capabilities. When the required libraries exist within a repository such as Conda the process is straightforward. You can simply add a file (a requirements.txt file or an environment.yml file) that specifies the package names and the versions to install. To do this, in Azure Synapse Studio, browse to a specific Spark Pool and select 'Packages'. Here, you can upload the file from the 'Requirements' files section. The package will be installed the next time a session starts up. You can also automate the library management process through Azure PowerShell cmdlets and REST APIs for Azure Synapse Analytics.
Version Control
Synapse Notebooks do not support real-time co-authoring or automated version control. A Synapse Notebook does not allow for pair programming - one person has to save the notebook before another person can open the notebook and edit/observe the changes. However, Synapse Studio does allow you to associate your Synapse workspace with Azure DevOps or GitHub. This allows you to take advantage of Git functionality such as creating/cloning repositories, managing branches and reviewing and committing changes.
A Synapse Studio workspace can be associated with only one Git repository at a time.
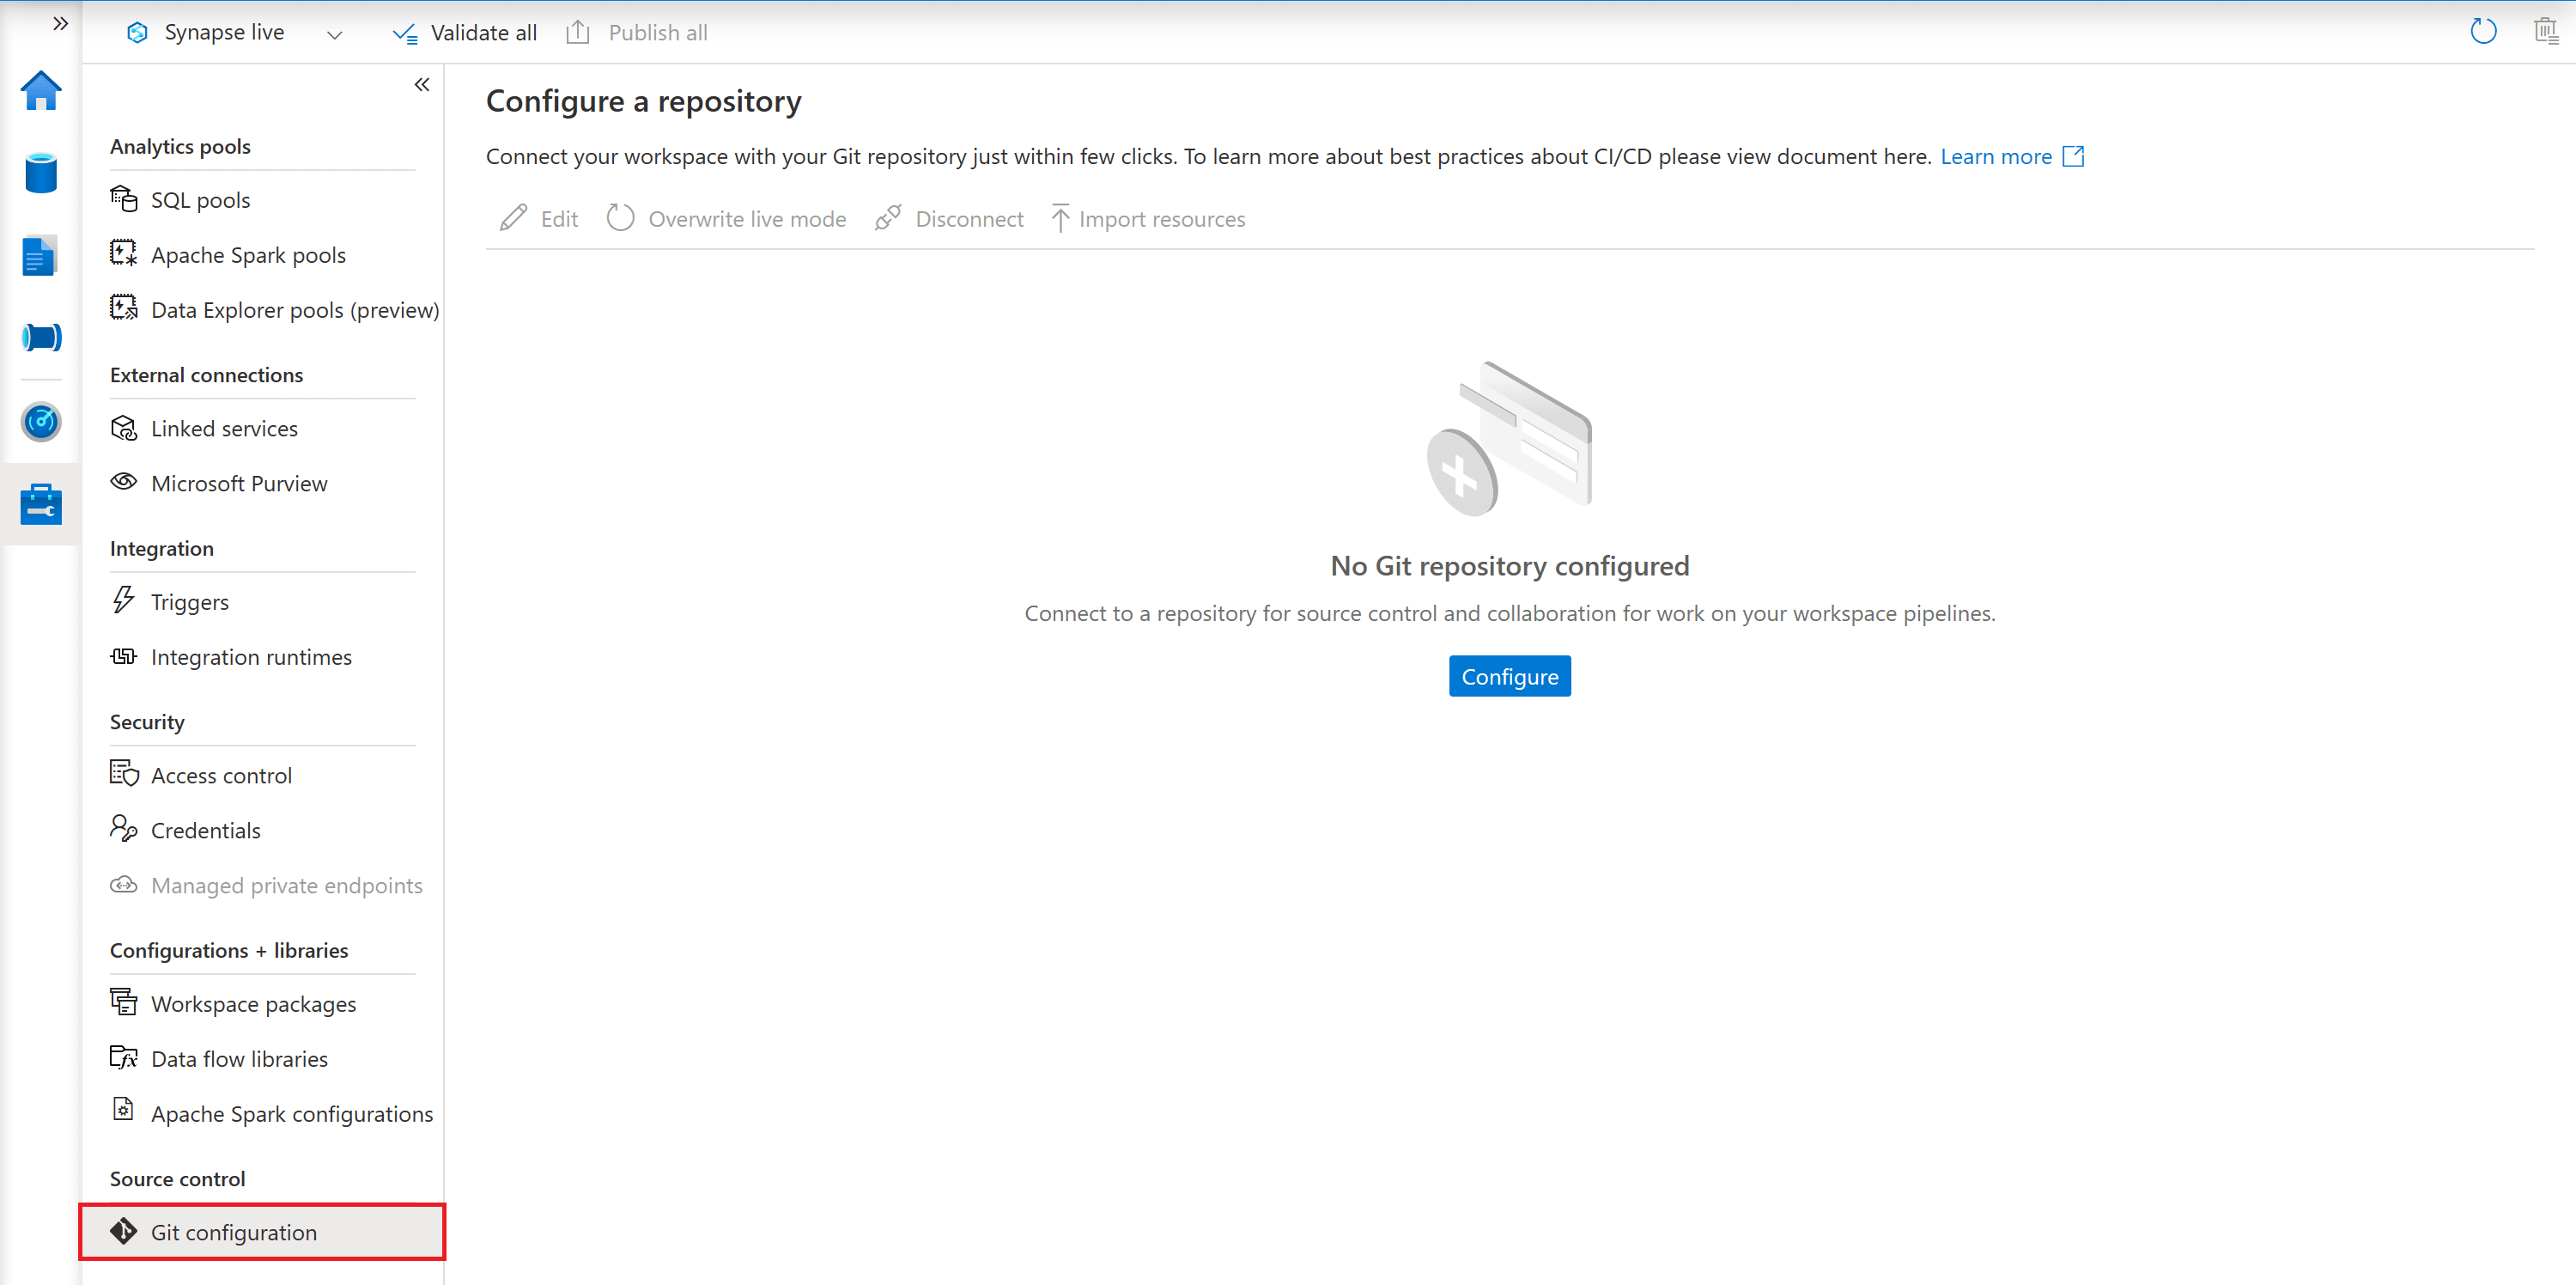
You can configure source control in your workspace by navigating to the 'Manage' tab of Synapse Studio and selecting 'Git configuration' in the 'Source control' section.
Pipeline Integration
In Azure Synapse Analytics, notebooks can easily be integrated with other tools used within the data science workflow. For example, a Synapse Notebook can be plugged into a Synapse Pipeline. There are two ways in which you can add a notebook to a Synapse Pipeline. You can drag and drop a Synapse Notebook Activity directly onto the Synapse Pipeline designer canvas. Or, from within a Synapse Notebook, you can select the 'Add to pipeline' button to either add the notebook to an existing pipeline or to a new pipeline.

Pass Parameters to Synapse Notebooks
You can pass parameters to a Synapse Notebook from a Synapse Pipeline. To do this, you first need to parameterise your notebook by designating a parameters cell. A parameter cell allows you to pass values into your notebook. To turn a cell into a parameters cell you will need to access the more commands on the cell toolbar (…) and select the 'Toggle parameter cell' option.

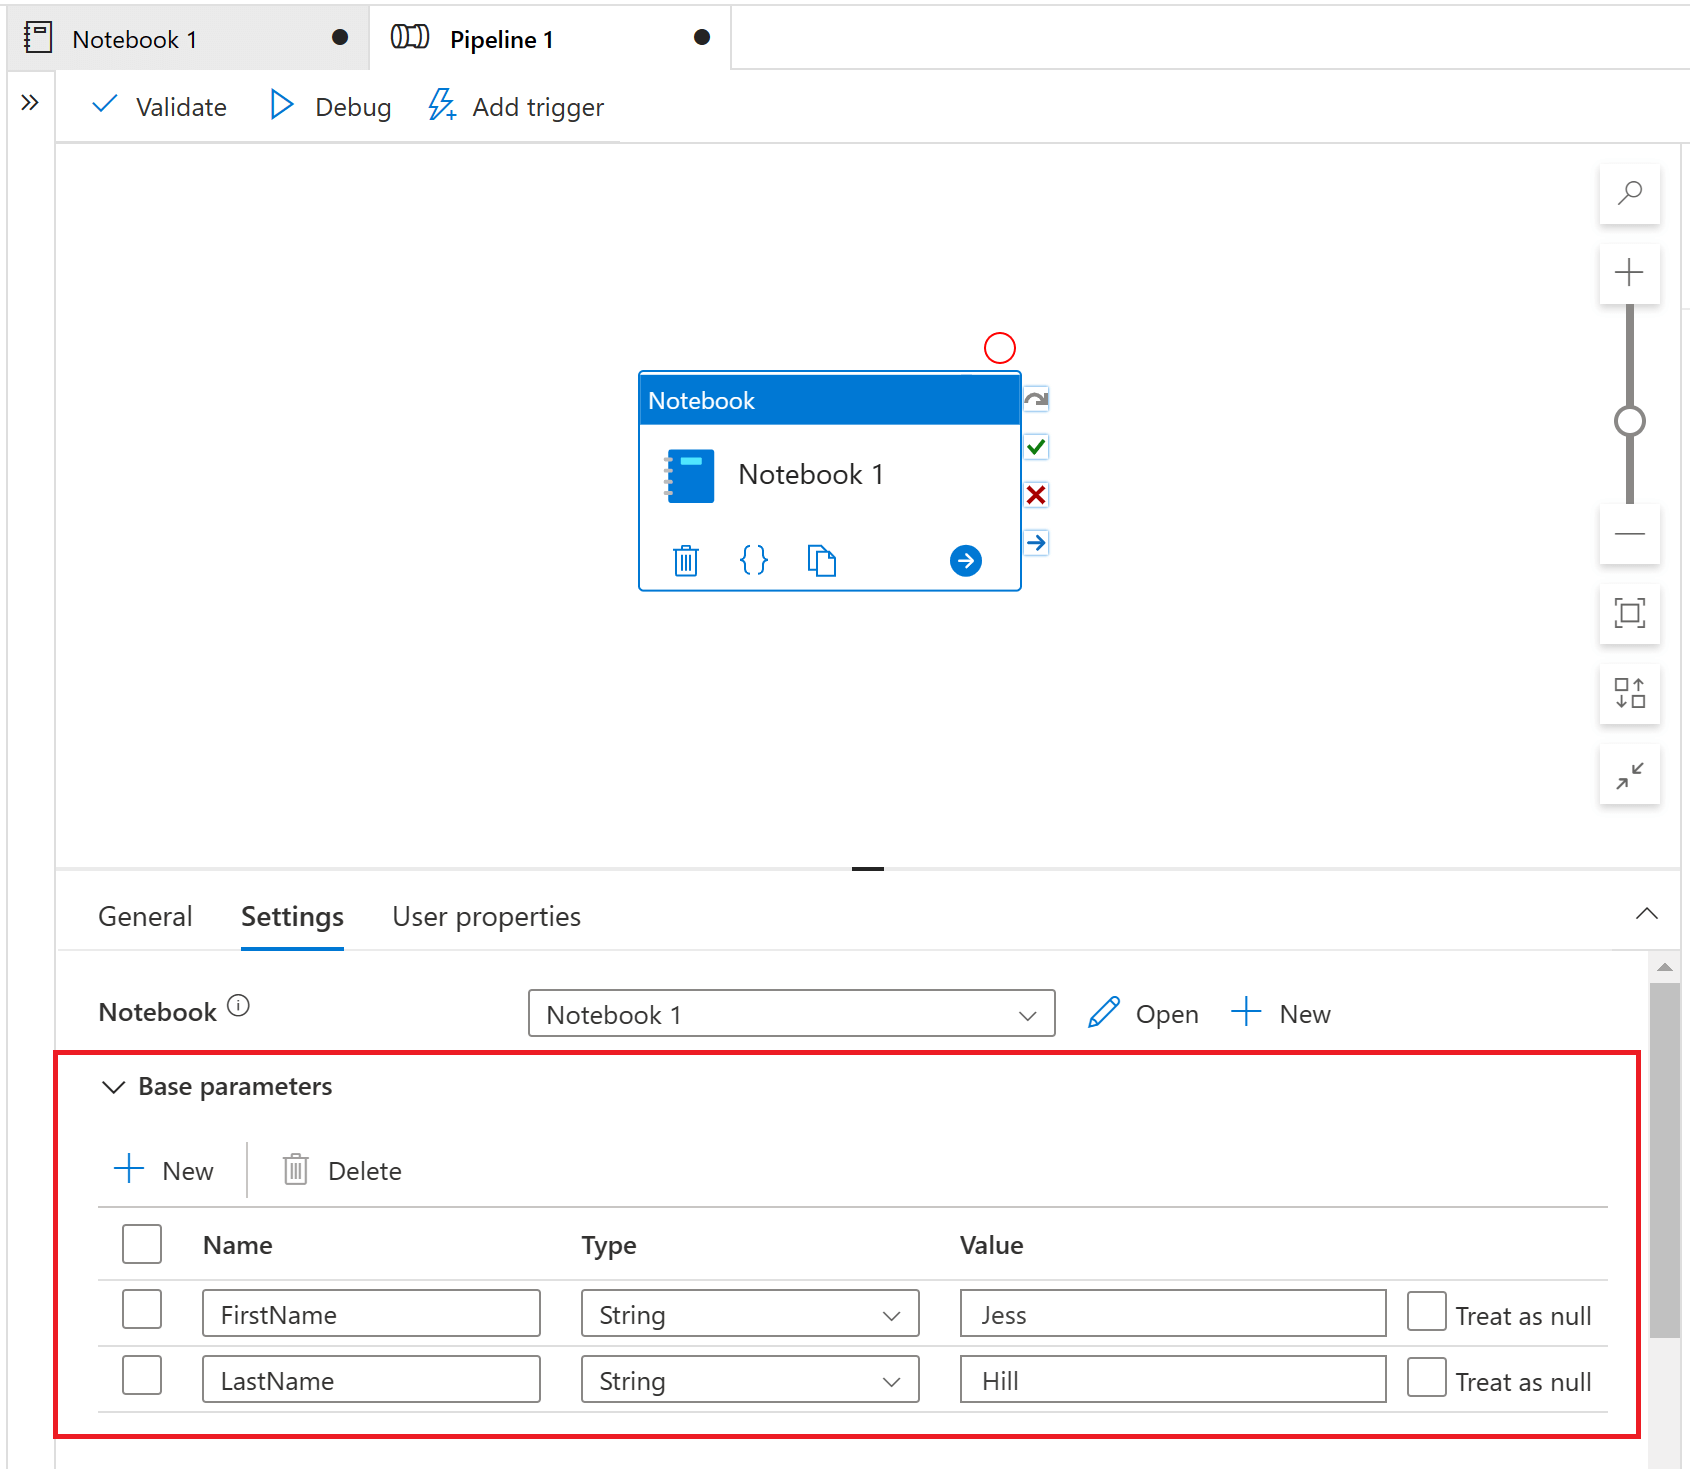
To supply values to notebook parameters from a pipeline, you will need to add the Synapse Notebook Activity to your pipeline canvas and then set the parameter values under the 'Base parameters' section on the 'Settings' tab. Once you have selected a notebook here, the required parameters are not automatically imported. You have to manually specify the parameters, so it is important to ensure that the parameter names you add match the parameters you have declared in your notebook.
Testing Synapse Notebooks
When Synapse Notebooks are integrated into a Synapse Pipeline, they form a part of a repeatable automated process that a business can rely on. Here, there is a need for quality assurance in order to avoid inaccuracies in the data going unnoticed. This is where testing comes into play. Synapse Notebooks can be easily tested thanks to their natural modularisation through their code cells. The key to testing Synapse Notebooks is to treat each cell as a logical step in the end-to-end process, wrapping the code in each cell in a function so that it can be tested.
In his talk and blog post, James Broome walks through how to test Synapse Notebooks.
Pros and Cons of Synapse Notebooks
One of the primary selling factors of Synapse Notebooks are their integration with the rest of the Azure platform. Synapse Notebooks can be seamlessly integrated into a Synapse Pipeline with a click of a button, quickly forming a part of a repeatable automated process a business can rely on. In Azure Synapse Analytics all of the core services that you need are together in one unified environment. This simplicity enables faster insight discovery.
Another selling point of Synapse Notebooks is their native support for .NET for Spark (C#). If you have a lot of .NET developers in house, you can leverage these skills and quickly get up and running with Synapse Notebooks. Similarly, if you already have a number of .NET libraries you can easily install these libraries onto the Spark Pool. This baked in support for .NET means there is a lower barrier to entry to using Synapse Notebooks - again allowing for faster insight discovery.
The main disadvantage of Synapse Notebooks is that they do not support real-time co-authoring or automated version control. However, the ability to collaborate by associating your Synapse workspace with a remote Git repository may mitigate this factor.
Conclusion
This blog post has explored the key features of the integrated notebook experience in Azure Synapse Analytics and has demonstrated how quickly and easily you can get set up with Synapse Notebooks to start exploring and generating insights from your data.

