Introduction to Containers and Docker


As part of my training programme as an apprentice engineer here at endjin, over the course of a few weeks, I spent some time exploring containers and the containerisation platform Docker. The words Docker, containers, and Kubernetes frequently came up in my casual readings of blogs and twitter threads before joining endjin; although I didn't have any knowledge of them then, it was clear these things were pretty important and so I was eager to begin exploring after joining endjin. This post is an introduction to containers and Docker, and I have written it for a version of myself in the past – when I first starting digging into this material.
What are containers?
Containers provide a way of creating an isolated environment, sometimes called a sandbox, in which applications and their dependencies can live.
Why are containers useful?

Portability – the isolated environment that containers provide effectively means the container is decoupled from the environment in which they run. Basically, they don't care much about the environment in which they run, which means they can be run in many different environments with different operating systems and hardware platforms.
Consistency – since the containers are decoupled from the environment in which they run, you can be sure that they operate the same, regardless of where they are deployed. The isolated environment that they provide is the same across different deployment environments.
Speed to deploy – for the same reasons as above. There is no need for considerations around how the application will operate in a production environment. If it runs in a container in one environment (say, your local machine), then it can be made to run in a container in another environment (say, in a cloud provider) very quickly
Containers vs Virtual Machines
Virtual Machines
A virtual machine (VM) is another way of creating an isolated environment. A VM is effectively an individual computer that lives inside a host machine; multiple VMs can live inside a single host machine. VMs are created by virtualising the host machine's underlying hardware (processing, memory and disk). The hardware is virtualised and split up, with a piece representing a portion of the underlying physical hardware, which a VM can be run on.

As you can see in the figure above, the thing that sits between the VMs and the host is the hypervisor layer. The hypervisor is a piece of software that virtualises the host's hardware and acts as the broker: managing the virtualised hardware and feeding resources to the VMs.
This virtualisation process brings with it substantial computational overhead. Furthermore, since each VM is basically its own machine, they have their own OS installed, which typically require tens of gigabytes of storage, and which therefore takes time to install, which has to be done every time you want to spin up a new VM.
Containers
Containers take a different approach to producing isolation: like VMs, containers live on top of a host machine and use its resources, however, instead of virtualising the underlying hardware, they virtualise the host OS. Meaning containers don't need to have their own OS, making them much more lightweight than VMs, and consequently quicker to spin up.

The parallel to the hypervisor layer with containers is the Docker daemon (assuming you're using Docker), it acts as the broker between the host OS and containers. It comes with less computational overhead than hypervisor software (as depicted by the thinner box in the figure above), again making containers more lightweight compared to VMs.
VMs suffer from duplication: many of the capabilities and features of the guest OS(s) are found in the host OS, so why not just use the host OS? This is what containers aim to do, whilst still providing isolation and decoupling from software in the host machine. With containers, only the things that the app absolutely needs are copied into the container, as opposed to VMs were the whole OS is installed – even the things from the OS that aren't used by the app.
What containerisation is actually doing under the covers is some clever misdirection whereby a container only gets to see a virtual view of the host OS; a view that only contains the things that have been prescribed for the container – certain things in the file system, for example.
Docker
Docker is a containerisation platform – it is a toolkit that allows you to build, deploy and manage containerised applications. There are alternative containerisation platforms, such as podman, however, Docker is the leading player in this space. Docker is an open source platform, free to download. There is also Docker Inc, the company that sells the commercial version of Docker. Docker comes with a command line interface (CLI), using which you can do all of the operations that the platform provides.
Docker terminology
- Images: The blueprints of our application which form the basis of containers. These contain all of the configuration settings that define the isolated environment.
- Containers: Are instances of a Docker image and are what run the actual application.
- Docker Daemon: That background service running on the host that listens to API calls (via the Docker client), manages images and building, running and distributing containers. The Deamon is the process that runs in the operating system which the client talks to – playing the role of the broker.
- Docker Client: The command line tool that allows the user to interact with the daemon. There are other forms of clients too.
- Docker Hub: A registry of Docker images containing all available Docker images. A user can have their own registry, from which they can pull images.
Docker image terminology
Base and child images
- Base images are images that have no parent image – they don't build on or derive from another image, usually images that represent an operating system (e.g. Ubuntu, busybox).
- Child images are images that build on base images and add additional functionality, most images you're likely to make will be child images.
Official and user images – these can both be base and child images
Official images are images that are officially maintained and supported by the people at Docker. These are typically one word long. Examples include python, ubuntu, and hello-world.
User images are images created and shared by people who use Docker. They usually build on base images and add functionality. Typically these are formatted as user/image-name.
Example: creating an image and building a container – hello world
Creating an image
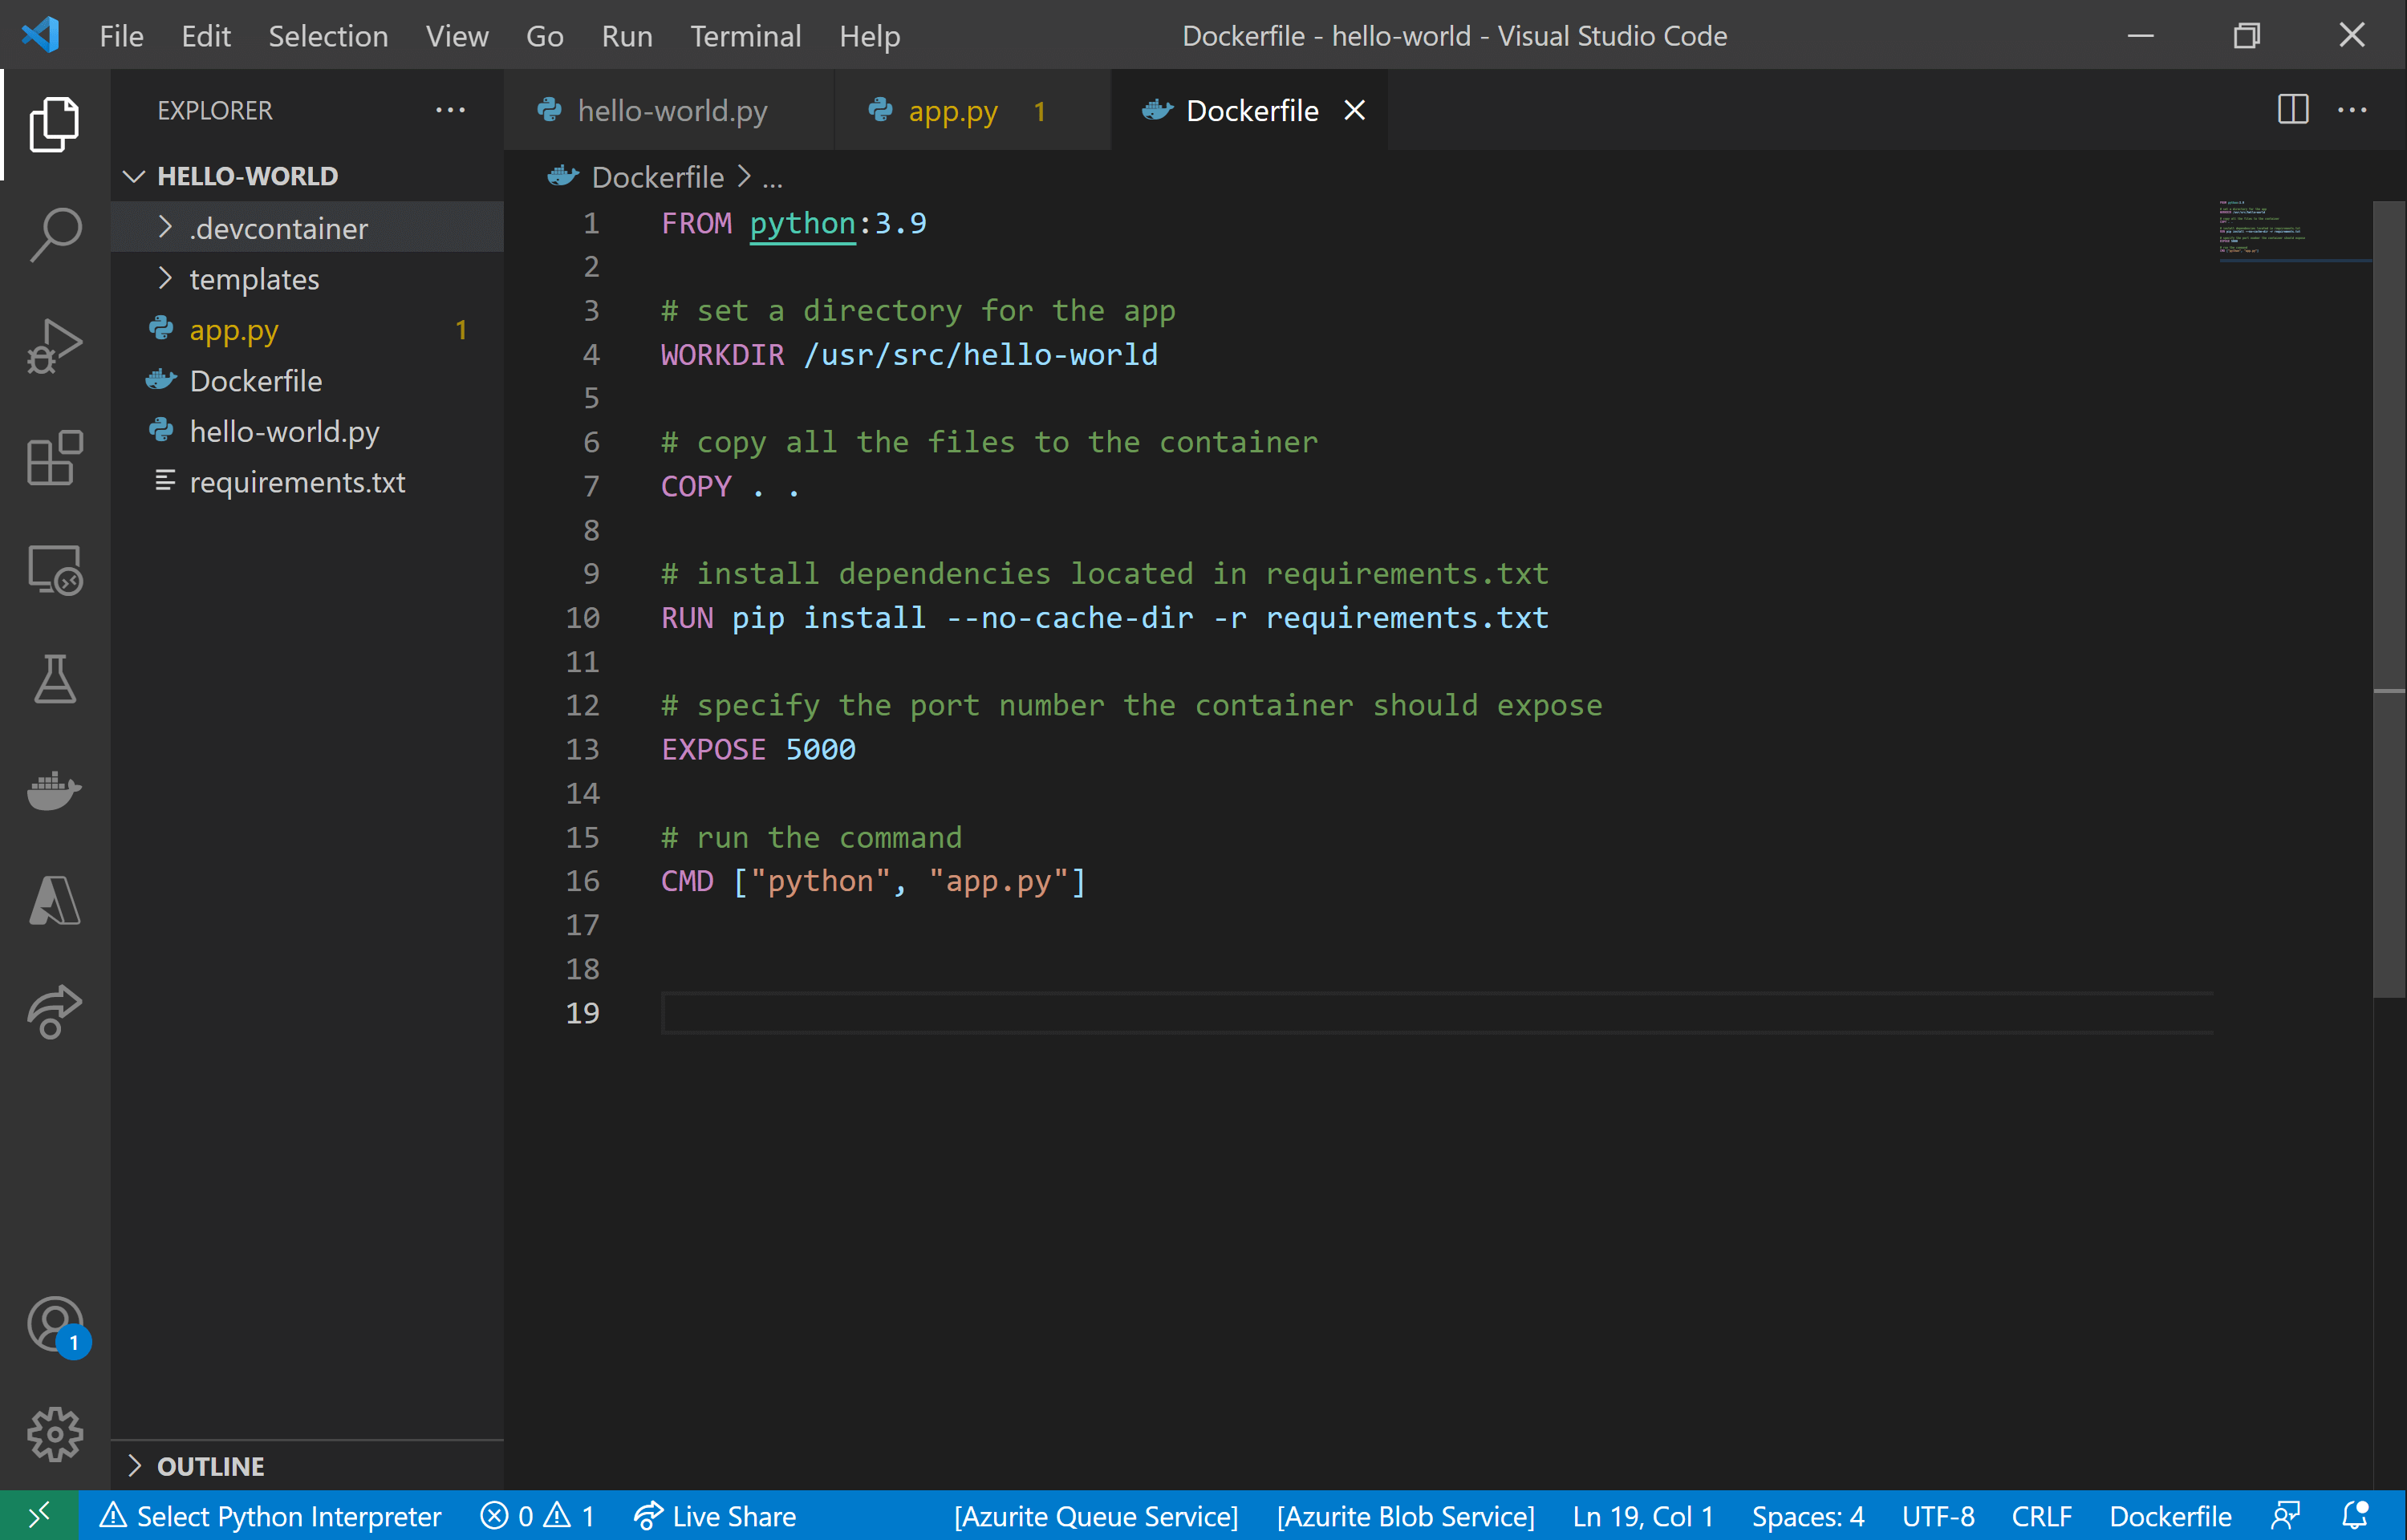
I have created a python script that simply prints “Hello world” when ran. In order to run this app inside a Docker container, I need to first create a Dockerfile. A Dockerfile is a text file that contains the instructions for how to create an image, from which a container can be built – a container is an instance of an image. Remember, an image is like a blueprint, the Dockerfile defines that blueprint. I have created a Dockerfile in the same directory as where my hello-world.py file lives, you can see it in the figure below.
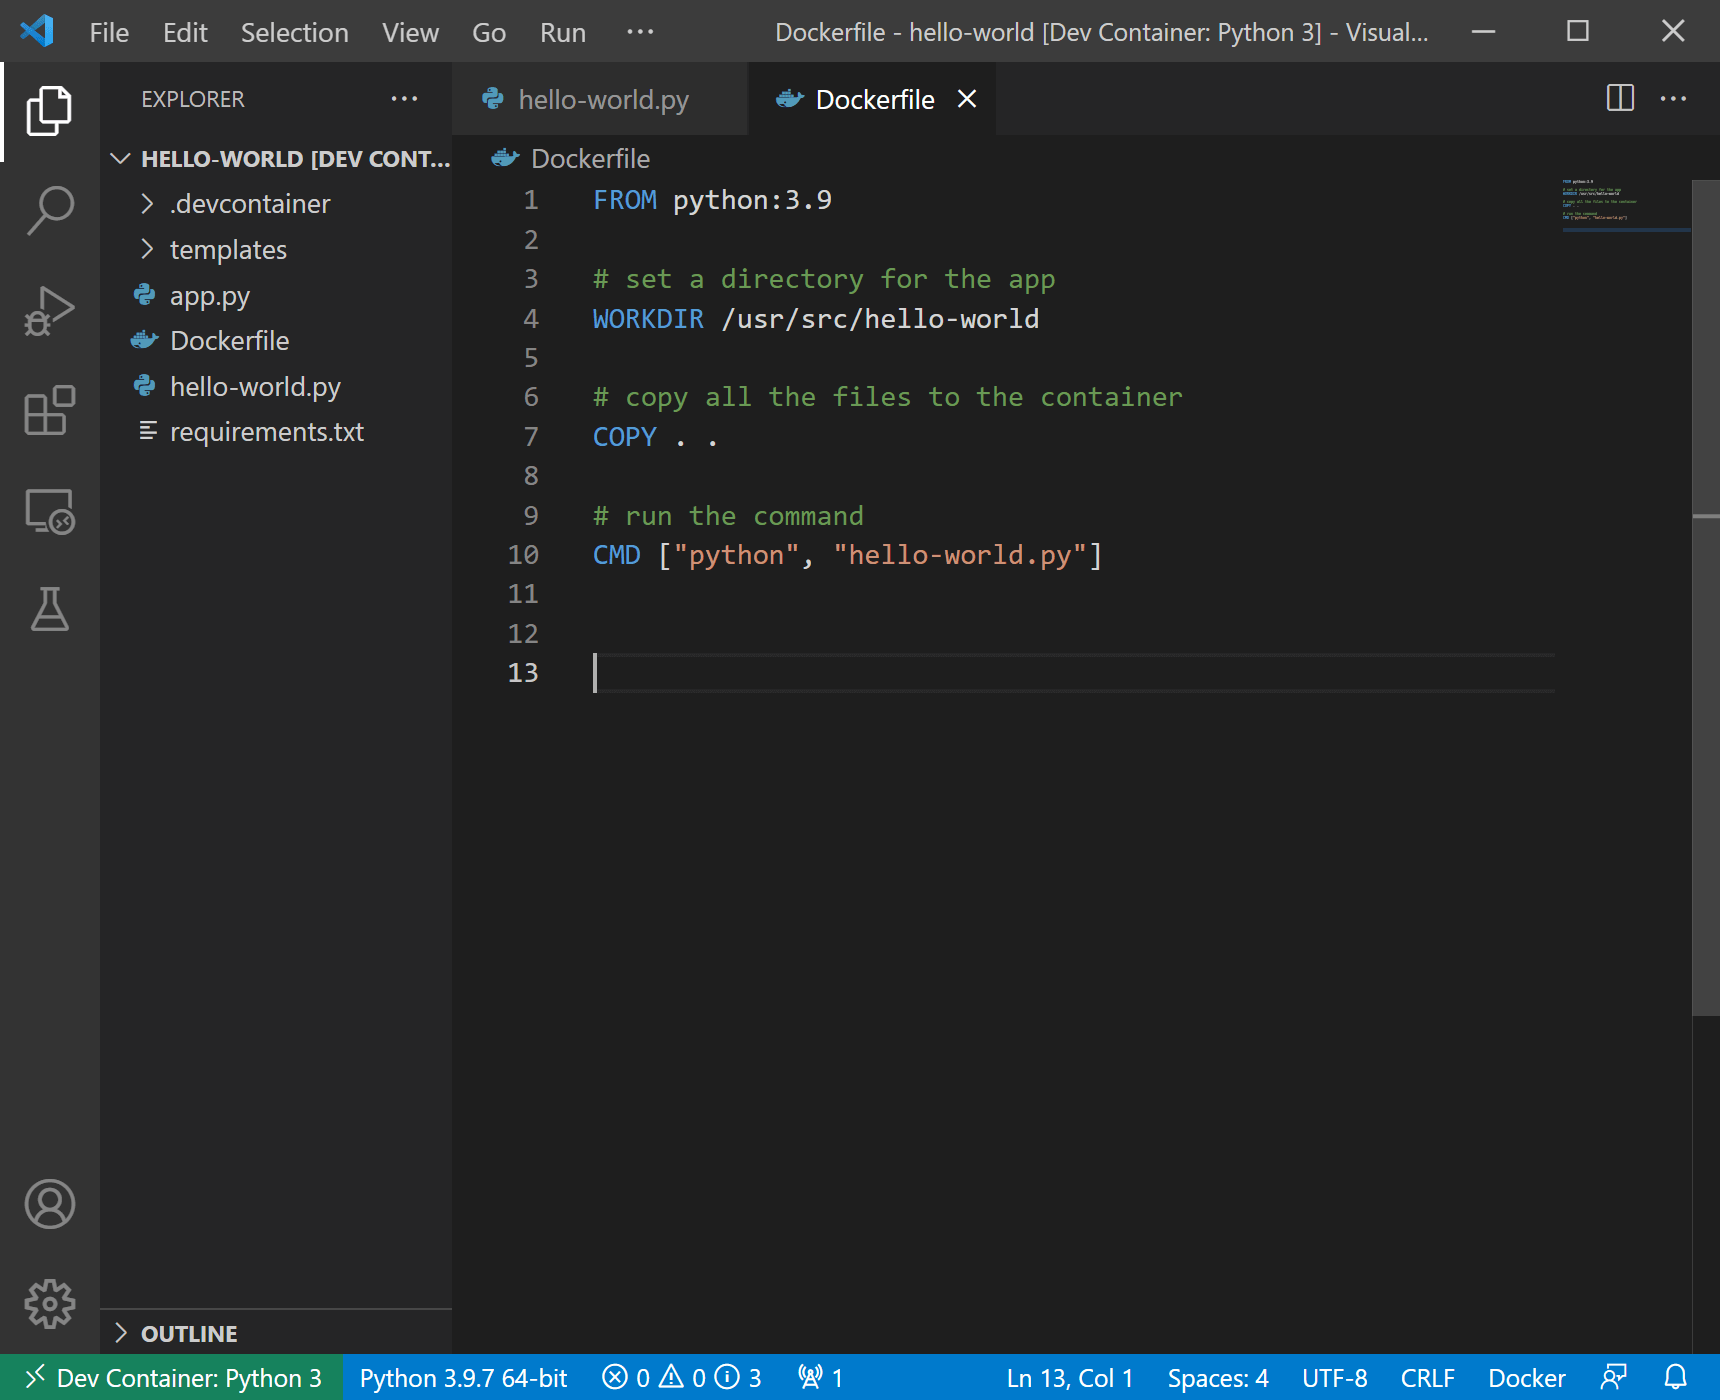
Now, let's run through what each of those commands in the Dockerfile mean.
FROM
Use the FROM command to specify the base image that you want your image to derive from. Here, we're using the Python version 3.9 base image as our app is running in Python.
WORKDIR
Sets the current working directory inside the container. Like a cd in Linux. Any subsequent commands in the Dockerfile will happen inside this directory.
COPY
The COPY instruction has the following format: COPY <source> <dest>. It copies files from <source> (in the host) into <dest> (in the container). So the above copy instruction is copying all files from the current working directory on my local machine to the current working directory in the container.
CMD
This is the command instruction, it specifies what to run when the container is created. Here we're telling Docker to tell Python to run our hello-world.py app.
Now that we have the Dockerfile we can build an image from it. Do this using the docker build command, which takes a directory and optional -t, which allows you to add a tag to the image name.
docker build -t lgmooney98/hello-world:v1 .
The convention for naming Docker images is to use your Docker username followed by a name, and the tag is usually used to specify the version of the image.
docker build -t username/image-name:tag directory
So, the above command is telling Docker to look in the current directory for the Dockerfile and build the image from it.
If you don't already have the python 3.9 image, the build might take a few minutes as Docker has to pull that image from the Docker registry.
We can check that our image has been created by using the docker images command, which lists all images available locally.

Building the container
The next thing to do is run the image, which creates an instance of the image – i.e. builds a container from the image. This is done with the docker run command.
docker run lgmooney98/hello-world

Since we instructed in the Dockerfile for hello-world.py to be run, we expect "Hello world" will be printed in the command prompt when this container is created. Notice if you do this that the container closes after it has done its thing; containers are ephemeral, they run as long as the command inside the container takes to complete, then close.
We can change this behaviour by telling Docker to run the container interactively, this is done with the -i flag. You also need the -t flag to create a pseudo terminal, without it you won't be able to issue commands in the terminal inside the container. You can also specify a shell at the end of the command, such as bash.
docker run -it lgmooney98/hello-world bash

From in here I can write regular Linux commands, such as running our hello-world python script.

Use the docker stop command to stop a running container, you need to provide the container ID – the first few characters should suffice, Docker just needs to be able to distinguish it from the others.
docker stop a2c9
Running a website in a container locally
To show something slightly more interesting, I have created a basic web app using flask, it shows “Hello world” in a web page, which changes colour upon refreshing the page. To get this running in a container, it's the same process as with the hello world example above, only now we need to change the Dockerfile.
First we need change the CMD command to make Docker tell Python to run app.py, instead of hello-world.py. Secondly, we need to tell Docker to expose a port in the container in order for us to be able to connect to the web page being run inside the container later on – this is done with the EXPOSE command. I have exposed port 5000 on the container here as that is the port that the flask app is set to run on. And finally, since we're using the flask package to build the app, we need to install that package. This can be done with the RUN command, which runs whatever you tell it inside a shell in the container when the container is being built; it's similar to CMD, except there can only be one CMD command. Here, we're telling Docker to use the package manager pip to install everything in requirements.txt, which contains flask.
We have a different Dockerfile now, and so we need to build a new image from it. Once the image is built, we can create a container from it using the docker run command. However, this time we need to map the port running on the container (5000) to a port on the outside, which in this case is my local machine, so that when we try to connect to the external port using our browser, that port is connected internally to the port on the container; the container can then serve the web app to our browser. This is done using the -p flag; here, I'm mapping port 5000 on the inside to port 8888 on the outside.
docker run -p 8888:5000 lgmooney98/hello-world-app
Now, go to your browser and go to localhost:8888, you should get the hello world web page.

I have enjoyed learning about and experimenting with containers and Docker these past few weeks. Particularly, I'm impressed by how quick and easy it is to get something running inside a container using Docker, which, as I mentioned, is one of the major benefits of using containers. Topics that I haven't explored in this post, that I think would be interesting: running a containerised app in a public cloud provider, such as Azure, and how this process compares with running it in a VM in the cloud; investigating the security differences between containers and VMs; and exploring further how containerisation works under the covers.