How to create a Power BI workspace in an Azure DevOps Pipeline using Powershell


As part of a recent project, we needed to automate the creation of a Power BI workspace.
This workspace was part of a bigger deployment that provisioned Azure resources (including a Power BI Embedded capacity), and was orchestrated via an Azure DevOps Pipeline.
Whilst there's a tonne of useful information out there, there was no complete guide to what we were trying to achieve, so this post clearly breaks down the end to end steps, highlighting the gotchas and decision points along the way...
Before you begin
You are going to need the following:
- Permissions to change organisational/tenant level Power BI settings
- Permissions to create and manage Azure Active Directory users & groups
- Permissions to create and manage Azure DevOps Pipelines

1. Create (or reuse) a service principal for automation
As we wanted our Power BI deployment to be fully automated, we wanted to run everything using a service principal account so we didn't have to sign in as a user. As we were already using Azure DevOps to automate our Azure resources deployment, it made sense to use the same account to automate our Power BI service as well.
In our case, the service connection between Azure DevOps and our Azure subscription was already in place, meaning we had an existing service principal in our Azure Active Directory, but if you're starting from scratch you'll need to set this up first.
It's worth noting that you don't have to use the same service principal that's running your Azure deployment - there may be valid reasons why you want to separate out your Azure service principal from your Power BI service principal.
Equally, you may be only concerned with deploying Power BI workspaces and not have, or need, a service connection into Azure from Azure DevOps. But the point is, you need a service principal - either an existing one, or a new one - to run your Power BI automation and for us, it made sense to use the same deployment account.
2. Create an application secret for the service principal
In order to connect to Power BI with the service principal we need the application ID and an authentication key associated with the account. This article provides instructions of how to retrieve the application ID and how to create a new key for Power BI automation. N.B. As the article states, once the key is created, you need to make sure that you copy the value as we're going to need it later on.
3. Create (or reuse) a security group for the security principal
Power BI requires the service principal to be part of an Azure Active Directory security group in order to grant access for automation. You can obviously re-use any group that already exists, but we chose to create a new security group called PowerBI_ServicePrincipals for this purpose.
As we move through different deployment environments (i.e. Azure subscriptions) we knew we'd end up with multiple service principals that would need access to deploy Power BI resources, so it made sense to create a dedicated group for this purpose.
Once the group is created, you'll need to add your service principal as a member of the group in the usual way, either by using the application ID, or the name of the account.
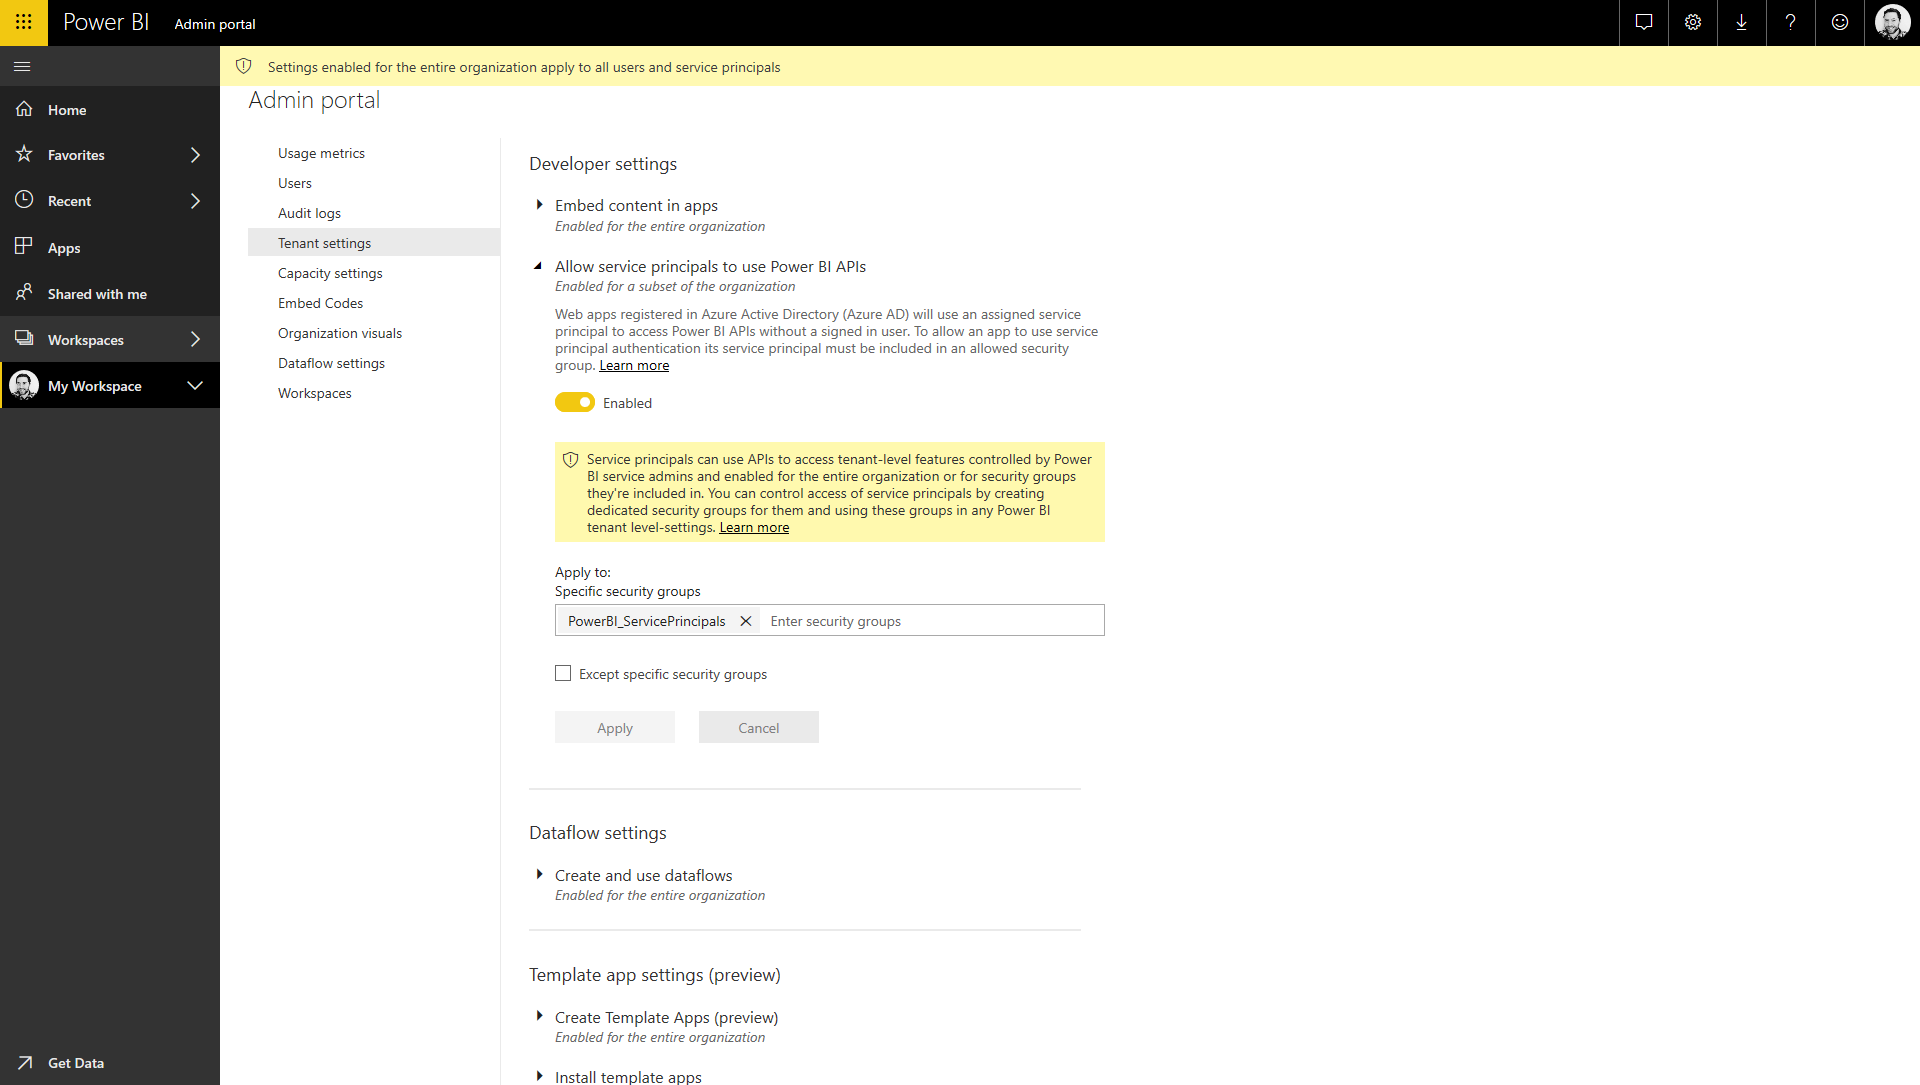
4. Enable service principal based authentication
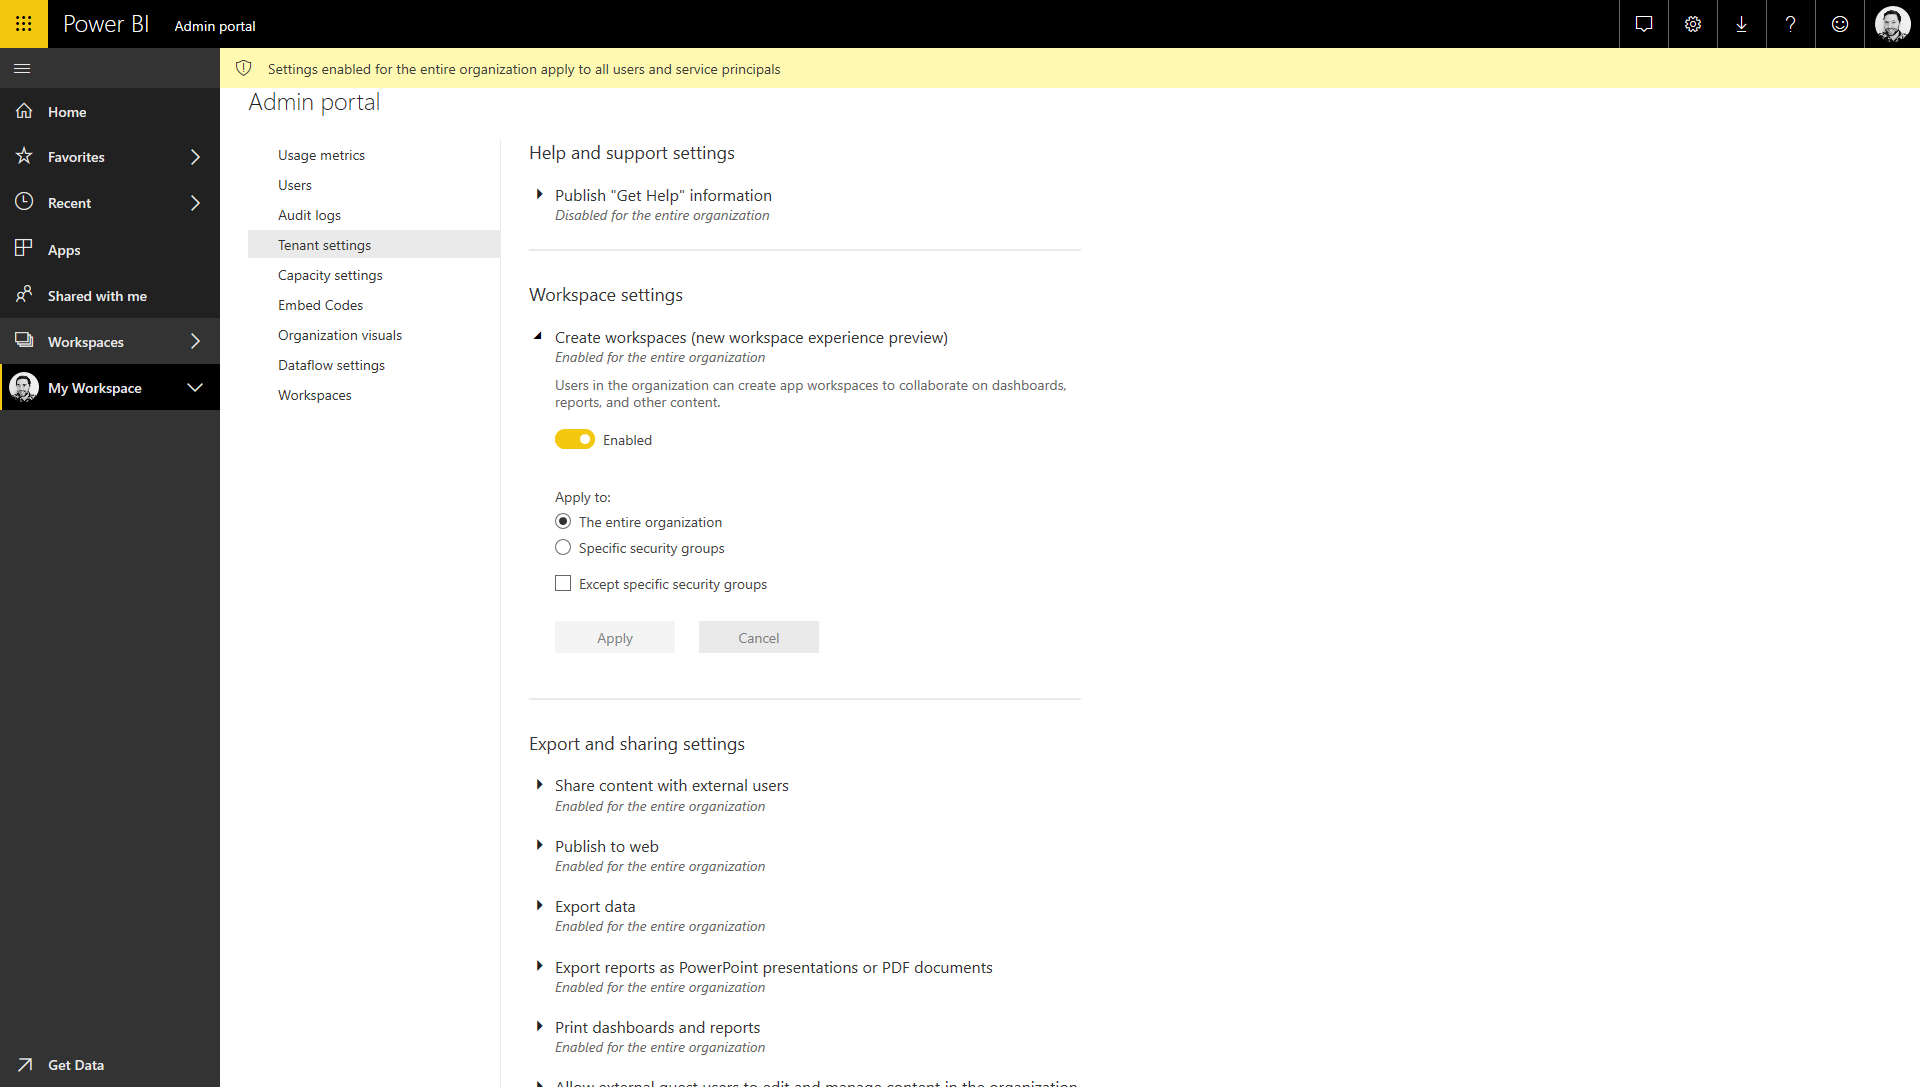
The ability to authenticate and manage Power BI resources with a service principal account is a relatively new feature, and it isn't enabled by default. In order to enable it, you'll need admin permissions in your Power BI tenant. Once you've logged into Power BI online, you can access the Admin Portal under the settings cog icon in the top menu bar.
If you have the right permissions, you'll see the Tenant Settings menu option, under which is an option titled "Allow service principals to use Power BI APIs". Firstly, you need to flick the switch to Enabled, and then you need to set the "Apply to: specific security groups" setting to the Azure Active Directory group you created or used in step 3.
This text box uses autocomplete so you should be able to find the group pretty easily as you start to type the name. You also have the option to exclude specific groups should you need to refine this access further, but this will depend on how you structure your group hierarchy. Make sure you click Apply to apply the changes.
5. Grant permissions to the security group
At this point, we've enabled service principal authentication, and controlled it via a specific security group. However, this group needs permission to actually create workspaces in Power BI, which isn't granted by default.
In the same Tenant Settings view of the Power BI Admin Portal, there's another option titled "Create workspaces (new workspace experience preview)". Once again, you'll need to flick the switch to Enabled and then decide how you want to apply this permission.
The simplest option is to use the "Apply to: The entire organisation" setting, but for most production scenarios you'll want to control this access a little more tightly. Again, it depends on how you structure your group hierarchy, but you have the option to include specific groups (e.g. the security group that the service principal is part of) and also exclude groups, so you should have the level of control that you need. Make sure you click Apply to apply the changes.
6. A recap...
At this point we have all the bits in place to allow us to programmatically manage Power BI resources. We've enabled this feature in Power BI and granted permission to a single security group (or wider set of groups) to create workspaces. We have a service principal account that belongs to one of these groups, and we have the application ID and authentication key for the service principal in order to authenticate against the service.
7. Installing the Power BI Powershell modules
Our bigger deployment pipeline was going to be orchestrated via Powershell, and we were going to use the Azure Powershell task in our Azure DevOps Pipeline to trigger the process of deploying our Azure resources (using Azure Resource Manager templates), and then create the new Power BI workspace.
We already had a Powershell script in place, but if you're starting from scratch you'd need to create a new one. Microsoft provide Powershell cmdlets for interacting with Power BI, which are broken down into the various types of resources that you want to manage - workspaces, datasets, profiles, reports.
You can install each individual module separately from the Powershell Gallery, or just install the wrapper module MicrosoftPowerBIMgmt that installs all of the sub-modules. Our script only uses cmdlets from the MicrosoftPowerBIMgmt.Profile module so this is the only one we need to install.
$moduleName = "MicrosoftPowerBIMgmt.Profile"
$module = Get-Module $moduleName -ListAvailable -ErrorAction SilentlyContinue

if (!$module)
{
	Install-Module -Name $moduleName -Force -Scope CurrentUser -SkipPublisherCheck
}
8. Connecting to Power BI with the service principal
Now that the necessary module is installed, we can make the connection with the service principal that we were using earlier. You'll need both the application ID and the authentication key from step 2 to make the connection.
For now you can just store these in variables in the script, but we'll replace them later when we add the script to an Azure DevOps Pipeline.
$DeploymentPrincipalAppId = "Application ID of deployment principal"
$DeploymentPrincipalAppSecret = "Authentication key for the deployment principal"
$TenantId = "Azure Active Directory tenant ID"

$credentials = New-Object System.Management.Automation.PSCredential ($DeploymentPrincipalAppId, (convertto-securestring $DeploymentPrincipalAppSecret -asplaintext -force))

Connect-PowerBIServiceAccount -ServicePrincipal -Credential $credentials -Tenant $TenantId
9. Creating the new Power BI Workspace
The MicrosoftPowerBIMgmt.Workspaces module contains the Get-PowerBIWorkspace and New-PowerBIWorkspace cmdlets which should be exactly what we needed to create new workspaces, however we ran into problems once we started adding other Azure related functions into our script. If you only care about automating Power BI in your script, then the easiest route would be to use these built-in functions.
However, as soon as you need to do anything that requires connecting to Azure (eg. by using the Login-AzureRmAccount cmdlet from AzureRM.profile, part of the Azure module), then you start running into issues with the Power BI cmdlets straight away.
The problem is caused by a mismatch in Newtonsoft.Json between the cmdlets loaded into the Powershell session. It's well documented here but at time of writing, there isn't any indication of if or when this might be fixed. A couple of workarounds are suggested - mainly switching to PowerShell Core - however, as we were only making use of two simple requests to the Power BI API, we decided to follow a different approach.
The MicrosoftPowerBIMgmt.Profile module contains a catch-all cmdlet for interacting with the Power BI API for anything that isn't supported in the other cmdlets (or, in our case, things that are, but aren't working as they should be).
The Invoke-PowerBIRestMethod cmdlet is half way between a cmdlet and querying the raw API directly, it's main benefit being that it handles the base URLs and authentication headers, whilst still allowing/requiring you to construct the specific URL/query/body yourself.
We decided it provided enough value for us to use it over constructing our own raw requests, and it solved the Newtonsoft.Json issues we were getting with the other out-the-box cmdlets.

Remember, our deployment pipeline contained a lot more than just the Power BI workspace and there's a high chance we'd want to re-deploy to an existing environment either to make infrastructure configuration changes or update application code, but Power BI will error if we try and create a workspace with a name that already exists.
So, we needed to perform a simple check for an existing workspace before we created a new one.
Checking for an existing workspace requires a query over the /groups API (N.B. "workspaces" are called "groups" in the REST API, even though they're called "workspaces" in the cmdlets). If we don't find anything then we can create a new group/workspace by POST-ing to the the same API.
$WorkspaceName = "Name of the new workspace"

$results = Invoke-PowerBIRestMethod -Url ('groups?$filter=name eq ''' + $WorkspaceName + '''') -Method GET | ConvertFrom-Json

if ($results.value)
{
	Write-Host "Power BI App Workspace $WorkspaceName already exists..."
}
else
{
	$body = '{"name": "' + $WorkspaceName + '"}'
	$workspace = Invoke-PowerBIRestMethod -Url 'groups' -Method POST -Body $body | ConvertFrom-Json
}
10. Adding permissions to the Power BI workspace
At this point, even though the workspace has been created, the only account that can access it is the service principal that created it, which has been set as the default admin. However, it's not possible to log into the Power BI service as a service principal, so at a minimum we need to add access for a user account, or a security group that contains user accounts, in order to use the workspace.
Once again, we need to use the Invoke-PowerBIRestMethod cmdlet in order to set the permissions. We'll need the ID of the newly created workspace from step 9, which can be accessed via $workspace.Id in the above code sample.
$ObjectId = "Object ID of the user, group or app"
$PrincipalType = "User|Group|App"
$AccessRights = "Admin" #N.B. Only Admin supported through API

$body = '{"identifier": "' + $ObjectId + '","groupUserAccessRight": "' + $AccessRights + '","principalType": "' + $PrincipalType + '"}'
Invoke-PowerBIRestMethod -Url ('groups/' + $workspace.Id + ' /users') -Method POST -Body $body
The groupUserAccessRight parameter is supposed to accept the values of Admin, Contributor or Member, but the note in the documentation states that "Only Admin access right is supported" through the API, which is disappointing, as we'd really not like to have to add admin permissions to our users.
There's no indication that this might change in the future, but if it does, we'd update that parameter accordingly to lower the permissions.
11. Another recap
At this point, we now have a Powershell script that checks for and installs the necessary modules, connects to Power BI as a service principal, checks for the presence of a workspace and, if not present, creates a new one, then applies permissions to a user account or security group to access it.
There may be other things you want to configure in your new workspace as part of the script, and you can follow the same pattern of calling the REST API using the Invoke-PowerBIRestMethod cmdlet.
12. Create Azure DevOps pipeline
Now that we have a Powershell script, we could run this locally to execute the automation. However, the goal here is to run this as part of an Azure DevOps release pipeline and there's a few considerations around that. If you don't already have an Azure DevOps Pipeline in place, the first step is to create one.
For the purpose of this post, our pipeline is going to contain a single task, using the built-in Azure Powershell task. It's important to note the distinction between this task and the standard Powershell task, which is that it will import the AzureRM module and connect into an Azure Resource Manager context using the deployment service principal.
If you're doing anything with Azure resources as part of your pipeline (e.g. provisioning Power BI Embedded capacity) then you'll need to use this. However, this is where the issues identified in step 9 arise, so by using this task, you're also losing the ability to use the New-PowerBIWorkspace cmdlet and are forced down the Invoke-PowerBIRestMethod route.
To keep things simple, the rest of this post also uses the Inline Script option, instead of Script File Path. For the most part, your Powershell script would live in your repository, be part of your build pipeline output, and be referenced via it's file path in that location.
But, given the variability from project to project, it makes more sense to illustrate this approach using the Inline Script option.
The full source code for the script is as follows, which can also be found at github here...
# Set local variables from ADO Release environment variables
$DeploymentPrincipalAppId = "$(DeploymentPrincipalAppId)"
$DeploymentPrincipalAppSecret = "$(DeploymentPrincipalAppSecret)"
$TenantId = "$(TenantId)"
$WorkspaceName = "$(WorkspaceName)"
$ObjectId = "$(ObjectId)"
$AccessRights = "$(AccessRights)"
$PrincipalType = "$(PrincipalType)"

$moduleName = "MicrosoftPowerBIMgmt.Profile"
$module = Get-Module $moduleName -ListAvailable -ErrorAction SilentlyContinue

if (!$module)
{
	Install-Module -Name $moduleName -Force -Scope CurrentUser -SkipPublisherCheck
}

$credentials = New-Object System.Management.Automation.PSCredential ($DeploymentPrincipalAppId, (convertto-securestring $DeploymentPrincipalAppSecret -asplaintext -force))

Connect-PowerBIServiceAccount -ServicePrincipal -Credential $credentials -Tenant $TenantId

$results = Invoke-PowerBIRestMethod -Url ('groups?$filter=name eq ''' + $WorkspaceName + '''') -Method GET | ConvertFrom-Json

if ($results.value)
{
	Write-Host "Power BI App Workspace $WorkspaceName already exists..."
}
else
{
	$body = '{"name": "' + $WorkspaceName + '"}'
	$workspace = Invoke-PowerBIRestMethod -Url 'groups' -Method POST -Body $body | ConvertFrom-Json

	Write-Host "Created Power BI App Workspace..."

  	$body = '{"identifier": "' + $ObjectId + '","groupUserAccessRight": "' + $AccessRights + '","principalType": "' + $PrincipalType + '"}'
  	Invoke-PowerBIRestMethod -Url ('groups/' + $workspace.Id + ' /users') -Method POST -Body $body

	Write-Host "Added $AccessRights permission to $PrincipalType $ObjectId..."
}
This should be pasted in to the Inline Script text box:
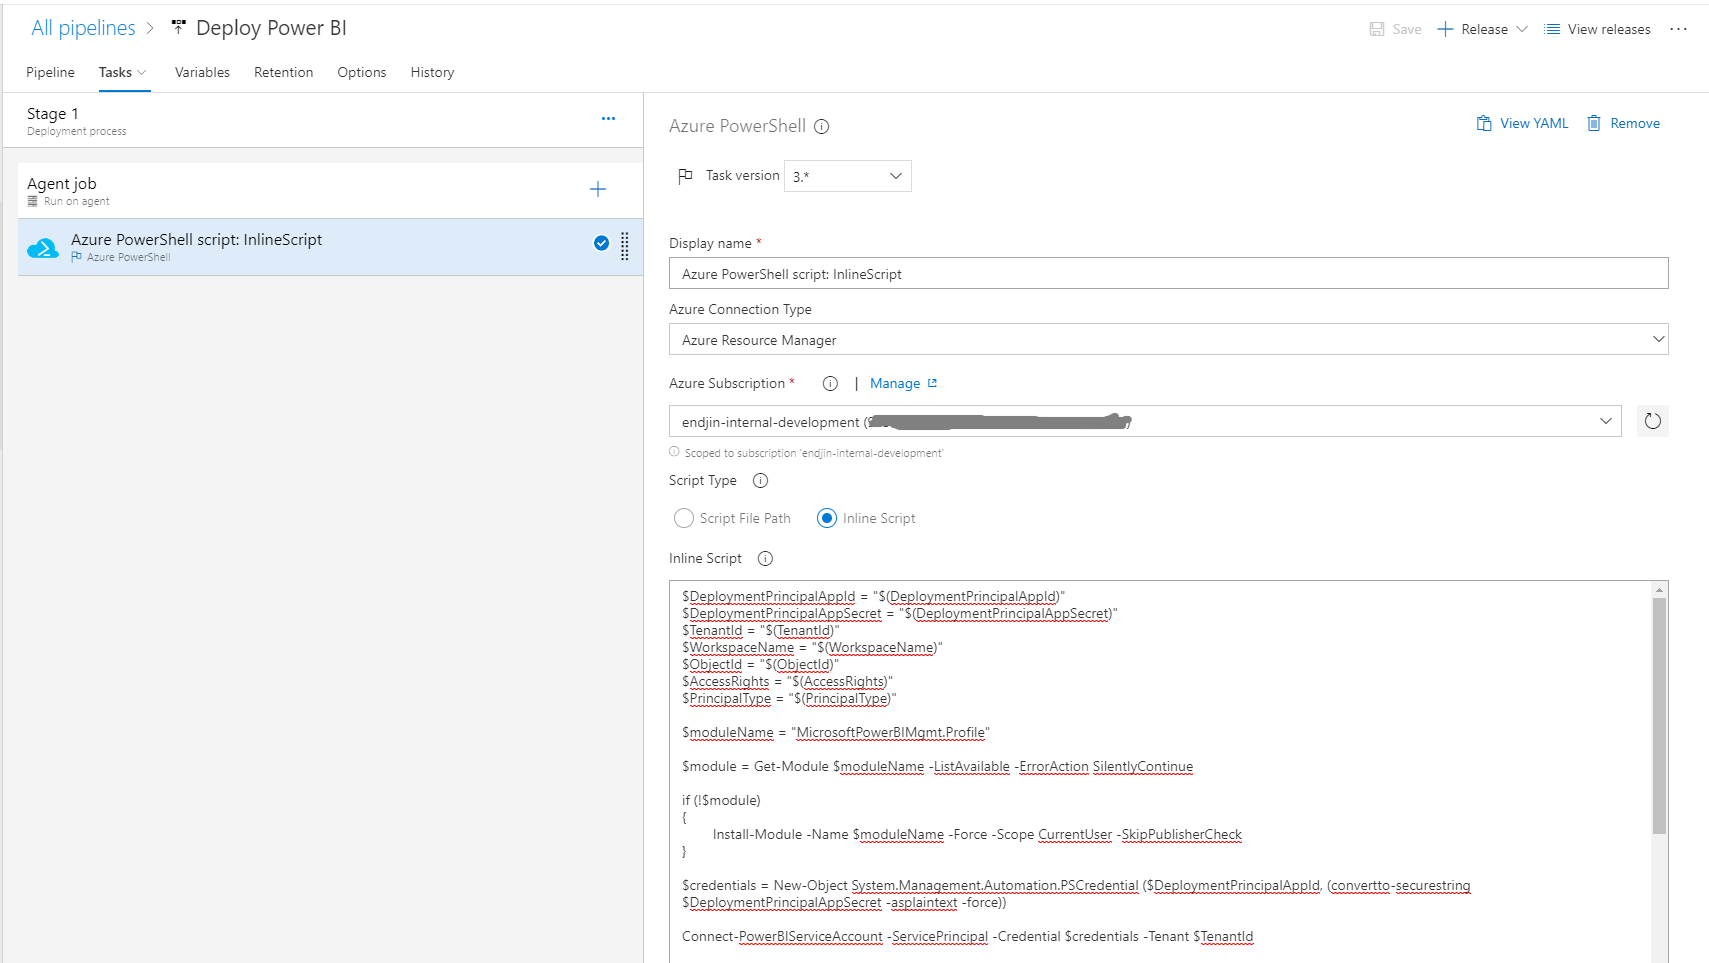
The script uses a number of variables that need to be set as variables in the Pipeline. They use the syntax $(variableName) in the script, which will automatically read in the value from the variable.

At this point, you should have a working pipeline and if you create and trigger a new release then (assuming everything runs successfully) you should end up with a new Power BI workspace. Remember - in order to see the workspace in the Power BI service, the $objectId parameter must either be related to your user account, or a security group of which you are a member.
You might need to refresh the Power BI service portal - we've typically found it takes a few seconds for the new workspace to show up.
If you click the ellipsis on the new workspace, and select the Workspace Access option, you will be able to see the deployment service principal and the security group or user both set as admins on the workspace.
14. Next steps..
The Azure DevOps pipeline currently stores all parameter values in environment variables - including the application secret for the deployment principal. This isn't great, and at a minimum, I'd recommend setting this as a secret variable by clicking the padlock next to the value.
A much better approach would be to store this value (and any other sensitive information) in Azure Key Vault, and retrieve it at deployment time using the Azure Key Vault task that can be added to your pipeline. The deployment principal would need to be granted access to this key vault in order to retrieve the secret.
An obvious extension to this script would be to assign a Power BI Embedded capacity (deployed through an Azure Resource Manager template) to the newly created workspace. Following the patterns that have been applied in the code above, this is pretty straightforward using the Invoke-PowerBIRestMethod to call the AssignToCapacity REST API.
Unfortunately, there's no way to filter the capacities using the API, so you'd have to retrieve them all, and find the one you want to retrieve its ID in order to assign it to the workspace.
15. Conclusion
This post has shown that it is absolutely possible to fully automate the creation of a new Power BI workspace and set the workspace permissions using a service principal account inside a Powershell script that's run as part of an Azure DevOps pipeline.
As Power BI is generally used to connect to additional Azure data platform resources, the post highlighted the specific steps needed in order to achieve this from inside the Azure Powershell task which loads the AzureRM module.
With these instructions, you should be in a great place to start automating your end-to-end Azure data analytics solutions.