Using Postman to load test an Azure Machine Learning web service

Azure Machine Learning (Azure ML) is a fully managed cloud service that enables you to easily build, deploy and share predictive analytics solutions.
Azure ML allows you to create a predictive analytic experiment and then directly publish that as a web service. The web service API can be used in two modes: "Request Response" and "Batch Execution".
A Request-Response Service (RRS) is a low-latency, highly scalable web service used to provide an interface to stateless models that have been created and deployed from an Azure Machine Learning Studio experiment. It enables scenarios where the consuming application expects a response in real-time.
A Batch Execution Service (BES) is a service that handles high volume, asynchronous, scoring of a batch of data records. The input for the BES contains a batch of records from a variety of sources, such as blobs, tables in Azure, SQL Azure, HDInsight and HTTP.

Azure Machine Learning in action

What is Postman?
Postman is a Chrome app that is useful to developers when building APIs. It allows you to build and test APIs by sending any HTTP request. The request history is saved and can be replayed later. Requests can also be saved in Collections for organizing and managing your API. Collections can be shared with colleagues allowing simple cross-collaboration.
Some of the more advanced features of Postman are very useful and will be used in this article. These include setting up different environments in Postman to allow customization of requests based on variables, using the Collection Runner to run a series of requests repeatedly, and writing test scripts to verify request results or set environment variables.
Postman in action

Why use them together?
While building a new web service, you'll most likely want to test it with various inputs, verify the outputs, put some load into it to test concurrency and performance etc.
In this example we will be focusing on a Batch Execution Service. The web service API for BES can be used to submit jobs, start jobs, delete (cancel) an existing job, and get details about a single job or a list of jobs.
Postman provides an easy way to interact with this API. It enables saving collections of API queries, making it an ideal tool for calling the Azure ML web service API during this development and testing stage. Once you reach production you'll likely be calling the API through some other tool, such as through an app or website, using Excel, or calling it directly from an Azure Data Factory pipeline.
In this example we will create a 'collection' of reusable queries in Postman for calling an Azure ML web service API. These queries will have any changeable parts parameterised, for example the web service ID and api key. These parameters can be stored in a Postman 'environment'.
Submitting a job to the web service returns a job ID. The Postman query that submits the job can also retrieve that job ID and save it into the current environment. This means the job ID can be parameterised in the query to start a job, and be retrieved from the environment.
It is then possible to use the Postman 'Runner' to perform some load testing against the web service. The submit/start queries can be called in turn, a large number of times.
Creating a sample Azure ML web service
In this section, we'll create and publish a sample web service, that uses an R script to run for a set length of time. If you already have a suitable web service to use for working with the API, move on to the next section.
First, create an Azure ML Workspace (or use an existing one).
Then create a new Experiment in the Workspace.
Add the "Execute R Script" module to the canvas.
Replace the demo script with the following line, which will cause the script to delay for 60 seconds:
Sys.sleep(60)
Run the experiment and make sure it completes successfully.
Click the "Set up web service" button. This will add an a blue output from the 'R Device' output of the 'Execute R Script' module. This output will be saved to blob storage.

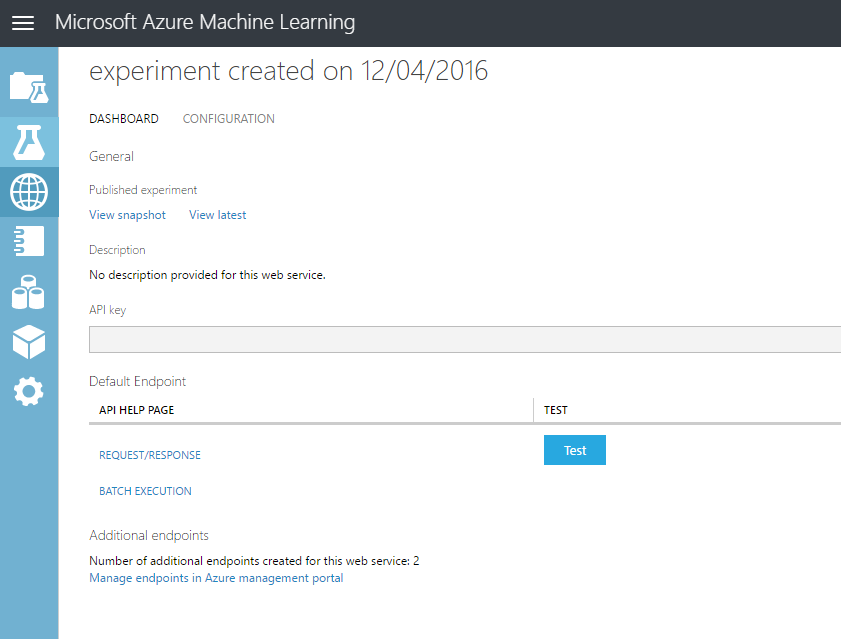
Run the experiment and then click 'Deploy web service'.
It will now be available on the web services page. This is where you can retrieve the API Key necessary for calling the web service, and view the help pages detailing the API.
Creating the Postman artefacts
Creating the first query
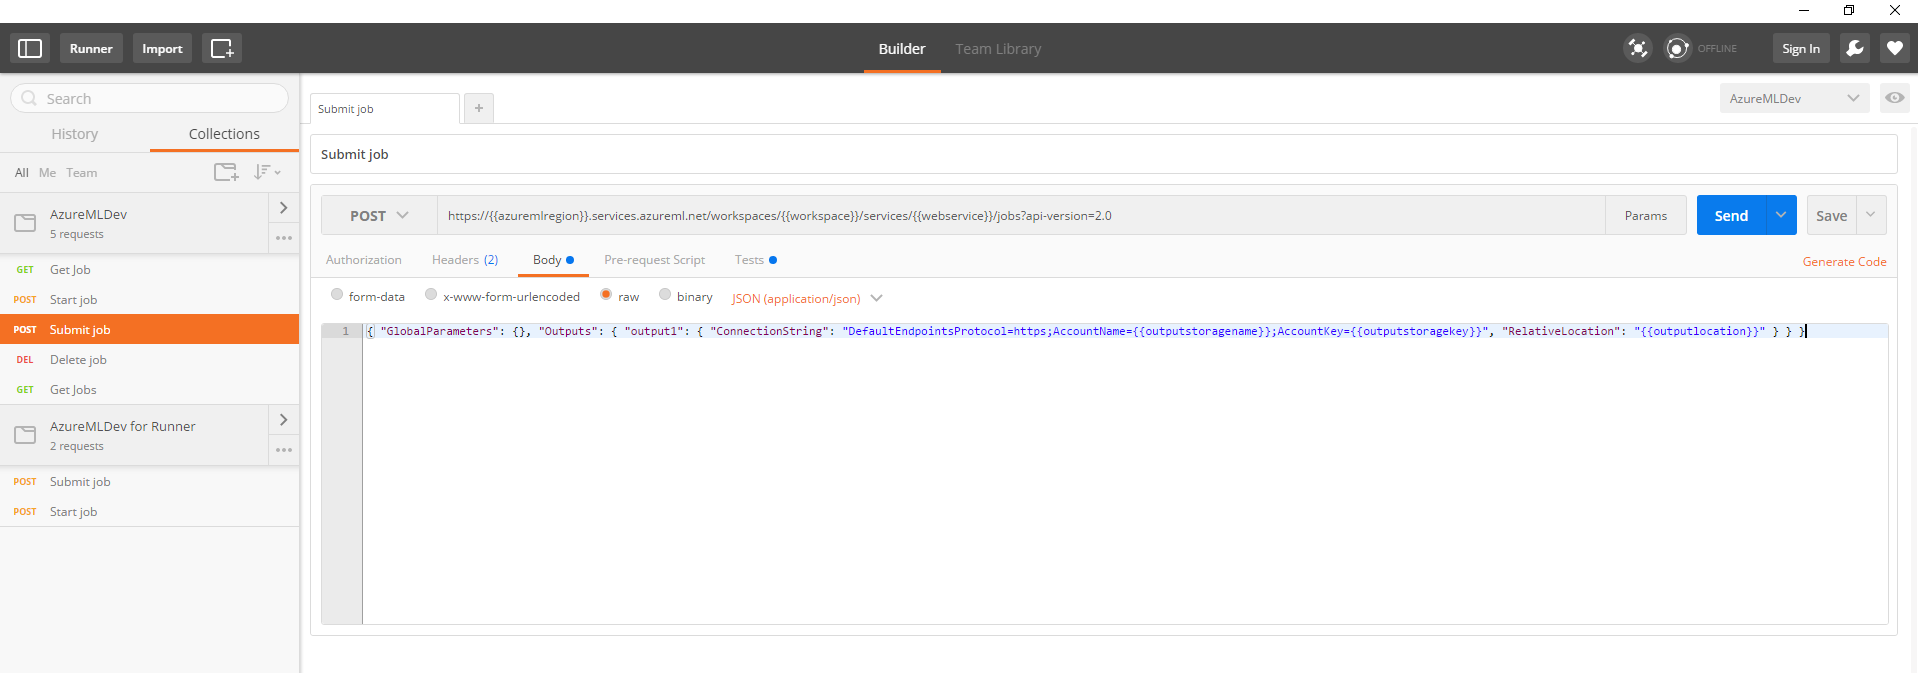
The main page in Postman is the query 'Builder'. This is where you provide the HTTP method, URL, headers and body of the query. You can save the query and send it. Let's create a query to submit a job.
Change the HTTP method to POST. Grab the URL from the BES API help page for your web service and enter it in the query Builder, for example:
Add headers for Authorization and Content-Type:
- Authorization: Bearer [your api key]
- Content-Type: application/json
Add the required body, making sure to replace the storage account name, key and output location (this is where the output of your web service is saved):
You should now be able to 'Send' this query and receive a 200 OK response, with the job ID in the return body:
"9f8813591aa945a1aabc726d70dbc20d"

Parameterise the query
You should now be able to generalise this query using parameters.
Replace the URL with:
The Authorization header value with:
The Body value with:
On the top right of the page is a dropdown that allows you to "Manage Environments".
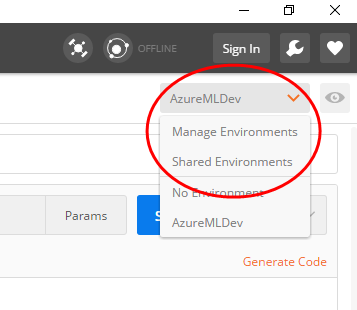
Add a new environment and click on that environment to edit it. This allows you to save variables at the environment level. Add variables for all of the parameters used above, setting their values appropriately:
- azuremlregion
- workspace
- webservice
- apikey
- outputstoragename
- outputstoragekey
- outputlocation
You should now be able to "Send" your query again in exactly the same way as before, and still get a 200 OK response, with the job ID in the return body.
Create queries for the other API actions
Duplicate the "Submit job" query 3 times, to create new queries for "Start Job", "Delete Job" and "Get Jobs".
For the Start Job query, change the URL to:
You'll also need to add a new environment variable for the job ID you want to start: "job"
For the Delete Job query, change the HTTP method to DELETE and the URL to:
For the Get Jobs query, change the HTTP method to GET and the URL to:
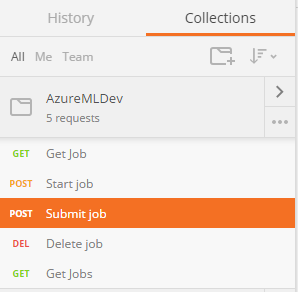
Now that you have 4 queries, you could create a Collection and move the queries into the same collection. This provides a way of wrapping up a group of queries and can be exported/imported. All the queries in a collection can also be executed using the Runner.
Automatically capture the submitted job ID
When running the submit job query, it returns an ID. Currently we are manually setting the "job" environment variable for the start job query to use. It would be great if we could automatically set that variable based on the return value of the submit query.
Fortunately, we can!
Open the submit job query, and go to the "Tests" tab. Paste in the following snippet:
Run the submit job query again, and check the "job" environment variable gets updated with the returned ID.
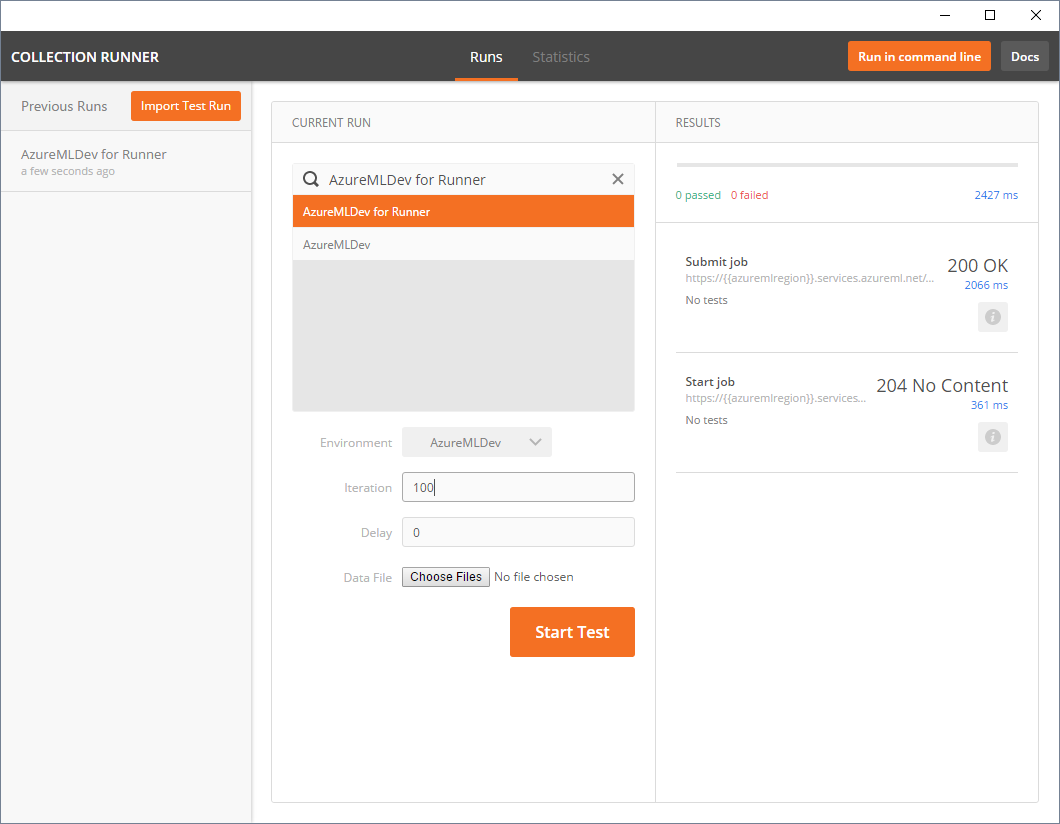
Using the Runner to perform a load test
The Runner can be used to execute a collection of queries. Duplicate the existing collection and delete all the queries except for the submit and start job queries. Make sure the submit query is listed first in the collection.
Open the Runner and pick the collection to run (the one with the submit and start queries only). Set the environment to use to be the environment with all our variables in it. Set a number of iterations to start that number of jobs e.g. 100.
You should see the requests submitted and their return code. Once the test run has finished you'll be able to see test statistics.
At the moment we don't have any tests defined on our queries and are just using the Runner as a tool to batch submit jobs to the API. For example tests could be added that verify the response code, to make sure every call in the test run works.
That's all folks!
Full Gists of the exported Postman collections and environment are available here:
- Environment (don't forget to replace the placeholder values with your own ids and keys!)
- Collection of all queries (submit/start/delete/get)
- Collection of submit and start queries (for using with the Runner)
You could save these as files and import into Postman to recreate the full set of artefacts discussed in this article.