Using SemanticMerge to fix Git merge conflicts

Part 4 of my series of posts about Git for .NET deals with merge conflicts, and describes how to resolve them using the command line, Visual Studio and SmartGit. Both Visual Studio and SmartGit offer built in conflict resolution tools. However, it's also possible to solve conflicts with specialist third party conflict resolution tools.
A few months ago, the people at SemanticMerge were kind enough to give me a licence so I could try out the product and cover it in this series. As the name suggests, SemanticMerge is a 'language aware' merge and diff tool. It seeks to limit the amount of conflicts you have to deal with manually, by understanding how to deal with many changes that would typically cause a conflict. It also provides some really nice visualisations of differences between file versions.
This blog describes using SemanticMerge to resolve Git merge conflicts arising in .NET projects. I describe how to integrate SemanticMerge with Git client SmartGit and Visual Studio, and then how to use the tool to resolve merge conflicts. Much of the content will also apply to merge conflicts for other source control systems and languages.
How does it work?
Git merge conflicts are usually triggered by changes to the same text block in a file. Where the system carrying out the merge treats each file as a set of arbitrary blocks of text, it will have difficulty in determining when the changes within a file can be safely combined, and when human intervention is required.
If on the other hand a tool understands the structure of the language involved, it has a better chance of recognising when two changes are compatible. SemanticMerge is able to parse C# files and carry out merges with an understanding of their structure. During the parsing phase, it recognises semantic elements within a file such as methods, properties and classes. A comparison is carried out between these structural elements, rather than text blocks.
SemanticMerge is able to recognise when a new structural element is added to a file, and distinguish the following types changes to the structural elements in a file:
- Additions (a new element such as a method is added)
- Changes
- Deletions
- Moves
- Renames.
Where two types of modification are compatible, the conflict can be automatically resolved by SemanticMerge. For example, it will be able to automatically merge cases where:
- A method is moved in one branch, and modified in the other
- A method orproperty is moved in both branches
- A file is modified in one branch and reformatted in the other (for example, a ReSharper code cleanup).

In cases where manual intervention is required (for example, both branches made changes inside a method), SemanticMerge provides a summary of the type of changes that have caused the conflict, and the element involved, so you can understand quickly what you need to resolve.
SemanticMerge and JetBrains have produced a webinar which describes some of the cases SemanticMerge can deal with in more detail.
As well as C#, SemanticMerge currently supports VB.NET, C and Java. According to the webinar, a JavaScript parser is available on request but is not yet part of the core tool. SemanticMerge falls back to a text based merge tool for other file types such as css.
Like the built in conflict solvers for SmartGit and Visual Studio, and essential for Git merges, SemanticMerge is a three way merge tool. This means that it uses the common ancestor of the two branches being merged to understand which lines in a file represent a change from the ancestor, and therefore somebody's precious work which they want to retain. It uses the terminology:
- base – the version of the file in the common ancestor commit of both branches being merged
- src – the source version of the file. In other words, the version of the file in the branch being merged into the current branch
- dst – the destination version of the file. In other words, the version of the file in the branch which is having the other branch's changes merged into it.
SemanticMerge can be used with other source control systems that support three way merging, such as TFS, Mercurial and Plastic SCM.
I'll describe using SemanticMerge to view changes and resolve conflicts later in this blog, after we've got it set up with our Git clients.
Configuring SmartGit to use SemanticMerge
Select Preferences from the Edit menu.

Select Conflict Solvers in the Preferences window.

In the Conflict Solvers window, select Add to add a new solver. This opens the Add conflict solver window.
If you want to restrict SemanticMerge to just C# files, you can specify this in the File Pattern area.
In the Command field, enter the location of the SemanticMerge exe on your system.

The Arguments field is where the nuts & bolts of the integration happen. Here, you specify the arguments passed to SemanticMerge when it is triggered by SmartGit. To the right of the field is a drop down menu that you can use to enter 'left file', 'right file' etc in the required format.

In the Arguments field, enter the following:
-s ${rightFile} -d ${leftFile} -b ${baseFile} -r ${mergedFile}
This is based on the instructions in on SemanticMerge's guide to Generic Tool Configuration although it took some head scratching to work out what SmartGit's 'left file' and 'right file' corresponded to!
The final step of the integration is to make sure that SemanticMerge is at the top of the list of SmartGit's conflict solvers in SmartGit, by moving it up if necessary.
Configuring Visual Studio to use SemanticMerge
You can't, directly.
When you use TFS for source control, third party merge tools can be added through Tools > Options > Source Control > Configure User Tools. However, I can't find a way of directly associating a third party merge tool with Visual Studio when you're using the Git source control plugin.
However! The way round this is to configure Git itself to use SemanticMerge as the merge tool, as described in the section below.
Once SemanticMerge is set as the merge tool for Git, when you trigger a merge in Visual Studio, get a conflict, and hit the 'Merge' button, SemanticMerge will open up, rather than Visual Studio's merge tool (which I've learnt from this process is called VSDiffMerge).
Configuring Git to use SemanticMerge
To configure SemanticMerge as the default merge tool for Git itself, edit the Git config file, either for a specific repository, or for all your repositories.
Repository-specific config files are found under the .git folder in the repository. The global Git config file is usually found under C:Users[Your account]
Before I messed with the global config file, I took a copy of its original state… you may or may not be this cautious!
Add a [merge] section to the config file (or edit the existing entry) as follows, replacing whatever value 'tool' has with 'semanticmerge':
[merge]
tool = semanticmerge
This tells Git to use SemanticMerge as its merge tool.
Next, add an entry for SemanticMerge, so Git knows what it is and how to launch it:
[mergetool "semanticmerge"]
cmd = C:/Users/Alice/AppData/Local/PlasticSCM4/semanticmerge/semanticmergetool.exe -d "$LOCAL" -s "$REMOTE" -b "$BASE" -r "$MERGED"
trustExitCode = true
Obviously you will need to replace the path to the exe with whatever it is on your system.
There may already be a similar entry for another merge tool – it's fine to leave that in there.
The SemanticMerge docs also suggest using the following optional settings:
[mergetool]
prompt = false
keepBackup = false
Prompt = false prevents a prompt from appearing asking if you want to use an external merge tool each time you run the git mergetool command. It doesn't appear to affect merges prompted from Visual Studio. KeepBackup prevents Git from keeping '.orig' files, which are backup copies of files in their conflicted state.
Once you've edited the config file, it should include the following sections:
[merge]
tool = semanticmerge
[mergetool]
prompt = false
keepBackup = false
[mergetool "semanticmerge"]
cmd = C:/Users/Alice/AppData/Local/PlasticSCM4/semanticmerge/semanticmergetool.exe -d "$LOCAL" -s "$REMOTE" -b "$BASE" -r "$MERGED"
trustExitCode = true
The config file can also be updated using the command line as described in the SemanticMerge docs:
git config --global merge.tool semanticmerge
git config --global mergetool.semanticmerge.cmd "C:/Users/Alice/AppData/Local/PlasticSCM4/semanticmerge/semanticmergetool.exe -d "$LOCAL" -s "$REMOTE" -b "$BASE" -r "$MERGED""
git config --global mergetool.semanticmerge.trustExitCode true
git config --global mergetool.prompt false
git config --global mergetool.keepBackup false
Oddly, I found that the mergetool.semanticmerge.cmd command didn't work when using PowerShell and Chocolately.
Solving merge conflicts with SemanticMerge
Opening SemanticMerge from SmartGit
If you're using SmartGit to carry out a merge, when you get a merge conflict, right click on a conflicted file, and select Conflict Solver. If you've set up SemanticMerge as the default conflict solver, this will open the conflicted file in SemanticMerge.
Before the SemanticMerge window displays, you will see a pop up message from SmartGit asking if you want to stage the file. This is because the integration between SmartGit and a conflict solver is limited to SmartGit triggering the launch of the conflict solver together with the arguments we saw during set up – it has no way of knowing when you're done solving the conflict unless you tell it. Ignore the pop up for now and continue to SemanticMerge.

Opening SemanticMerge from Visual Studio
If you're using Visual Studio to carry out a merge, when you hit a merge conflict, click on the 'Resolve the conflicts' link, click on a conflicted file, and select the Merge button.
If you've configured Git to use SemanticMerge as the mergetool, then this will open up the conflicted file in SemanticMerge.
Getting an overview of the conflict
When SemanticMerge first opens, it displays summary page which lists the conflicts. Each conflicted structural element of the file is presented with a blue heading containing its name and type. Clicking on a heading expands a section below with information about the action in each branch which caused the conflict. If there's more than one conflict for the element, both conflicts are described. The full file is displayed to the right.
Different types of changes are represented by icons, making it easy to understand the context of a conflict:

Clicking on one of the change descriptions (e.g. 'changed on source') displays some additional options:

The view code options highlights the affected section in the file, and the diff option opens a diff between the base (common ancestor) and the branch.
Visualising about the conflict
If at this point you want to get a better understanding of the file and the conflict, you can use the Visual Merge option to see an interactive diagram of the differences between the conflicted files in the Visual merge window. The Visual Merge window presents the structure of the file being merged in a beautifully clean visual format, which can be filtered and drilled into. It displays a visualisation of the conflicted file, breaking it into namespace, using directives, class and class members.
Where there has been a change, the component affected is labelled with one of SemanticMerge's labels for the change type. Only those areas that have changed are displayed by default, though you can choose to show all structural elements of the file, or display an indication that there are unchanged sections.
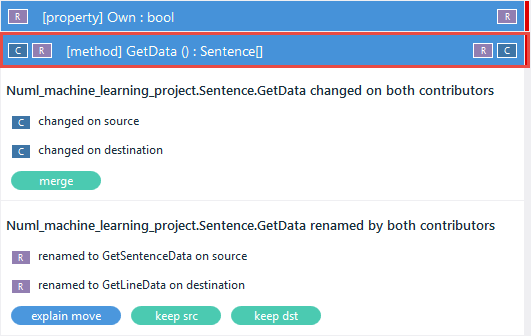
To see a diff of the code for any elements displayed, you can select two elements in the visualisation, and click diff. For example, below I've selected the different versions of the original GetData method in the source and destination files to see a diff.

I find the visualisation very useful. Another nice thing about this tool is that the diff windows scroll at different speeds to keep the equivalent sections on screen.
At the moment, the visual merge window is purely for information, and you need to close it and go back to the main screen to carry out a merge. I'm finding it hard to fault SemanticMerge, but as a wishlist item, it would be excellent to be able to carry out merges from the visual merge window.
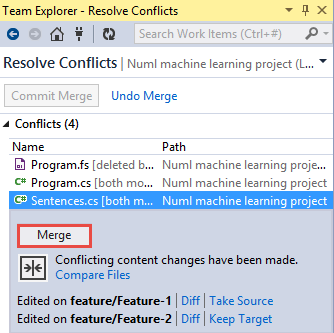
Resolving the conflict
To resolve the conflict, close the visual merge window and go back to the main window. For some conflicts (such as a rename on both branches, or a change in one branch and a deletion in another), the only options available will be keep src or keep dst. The conflict is a simple either/ or.

For more complex conflicts, a merge option will be available. This opens Plastic SCM's XMerge, which is more like a traditional merge tool UI. (SemanticMerge can be configured to use other text merge tools). In addition to the source, destination and merged files, the base file is also shown.
The addition of the base file makes it sounds like the screen would be pretty crowded but the tool is visually clean and opens up with a focus on the first conflict, which is highlighted with a purple block over the line number. Conflicted areas are indicated by a red block in the margin between the panes, and changes which were automatically resolved are indicated with a grey block in the margin between the panes.

As with the other tools, you can navigate between conflicts using a tools pane with navigation arrows and the number of unresolved conflicts still waiting for resolution.
![SemanticMerge-conflict-navigation-op[1]_thumb](https://res.cloudinary.com/endjin/image/upload/f_auto/q_80/assets/images/blog/2014/08/SemanticMerge-conflict-navigation-op1.png "SemanticMerge-conflict-navigation-")
The results pane at the bottom of the window shows the conflicted line for source, base and destination, with colour coding to identify which version a line comes from.

To choose one version, deselect the two panes for the versions that you don't want to take by clicking the title at the top of the panel:

Alternatively, you can edit the results pane directly to choose the combination of changes you want to keep.
Once you are happy with the changes, you click save and exit in the conflict solver window.
Back in SemanticMerge's main window, the conflict panel will show that the conflict is solved.

To return to your Git client, click save and close in SemanticMerge's main window.
Completing the merge in SmartGit
If you triggered the merge in SmartGit, as this point, you need to hunt out the popup the first appeared when you opened SemanticMerge, and select to stage the newly resolved file.

Once you do this, the resolved file will be marked as staged, ready for a commit.
This process needs to be followed for each conflicted file you merge using SemanticMerge.
Finally click Commit, to complete the merge.
Completing the merge in Visual Studio
If you triggered the merge in Visual Studio, when you return to Visual Studio after working on a file, you will see a popup window asking if you want to accept the merged result.

This process needs to be followed for any conflicted files.
Once you've finished resolving the conflicts, click Commit Merge and enter a commit message to complete the merge.
I'll let you judge for yourself, but IMO this is a beautiful and useful tool.