Visual Studio, Xcode and VMware Fusion Shared Folders
Xamarin lets you develop iOS applications using Visual Studio. This is obviously great for .NET Developers except that you currently have to go to Xcode (Apple's Developer tool) if you want to create the UI using a designer tool. When you've got a Xamarin.iOS project, that means switching back and forth between the two IDEs. Apart from the obvious cut and paste solution, one way to 'synchronise' the files is to go via GitHub. Work in VS, commit and push. Back into Xcode. Pull, make changes, commit and push. And it goes on. Either way this is far from an optimal workflow. But if you're running VS under VMware Fusion, you can use shared folders to have one common location for your repository, making the switch a lot easier.
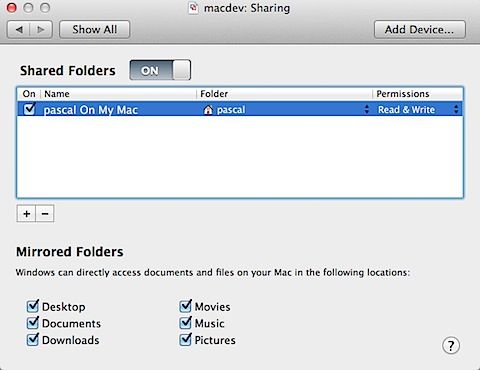
Setting up Shared Folders

Once a shared folder is setup, the Windows guest OS will be able to access it (e.g. "\\vmware-host\Shared Folders\pascal On My Mac" in my case).
Next create, under the shared folder, a Dev folder and a Repositories subdirectory.
Junction Point
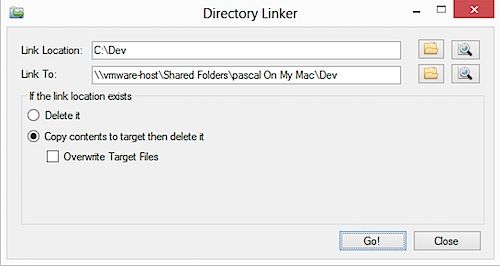
To make things easier, we can create a symlink that will target our newly created Dev folder. Because I can never remember the command to create the junction points, I use a small but handy little utility called Directory Linker for that:

Now you can just create or clone your repo in the shared Dev folder and work on the project as if it was held locally.
Cannot access network or mapped drives
Chances is that if you try the above you might end up with an error because the tool doesn't recognise the network drive. Or it might be that if you try to create a new project in the Repositories directory, Visual Studio cannot see or access that location. This is apparently a problem with UAC (User Account Control) and can happen, paradoxically, when running programs as Administrator. See this Microsoft support article for a full explanation.
Workarounds
Below are the steps I had to take to work around this problem.
WARNING: Don't do this at home unless you know what you're doing, know how to backup the registry and you're prepared to loose everything... Do this at your own risk!!!
1. Go to the User Account Control Settings (useraccountcontrolsettings command), set it to Never notify and close the window
2. Open the Registry Editor (regedit command)
3. Go to HKEY_LOCAL_MACHINE\SOFTWARE\Microsoft\Windows\CurrentVersion\Policies\System
4. Add a new DWORD named EnableLinkedConnections (if not already present) and set its value to 1
5. Add a new DWORD named EnableLUA (if not already present) and set its value to 0
6. Close the Registry Editor and restart your computer.
Note that step 5 disables UAC completely and, to reiterate, is something that is absolutely not recommended in a standard environment. This is just a temporary solution that allows me to minimise the overhead of developing cross platforms.

