A step by step guide to installing an F# REPL environment on Windows

Getting set up on Windows
You need to be running Windows 7 or Windows 8 (or later).
If you're running Windows Vista or Windows XP, I'm sorry, but this isn't going to work for you.
First, we need to make sure that the .NET Framework V4.5 is installed.
If you happen to have installed Visual Studio 2012, then you've got it already.
If you are running Windows 8, then you've got it already.
If you are running Windows 7, then go to this link to download and run the .NET V4.5 installer.
http://go.microsoft.com/?linkid=9810134
Follow the instructions in the wizard to get .NET installed on your operating system. This may require a reboot.
Next, we have to install the Windows SDK.
If you have installed Visual Studio 2012, then you've got it already.
If you are running Windows 8, you need the Windows 8 SDK
Go to the Windows 8 SDK download page:

Find the download button and run the installer. Follow the instructions in the Wizard to install the SDK with the default options.
If you are running Windows 7, you need the Windows 7 SDK
Go to the Windows 7 SDK download page:

Find the download button, and run the installer. Follow the instructions in the Wizard to install the SDK with the default options.
Next, we can install the F# Runtime environment and tools.
Download and run the F# tools from here.
Agree to the license, and click next. The tools will be setup for you.
Once you've done that, the tools are on your computer, but getting at them is a bit tricky!
To make things easier, we need to add the Fsharp tools to our environment PATH.
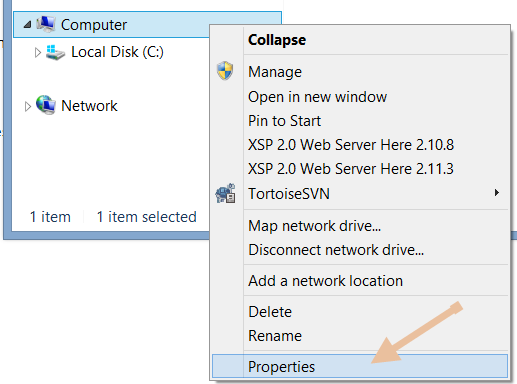
Open up a Windows Explorer window, and find Computer. Right click it and choose 'Properties'.

This opens the system properties Window (the picture is of the Windows 8 version, but Windows 7 is very similar).

First take note of whether you are running a 32bit or 64bit operating system, this will be important in a minute.

Then, on the left hand side of the window, click 'Advanced System Settings'.

This pops open the System Properties Dialog. Click 'Environment Variables'

This opens the Environment Variables window. In the 'System Variables' section, scroll down until you can see the 'Path' item, and select it. Then click the 'Edit' button.

This opens the Edit window.

Put the cursor at the end of the 'Variable Value' text field and type a semi-colon to separate this new path from the next one:
;
Then add the path to the directory where the F# tools were installed:
If you have a standard 32bit installation of Windows 7, this will be
C:\Program Files\Microsoft SDKs\F#\3.0\Framework\v4.0
If you have a standard 64bit installation of Windows 7 or Windows 8, this will be
C:\Program Files (x86)\Microsoft SDKs\F#\3.0\Framework\v4.0
Now, click 'OK' to close the 'Edit System Variable' window, 'OK' again to close the 'Environment Variables' window, and 'OK' again to close the 'System Properties' window.
You can then start a command prompt:
On Windows 8 go to the start screen and start typing
cmd
make sure Command Prompt is highlighted and press enter (or click it)
On Windows 7 click the start button and type
cmd
make sure Command Prompt is highlighted and press enter (or click it)

Finally, we can check that the environment is installed correctly.
To start the interactive F# environment, just type
fsi
You should see the F# interactive command prompt.

To quit, type
#quit;;


