A step by step guide to building a Twilio voice app with Web API
Background
Twilio is a cloud based voice and SMS service and this post will show you how easy it is to create your own inbound voice application using MVC 4 Web API.
The basic premise of how it works is Twilio parses a form of XML called 'TwiML', which contains various verbs telling Twilio what to do. For example, parsing the following TwiML would read out "Good morning. How do you do?" in a woman's voice, pause for 5 seconds, then make a POST request to https://twiliowebapisample.endjin.com/api/Sample for the next section of TwiML :
The full set of verbs and parameters you can use are detailed in Twilio's docs section.
When someone dials into your service, Twilio will make a request to an action on one of your Web API controllers. Your controller may call on some back-end infrastructure and will then generate some TwiML to return to Twilio's parser. This TwiML will need to contain instructions on where to make the next request, and so this will continue until the call is over.
Setup
To get started, firstly create a new ASP.NET MVC 4 app in Visual Studio and select Web API. Then pull in the Nuget package for Twilio.Mvc which contains libaries for MVC helpers and REST API wrappers.
You will also have to sign up for a Twilio account (there is a free trial for developers). You will be given a phone number on signing up that you can use for the service.
Controllers
Let's start by making a controller for our Twilio service to call when someone rings in. Create a new ApiController with a Post method like so:
By default, all request Twilio makes are POST but you can change these to GET if you wish. When Twilio makes a request it also passes a set of parameters, the same as the ones contained in the VoiceRequest class in the client library.
Use the TwilioResponse MVC helper to build up the TwiML for the response. It contains methods for generating the correct TwiML and stores it in the Element property. When you have built up your TwiML, simply return the Element property as an HTTP response and format as XML.
If you use the gather verb in your TwiML, after the user has pressed a specified number of digits, Twilio sends a request to the URL you specify in the action parameter (you can specify relative or fully-qualified URLs). It also passes a Digits string as one of the request parameters, which contains the numbers that the user pressed on their telephone. Now you can use these digits in your controller method, for example if you wanted a user to enter in an ID number to login into a service.
Now if you wanted to pass other parameters to your controllers (the ID number the user previously entered, for example) you can just format your action and redirect URLs to include query parameters
Then add a extra parameter to the action of the relevant controller
You can create a complex service with many functions in this way.
Security
If your controllers expose any sensitive data you may want to validate that your requests are coming from Twilio. Fortunately, if you are using SSL and configure Twilio to use HTTPS URLs then you can do just that.
Twilio will take the full request URL and any POST parameters, concatenate them into a string, sign the string using HMAC-SHA1 with your AuthToken as the key (you are given an AuthToken when you create an account), and send this signature as a header on the request called 'X-Twilio-Signature'. Full details are given in Twilio's Security section.
So to authenticate the request we need construct the signature in the same manner on our side and check the two signatures match. In the Twilio.Mvc client library there is an attribute that can be applied to controllers and actions called ValidateRequestAttribute that does this for you if you are using MVC. For Web API though we will need to change this method slightly.
Create your own attribute as follows:
You will want to store your AuthToken somewhere in your configuration. In my example I have stored it in the Web.config file and used the ConfigurationManager to retrieve it in the default constructor. You'll also notice there is a constructor that takes a urlOverride – you may need this when testing (we'll get to that soon).
You can see the IsValidRequest method mirrors Twilio's process for constructing the signature and then does the comparison. The attribute throws an exception and returns a Forbidden code if the signatures do not match.
To use the validation, all you need to do is decorate your actions (or controllers) with the attribute.
Debugging
To check if your controllers are returning the correct TwiML you could use a web debugging tool such as Fiddler to make requests to your controllers and look at the responses. But if you want to test your application actually running in Twilio then you will need to create an app in the Twilio dashboard. To do this, sign in to your Twilio account and go to DEV TOOLS –> TWIML APPS –> CREATE APP.
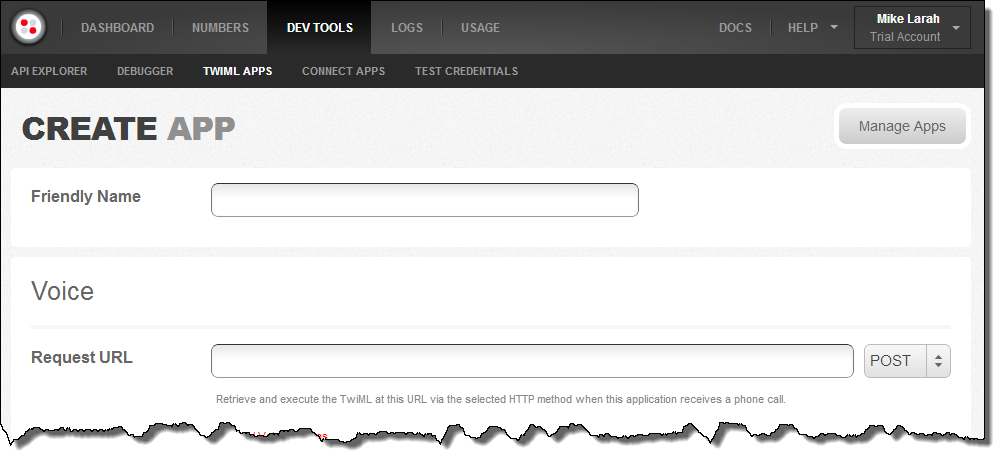
Give it a friendly name and then you will see you have to supply the request URL as an endpoint for Twilio to make requests. Now unless your machine is publicly exposed to the internet, you will need to set up some tunnelling in order to debug your application whilst in development.
For tunnelling I used a service called Forward (it was the only service I could find to work on Windows). This takes a little bit of setup. Firstly you will have to install Ruby and RubyGems (Ruby Installer for Windows is an easy option for this). Then sign up for an account at Forward – they offer a free 30 day trial. With Ruby installed, open up Command Prompt With Ruby and install Forward using
gem install forward
Finally, in your Web API project's properties pane in VS, in the Web section under servers, change the setting to 'Use Visual Studio Development Server' and set a specific port of your choice.
Now we're ready to go. Back in your Twilio dashboard, set the the request URL for app as the domain you specified when signing up for Forward (e.g. https://example.fwd.wf). Start up your Web API app in debug mode, then in Command Prompt With Ruby type
forward {port}
where is the port you assigned in the app properties. The first time you do this you be asked for your Forward credentials.
With that done, you should now hopefully be able to call your service. If you navigate to your TwiML app in the Twilio dashboard, just press the Call button.

And now you can run through your service using the onscreen keypad and debug on your development machine. The Twilio debugger in the dashboard also provides useful information for when errors occur.

NOTE – if you are using the authentication attribute from above to do validation, you will need to specify a urlOverride parameter when testing, otherwise you will find that Twilio will use your Forward URL when constructing a signature, but your app will use a "https://localhost:" URL and they won't match.
Conclusion
There is of course plenty more functionality to be found with Twilio and this just scratches the surface. I would recommend you check out their website for all the features. But following this guide you can get quickly and simply set up with building an inbound voice application using Web API.
For the full sample application, download it from the endjin samples GitHub repo.
Finally, thanks to @sydlawrence and @devinrader for help getting me starting with my Twilio project.

